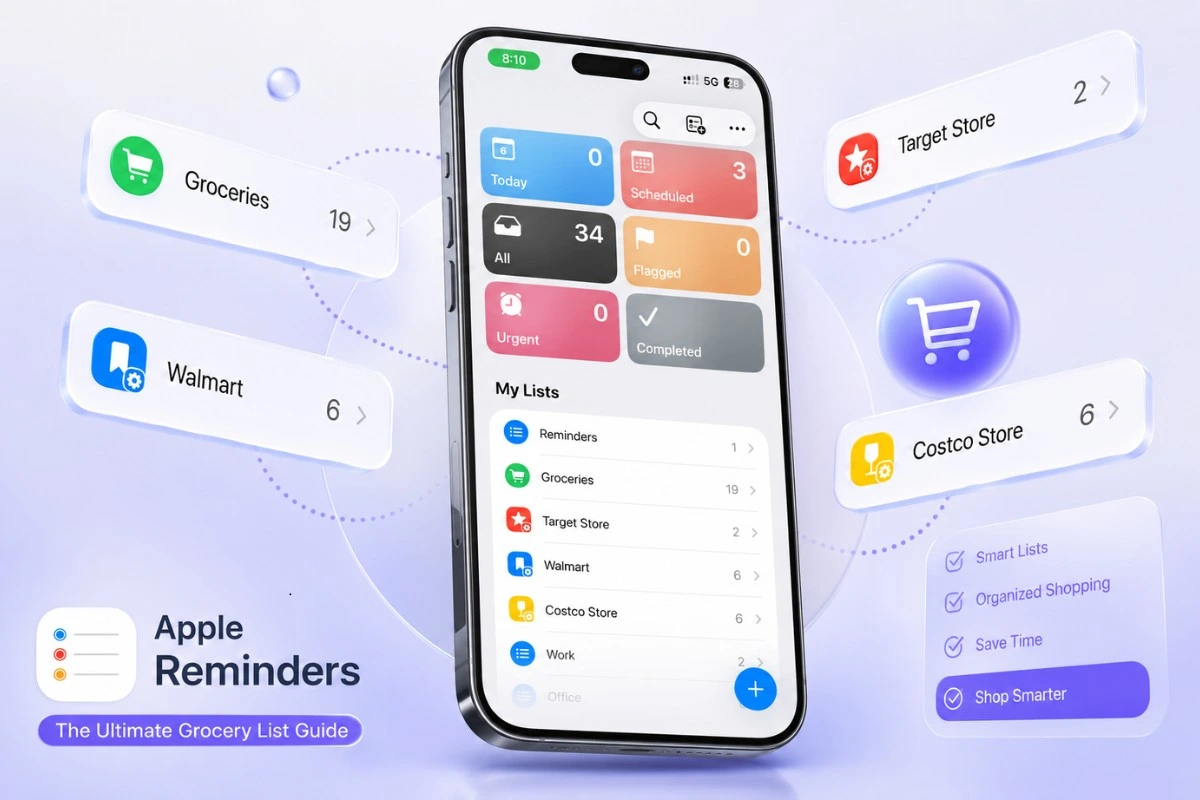
Apple Reminders for Beginners: The Easy Guide
I’ve spent more hours inside Apple Reminders than is probably reasonable.
I’ve pushed it past what it’s built for, tried to make it run things it has no business running, and found the exact spots where it breaks.
This guide is the honest version of what I learned, written for the person opening Reminders for the first time.
Here’s my actual take after all that testing: Reminders is not trying to be powerful, and that’s the whole point.
Most task apps lose you because keeping the system tidy becomes a second job. Reminders doesn’t have that problem.
It opens fast, it does what you tell it, and there’s nothing to maintain. That sounds like faint praise. It isn’t. It’s the reason it’s the one that sticks.
This guide is for you if:
- You’ve opened Reminders, stared at the blank list, and closed it again
- You’re walking away from a heavier app and want something that just works
- You want to know what it’s actually good at before you trust it with anything important
By the end, you’ll have a setup you trust, you’ll know the few things that trip up every beginner, and you’ll know the handful of things Reminders genuinely can’t do.
Because that part matters up front: Reminders is a checklist with a good memory, not a do-everything app.
Keep it in its lane, and it’s close to flawless. Push it out of that lane, and it gets clumsy fast, which is exactly when people quit.
I’ll flag those limits again as they come up, and where it’s weak, I’ll tell you it’s weak.
Table of Contents
1. Creating your first reminder
Open the app, tap the blue + button in the bottom corner, type what you need to do, and you’re done. That’s the honest truth of it.
A reminder needs nothing but a title to exist. “Call mom” is a complete, valid reminder.
But a bare reminder just sits in a list.
The useful part is telling it when, where, or how to come find you, and you do all of that from the small row of buttons that appears right above the keyboard the second you start typing.
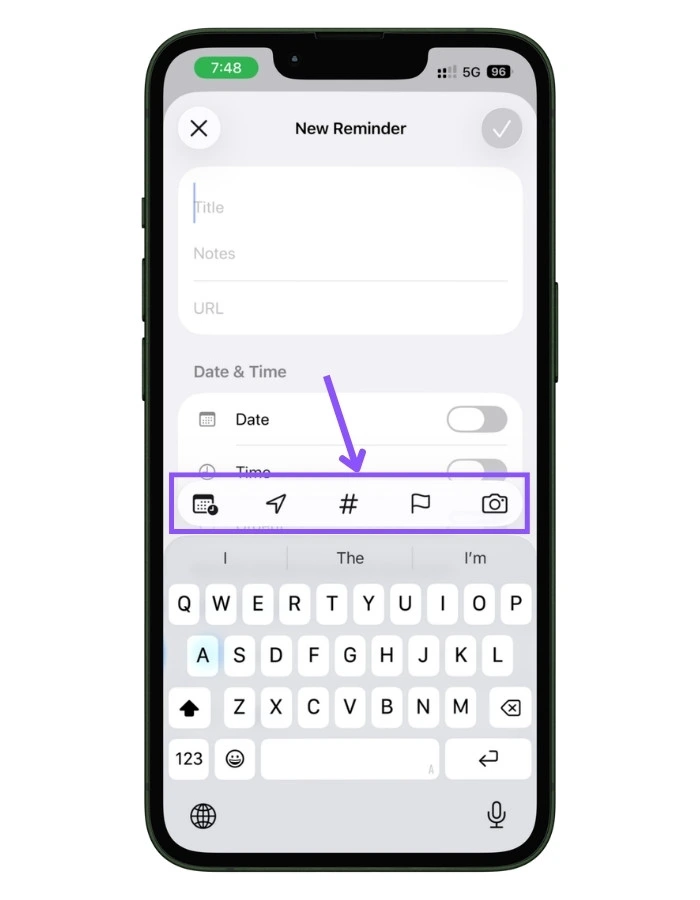
Left to right, those buttons are date and time, location, tags, flag, and camera. We’ll hit the important ones now.
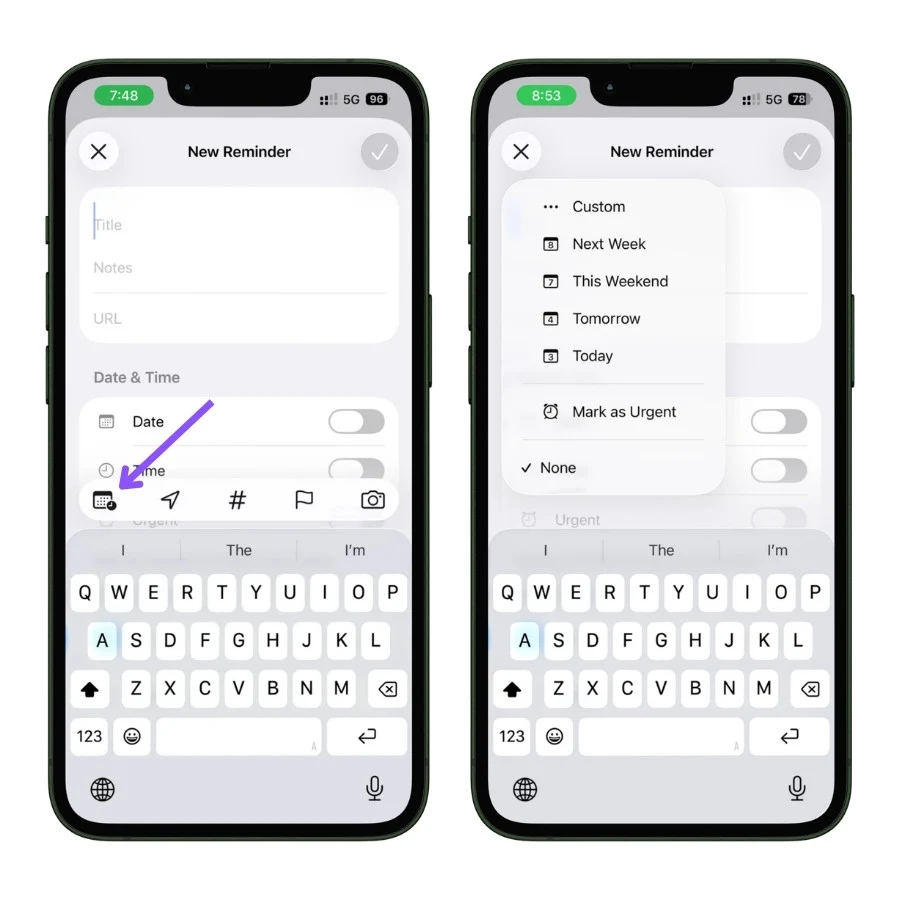
1.1 Adding a date and time
Tap the date icon (the calendar with a little clock), and you get instant options: Today, Tomorrow, This Weekend, Next Week, or Custom for an exact date.
Here’s the distinction that trips up almost every beginner:
- A date with no time drops the reminder into your “Today” list on that day and sorts it loosely into Morning, Afternoon, or Tonight. It won’t actively buzz you. Think of it as “deal with this today.”
- A date with a time fires a notification at that moment.
And the part worth burning into memory: the time you set is the deadline, not a start time.
Set it for 9 am, and it alerts you at 9 am. It does not quietly surface the task earlier so you can plan around it.
Reminders has one date field, and it always means “due.”
If you’re coming from Things or Todoist, which split start and due dates, this will feel limiting at first. It’s a real constraint, not you using it wrong.
One nice touch: you can type the timing in plain English, and Reminders reads it. Write “pay rent tomorrow at 9 am,” and it pulls the date and time out on its own.
1.2 When it absolutely cannot be missed: Urgent
This is the feature I wish more people knew about.
A normal reminder fires one quiet notification and then sits in Notification Center.
It will not chase you. For most things, that’s fine. For the stuff you genuinely cannot miss, like medication or a flight check-in, one easy-to-swipe banner isn’t enough.
The fix is the Urgent toggle.
When you set a time, flip Urgent on (it’s right there in the Details screen, and also in the quick date menu as “Mark as Urgent”).
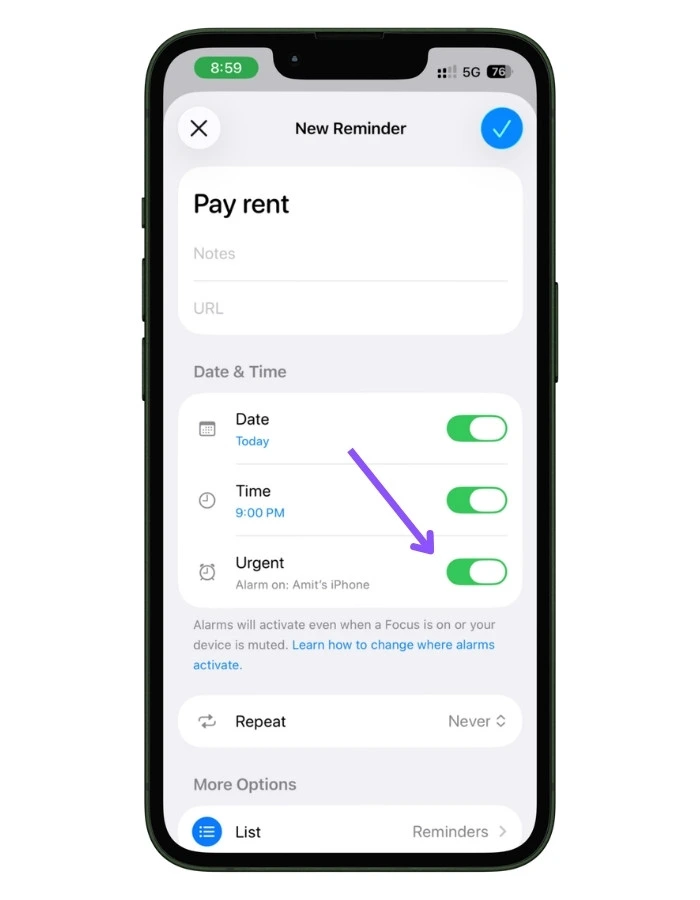
An Urgent reminder behaves like an actual alarm instead of a gentle banner, so it’s much harder to sleep through or swipe away by accident.
Urgent items also collect into their own list on the home screen, so you can see your no-excuses tasks at a glance.
This is the honest answer to “can I trust Reminders with something important?” In the latest version of iOS, yes, as long as you mark it Urgent.
1.3 The rest of the toolbar
Three more buttons worth knowing on day one:
- Location (the arrow): triggers the reminder when you reach or leave a place. Tap it, and you’ll see options like Current location, plus Getting in Car and Getting out of Car, which are perfect for “remind me to grab the dry cleaning when I get in the car.” More on this later, it’s one of the app’s most underused tricks.
- Tags (the #): a flexible label you can slap on any reminder in any list. Don’t worry about these on day one; just know the button’s there.
- Flag: marks something as important. Flagged items gather into their own automatic view, a quick “this one matters” without building anything.
- Camera: attach a photo, or Scan Document / Scan Text straight onto the reminder. Handy for a receipt or a serial number.
1.4 Make notifications actually work
Easy to miss and the source of most “it’s broken” complaints: a timed reminder only notifies you if Reminders has notification permission turned on. If your alerts never show up, that’s almost always why.
Check Settings > Reminders and make sure Allow Notifications is on.
While you’re there, turn on sounds or banners so alerts are hard to miss. I’d rather flag this now than have you set ten reminders, hear nothing, and assume the app failed. It’s usually just a toggle.
2. The fastest ways to capture a reminder
Here’s the thing nobody tells beginners: the app you tap open is the slowest way to use Reminders.
The whole point of a task tool is catching a thought the second it shows up, before it evaporates. If capturing something takes five taps, you won’t do it, and the system quietly falls apart.
So before you build any lists, learn the fast ways in. These are what turn Reminders from “an app I forget to check” into something you actually trust.
2.1 Just talk to Siri
This is the one I lean on most.
Say “Hey Siri, remind me to take the trash out tonight at 8” and it’s done, no screen, no typing. Siri drops it straight into Reminders with the time already set.
It works best when you talk to it the way you’d talk to a person:
- “Remind me to call the dentist tomorrow morning”
- “Remind me to buy milk when I leave here” (yes, it understands location)
- “Add paper towels to my grocery list” (it adds to the right list by name)
Where Siri shines is the hands-busy moments: driving, cooking, walking the dog.
If you’ve got an Apple Watch, this gets even better; you can dictate a reminder straight from your wrist without ever pulling out your phone.
That’s the moment most people realize the app is useful. A thought hits, you say it out loud, it’s captured, and your brain lets go of it.
2.2 The one-tap button most people never set up
Siri’s great, but sometimes you’re somewhere you can’t talk out loud. For that, iOS has a New Reminder control you can place where it’s instantly reachable.
The easiest spot is Control Center.
Swipe down from the top-right corner, press and hold an empty area, tap Add a Control, and pick New Reminder.
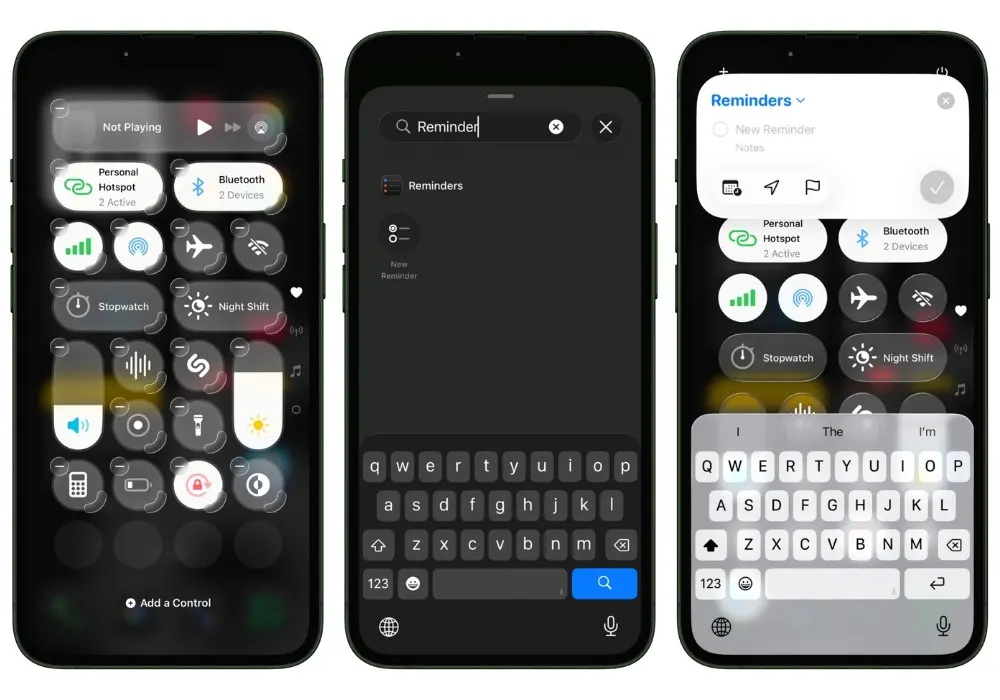
Now a new task is one swipe and one tap away from anywhere, and it opens a compact panel right on top of whatever you’re doing instead of launching the whole app.
If your iPhone has an Action Button (the programmable button above the volume keys on the higher-end models), you can map it to the same thing: Settings > Action Button, swipe to Controls, choose New Reminder.
After that, a long press of that button summons a reminder from anywhere, even the lock screen.
It’s the fastest capture method there is, if your phone has the button. If it doesn’t, the Control Center version above gets you nearly the same speed.
2.3 Save an email, text, or webpage as a reminder
A lot of what you need to remember doesn’t start as a thought, it starts as something on your screen.
- An email you need to reply to
- An article to read later
- A product a friend texted you
You don’t have to retype any of it.
Use the Share button in almost any app (Mail, Safari, Messages, Photos) and pick Reminders.
It creates a task that links straight back to the original. So a reminder called “Reply to landlord” can drop you right back into that exact email thread when you tap it.
There’s also a quieter option built into the reminder itself: When Messaging.
Open a reminder’s details, turn on When Messaging, and pick a person.
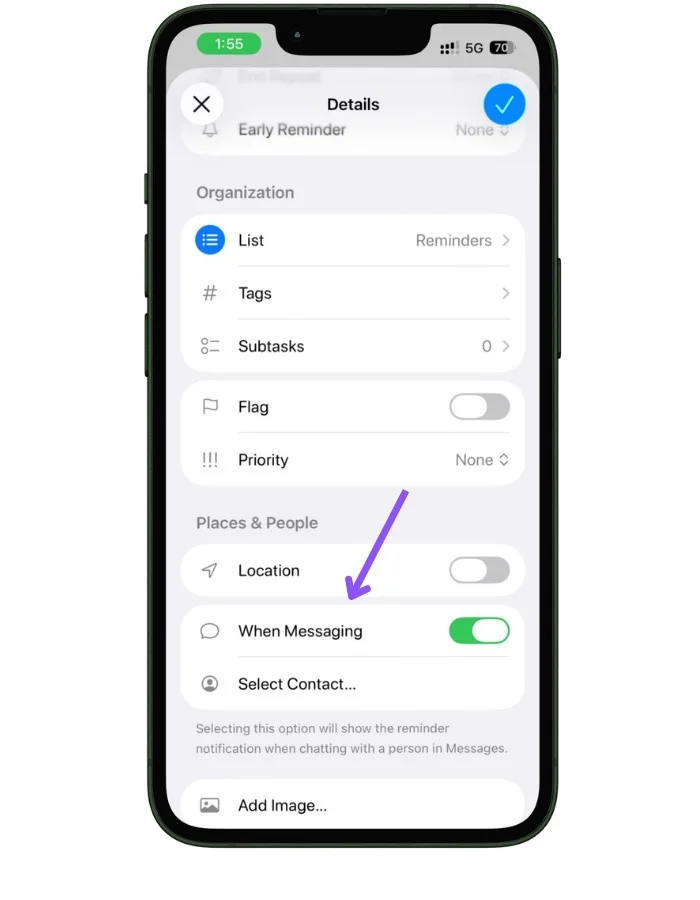
The reminder surfaces the next time you’re texting that person, which is perfect for “ask Mom about the recipe” or “tell Dave I found his charger.”
It waits until you’re actually in the conversation where it’s useful.
3. Organizing without overthinking it
This is where most beginners freeze.
They open Reminders, see a blank slate, and feel like they need to build some elaborate system before they can start.
You don’t. Reminders rewards keeping it simple, and over-organizing is the fastest way to abandon it.
Here’s the only structure you actually need to understand on day one: lists, the smart lists you already have for free, and tags. That’s it.
3.1 Lists: your main buckets
A list is just a container for related tasks, like a folder.
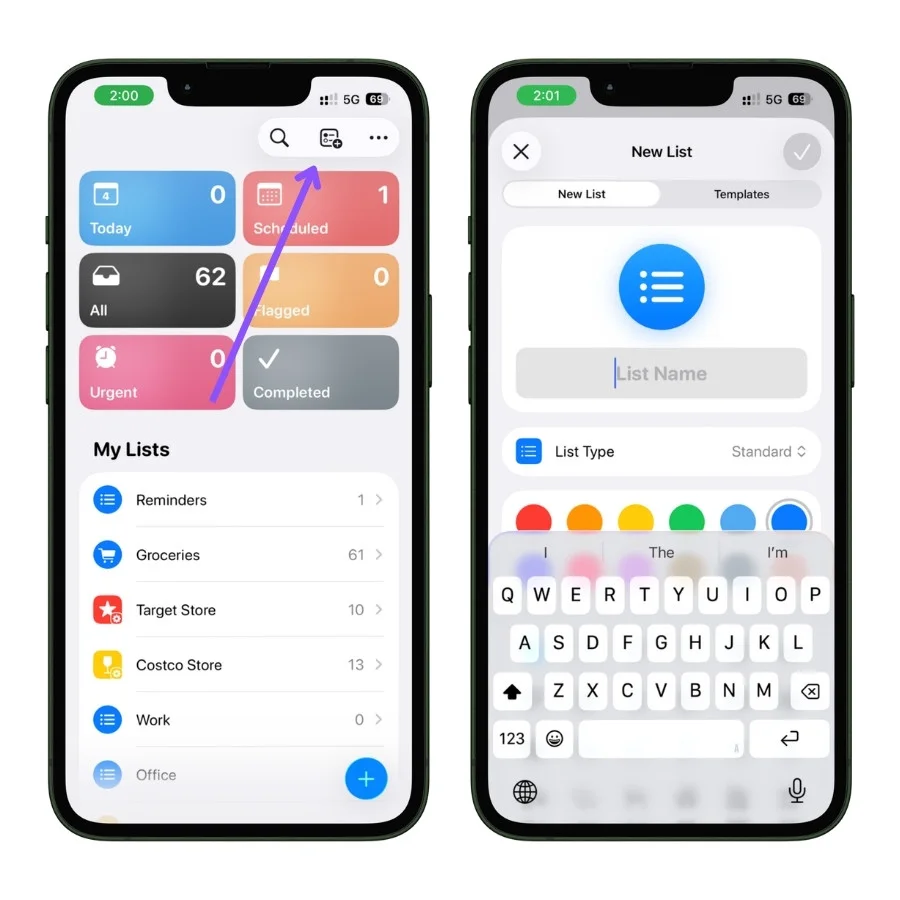
To make one, tap the new list icon in the top-right corner of the main screen (next to the search and menu icons), give it a name, and pick a color and icon.
The single most common beginner mistake is making too many lists.
You don’t need one for every corner of your life. A reminder can only live in one list at a time, so the more lists you have, the more you’ll hesitate over where each new task goes, and that hesitation is exactly what kills the habit.
Start with a handful of broad buckets that match how your life actually splits up. Something like:
- Reminders (the default list, great as a catch-all inbox for anything that doesn’t have an obvious home)
- Groceries
- Work
- Home
That’s plenty to begin with.
You can always add more later when a real need shows up, which is very different from inventing fifteen empty lists on day one and then feeling bad about the empty ones.
3.2 The smart lists you already have
Before you build anything, look at the top of the main screen.
Those colored tiles aren’t lists you made, they’re smart lists Apple gives you automatically, and they pull from everything across all your lists.
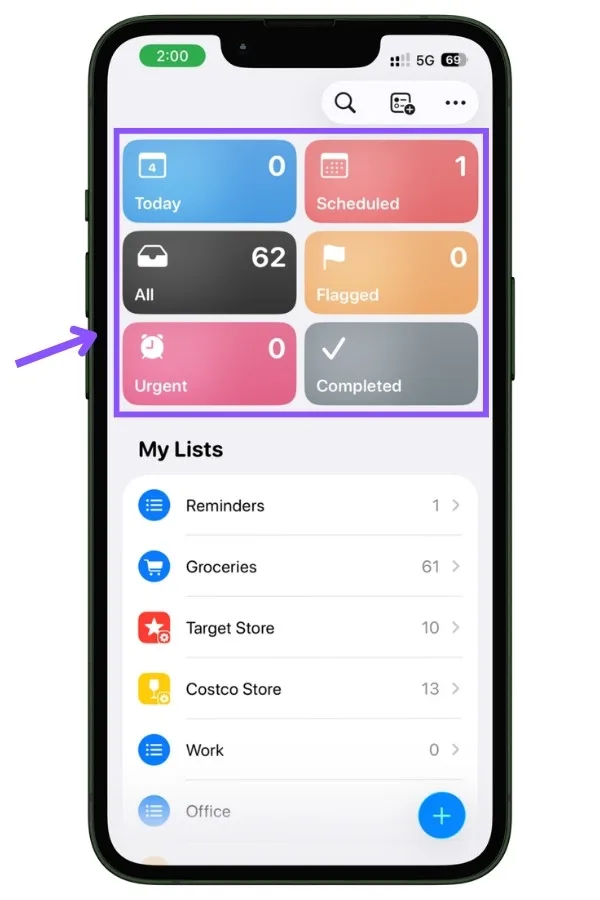
- Today shows everything due today, and even sorts it loosely into Morning, Afternoon, and Tonight.
- Scheduled is everything with a date attached, laid out in order.
- All is literally every reminder you have.
- Flagged collects anything you’ve flagged as important.
- Urgent gathers the reminders you’ve marked Urgent (the alarm ones from earlier).
- Completed is your history of finished tasks.
The useful realization here: you don’t go into your individual lists very often. Most days, you just open Today, see what’s due, and work through it. The lists are where things are filed; the smart lists are where you actually look. Understanding that one split makes the whole app click.
3.3 Tags vs lists
Tags confuse beginners because they seem to do the same job as lists. They don’t.
Here’s the clean distinction:
- A reminder lives in exactly one list. (It’s either in Work or in Home, not both.)
- A reminder can have any number of tags, and a tag works across every list at once.
So you might have separate Work and Home lists, but tag tasks in both with #errand or #urgent.
Later, you tap that tag and see every errand from your whole life in one place, no matter which list each one lives in.
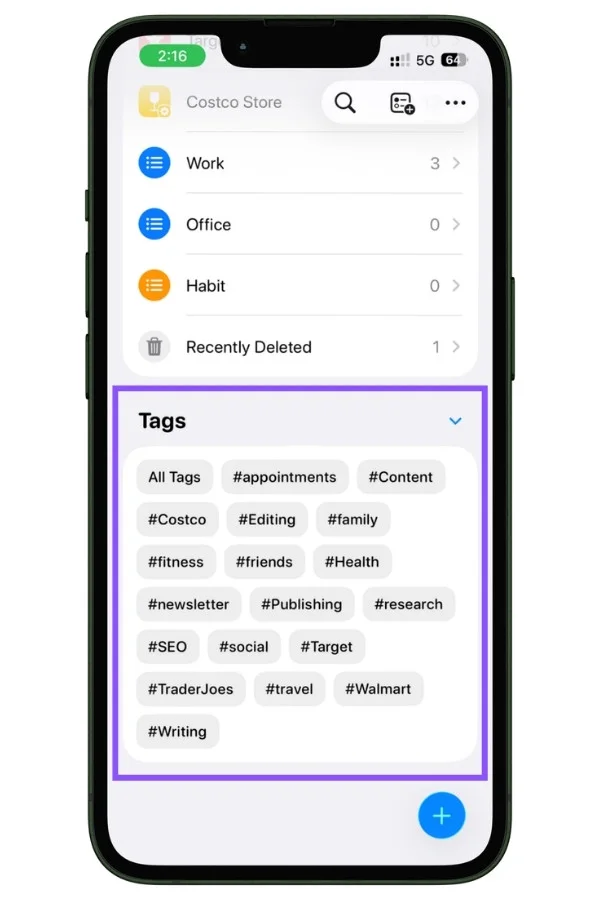
You add a tag with the # button on the toolbar, or just type a hashtag while writing the reminder.
My honest advice for day one though: ignore tags until lists start to feel limiting. Most people don’t need them right away, and reaching for them too early is just more system to maintain.
4. Three beginner setups worth copying
Theory is fine, but nothing makes Reminders click like setting up something that immediately makes your life easier.
These are the three I’d hand any beginner first.
Each one is genuinely useful on its own, and together they cover most of what a normal person needs a task app for.
4.1 A shared grocery list that sorts itself
This is the setup that converts people.
Reminders has a dedicated Groceries list type, and it does something the plain list doesn’t: as you add items, it automatically sorts them into store sections like Produce, Dairy, and Frozen, so you’re not zig-zagging across the store.
To turn it on, make a new list, tap List Type, and choose Groceries instead of Standard.
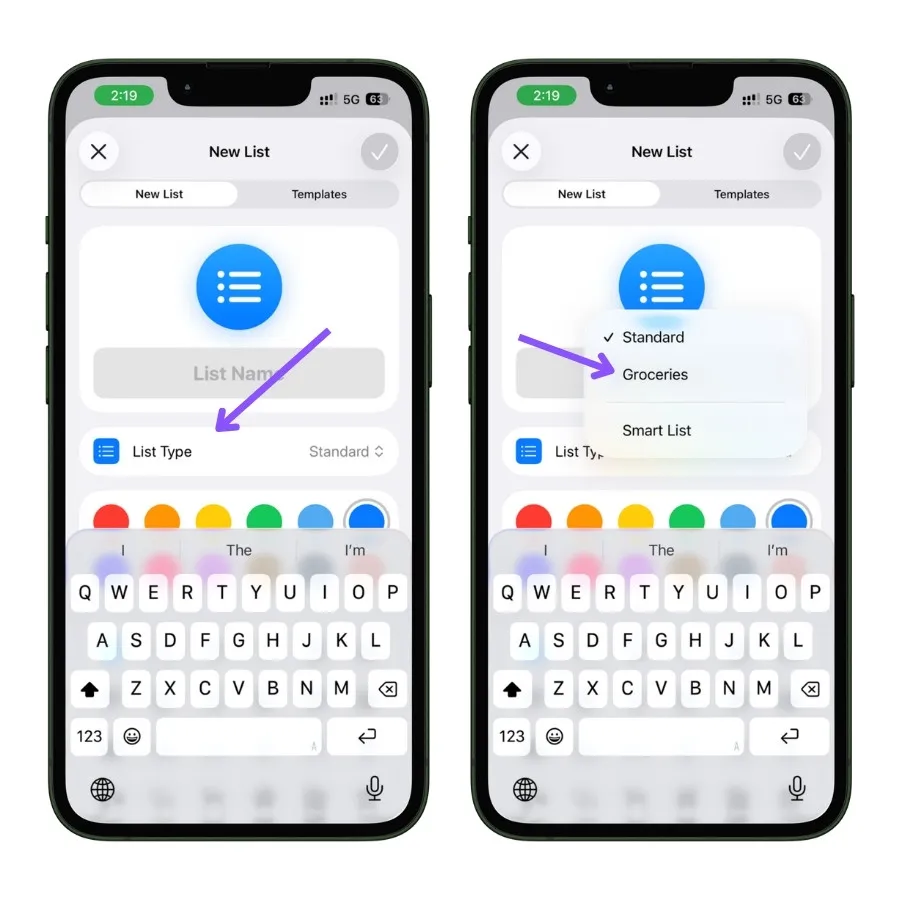
Now add “bananas, milk, chicken, ice cream” in any order and watch them drop into the right sections on their own.
You can dictate the whole thing to Siri in one breath, and it still sorts correctly.
The second half of this, and the reason it’s so good, is sharing.
Open the list, tap the share icon, and invite whoever you live with. Now it’s a single live list both of you add to. One person spots you’re low on coffee and adds it; it’s instantly on the other person’s phone.
This beginner setup works well on its own, but if you want a more structured approach, check out my guide on using Apple Reminders as a complete grocery management system.
4.2 A “Waiting On” list to clear your head
This one isn’t a to-do list at all, and that’s the point.
So much low-level mental clutter comes from things you’re waiting on, stuff you’ve handed off and can’t act on, but don’t want to forget: a package in transit, money a friend owes you, a reply you’re expecting from a coworker, a refund that hasn’t landed.
Make a single list called Waiting On and park all of it there. Nothing in it needs a due date. It’s just a trusted place to look so your brain can stop holding the list itself.
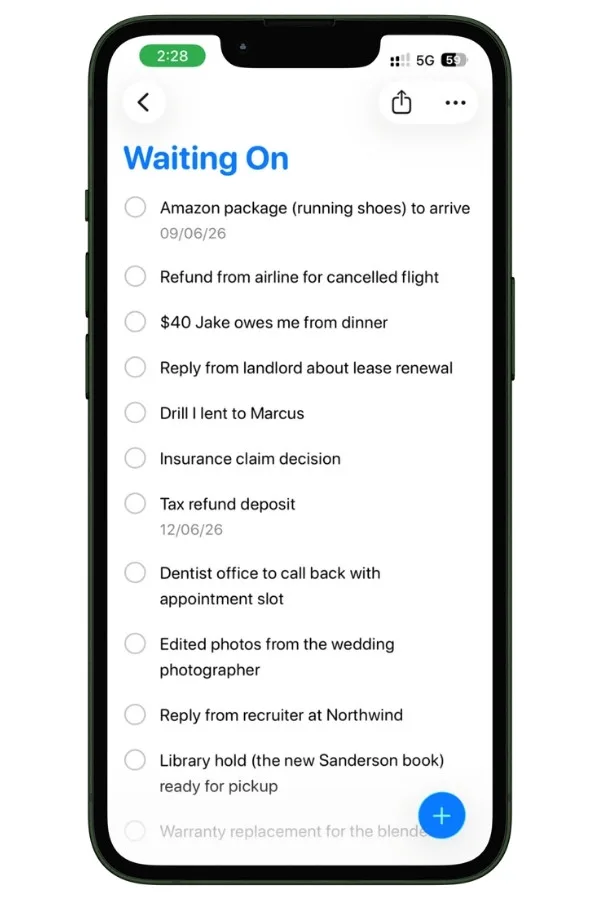
The trick that makes it powerful: for anything that needs a nudge if it doesn’t resolve, add a date a week or two out. If the package still hasn’t arrived by then, the reminder surfaces and prompts you to chase it. If it showed up, you just check it off early. Either way, you’ve stopped carrying it around in your head.
4.3 Simple habits without the streak pressure
People reach for fancy habit-tracker apps and then quit them, usually because maintaining the tracker becomes its own chore and one missed day feels like blowing a streak.
Reminders is quietly great at habits precisely because it’s so plain.
Make a recurring reminder for the habit: open the reminder’s details, set a time, and set Repeat to Daily (or whatever rhythm fits).
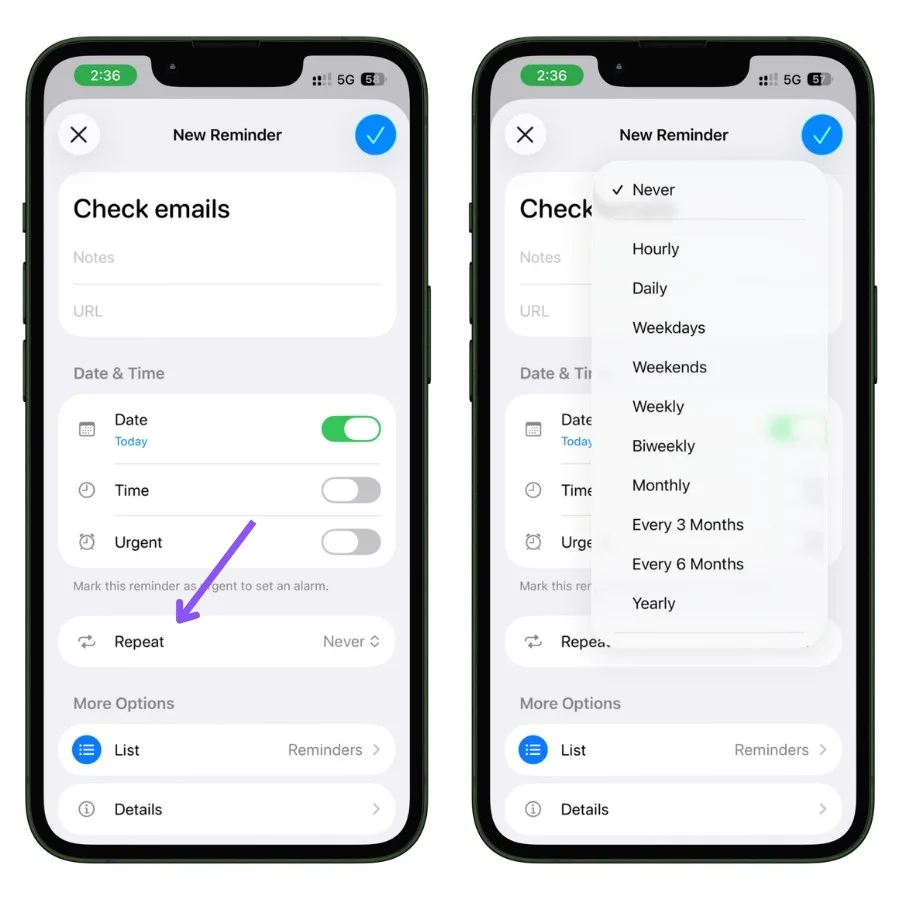
Then put it where you’ll see it without opening anything.
Add a Reminders widget to your Home Screen or Lock Screen showing that habit list, so the unchecked items just sit in your peripheral vision all day.
A gentle visual nudge beats an aggressive notification, and because there’s no streak counter, a missed day is just an unchecked box, not a failure.
You pick it back up tomorrow with zero drama.
5. The beginner mistakes and friction points
I’m not going to pretend Reminders is flawless. It isn’t, and the fastest way to lose trust in any tool is to hit a wall nobody warned you about.
So here are the three you’re most likely to hit early, and what to do about each.
5.1 Recurring tasks repeat from the schedule, not from when you finish
There’s a piece of advice floating around the internet that says missed recurring reminders pile up into a huge overdue backlog, and that you have to manually edit the date to fix it.
I tested it. That’s outdated. It’s not how the app works anymore.
If a daily reminder is four days overdue and you tap it complete, Reminders is smart enough to skip the backlog and jump straight to the next logical occurrence (tomorrow).
You don’t check it off four times. So relax, that particular horror story isn’t real.
Here’s the actual quirk, and it’s subtler:
Reminders always calculates the next due date from the original scheduled date, not from the day you finish it.
An example makes it clear:
Say you have a task set to repeat every 3 days, due Monday. You get busy and don’t check it off until Thursday. You’d expect the next one to land Sunday (three days after you finished). It doesn’t. The app counts three days from the original Monday: Monday + 3 = Thursday. So the moment you complete it late on Thursday, it instantly pops back up as due today.
It feels broken the first time it happens, but now you know why: the schedule is anchored to the original date, and finishing late doesn’t shift that anchor.
For habits where this gets annoying, the cleaner fix is to delete the reminder and recreate it fresh on the day you actually want the cycle to restart, which resets the anchor to that day.
5.2 “No start date,” and the Early Reminder workaround
I mentioned this earlier: Reminders has only one date field, and it always means due. There’s no separate “start date” telling you when to begin something.
So, a task you’d like to start chipping away at on Monday but isn’t actually due until Friday has no clean home. You either set it to Friday and forget about it until then, or set it to Monday and pretend it’s due early.
There’s no perfect fix, but there’s a useful half-measure: Early Reminder.
In a reminder’s details, you can set an Early Reminder to nudge you ahead of the due time, hours or days before.
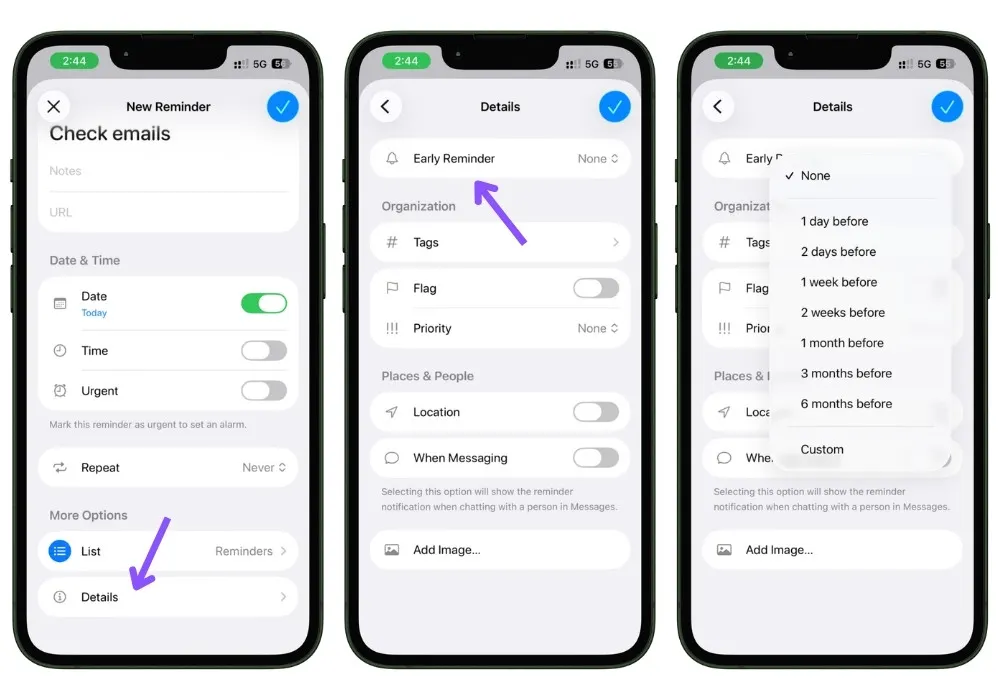
It’s not a true start date, but it gives you a useful nudge before the task is actually due.
If you’re coming from an app like Things that separates the two dates, set your expectations here: this is the closest Reminders gets.
5.3 Where Reminders still stops
A few honest limits worth knowing before you over-invest:
- It’s not a project manager. It handles a multi-step task with subtasks just fine, but it has no boards, no timelines, no dependencies. Try to run something genuinely complex through it, and you’ll outgrow it fast.
- Heavy reference material doesn’t belong here. The Notes field on a reminder is fine for a line or two. Long text, research, anything you’ll actually read at length, put that in Apple Notes and let the reminder just be the nudge.
- It’s a checklist, not a planner. Reminders is excellent at “don’t forget this.” It’s weak at “help me decide what to focus on today,” because of that missing start-date concept. Knowing which job it’s good at saves you a lot of frustration.
None of this means Reminders is bad. It means it’s focused.
For the vast majority of people, the limits above never get in the way, and the simplicity is the whole reason it sticks where heavier apps didn’t.
But you deserve to know where the edges are before you trust it with everything.
6. What’s new if you’re on the latest iOS
If you just updated, a few things in Reminders are newer than what older guides describe.
Most of what’s in this guide already reflects the current version, but here are the additions worth knowing about specifically.
6.1 Auto-Categorize for messy lists
If a list has turned into a jumbled dumping ground, Apple Intelligence can now clean it up for you.
Open the list, tap the three-dot (⋯) menu in the top-right corner, and choose Auto-Categorize.
It reads through that list and groups the tasks into sections that fit what’s actually in it, so a chaotic list reorganizes itself with no manual sorting. It only rearranges things into sections; it doesn’t touch the details of the tasks themselves.
To undo it, open the same menu and turn it off.
Two honest caveats:
- It runs on Apple Intelligence, which isn’t on every iPhone. Older models don’t support it, so if you don’t see the option, that’s why, not a bug.
- If your phone can’t run it, you’re not stuck. Tap the same three-dot menu and choose New Section to sort your list into sections by hand. It’s a minute of work instead of automatic, but you get the same tidy result.
6.2 The faster New Reminder panel
I touched on this back in the capture section, but it’s worth calling out as a recent change.
When you use the New Reminder control (from Control Center, the Lock Screen, or the Action Button), it no longer dumps you into the full app.
Instead, it pops up a compact panel right over whatever you’re doing, with everything you need: the list, a note, date, location, and flag.
You fill it in, and it’s gone, without ever leaving the app you were in. It’s a small thing that makes quick capture genuinely quick.
6.3 The redesigned look
If the app looks different from screenshots you’ve seen elsewhere, that’s the newer system-wide design at work, the more translucent, rounded interface across iOS.
Nothing about how Reminders works changed because of it, but the toolbar, menus, and tiles all look a bit different than they did a version or two ago.
If you’re following an older tutorial and the buttons don’t quite match, that’s usually why.
The Bottom Line
If you take one thing from this guide, let it be this:
Reminders works because it gets out of your way.
You don’t need a system, a methodology, or a single paid app to get real value from it. Capture things the second they occur to you, let the Today view tell you what’s due, and check things off.
That’s the whole game, and it’s enough for most people, most of the time.
Start small. Make two or three lists, set up a shared grocery list, mark the one thing you genuinely can’t miss as Urgent, and use it for a week.
Once it’s a habit, the rest of what we covered, tags, location triggers, Auto-Categorize, will make sense exactly when you need it and not a moment before.
FAQs
Is Apple Reminders free?
Yes, completely. It comes pre-installed on every iPhone, iPad, and Mac, with nothing to buy and no subscription. It syncs across all your Apple devices through iCloud automatically.
What is the difference between Apple Reminders and Calendar?
Reminders is for things you do (tasks you check off). Calendar is for things that happen at a set time (appointments and events). “Call the dentist” is a reminder; the 3pm appointment itself is a calendar event. If it exists whether or not you act on it, it belongs in Calendar.
Why are my Apple Reminders not notifying me?
Almost always a permissions issue. Go to Settings > Notifications > Reminders and make sure Allow Notifications is on. Also check that the reminder actually has a time set, not just a date, since a date-only reminder shows up in your Today list but doesn’t buzz you.
Can Apple Reminders be used as an alarm?
Yes, if you mark the reminder Urgent when setting its time. An Urgent reminder behaves like an alarm rather than a single quiet banner, so it’s much harder to miss. For everyday tasks you won’t need it, but for the things you truly can’t sleep through, it’s there.
How many lists should I have in Apple Reminders?
Fewer than you think. A handful of broad buckets (like Personal, Work, Home, Groceries) beats a dozen narrow ones. Too many lists makes you hesitate over where each task goes, and that hesitation is what makes people quit. Add more only when a real need shows up.
Does Apple Reminders work on older iPhones?
The core of everything in this guide works on any iPhone running a recent version of iOS. A few of the newest touches, like Auto-Categorize, need Apple Intelligence and only run on newer models, but none of the essentials depend on having the latest phone.
How do I share an Apple Reminders list?
Open a list, tap the share icon, and invite people. Everyone sees the same live list and can add or check off items in real time, which is what makes the shared grocery list so useful.