How to Use Apple Notes for Expense Tracking (Free Shortcut)
Every other guide on this topic will tell you Apple Notes is a powerful budgeting tool. It isn’t.
And the sooner you accept that, the more useful it becomes.
Apple Notes is an expense-logging tool. It captures what you spent, when you spent it, and what you spent it on.
It does not plan your budget, it does not categorize your transactions automatically, and it does not give you month-over-month reports.
Once you stop expecting those things from it, Apple Notes becomes one of the fastest and most private ways to track spending on an iPhone, with zero subscriptions, zero bank linking, and zero learning curve.
This guide is for you:
- If you care about privacy and refuse to link your bank to another app
- If you’re a minimalist who does not want to install one more thing
- If you tried YNAB and bounced off the learning curve
- If you and your partner need a shared view of household spending without onboarding them to Splitwise
- If you are self-employed and need a receipt archive that does not cost $60 a year
This guide is not for you if you need formulas, charts, category-based reports, or strict zero-based budgeting.
For that, you need Apple Numbers or a dedicated app like Copilot or Monarch.
By the end of this guide, you will have a working expense tracking system inside Apple Notes, a downloadable Shortcut that logs an expense in under five seconds from your Home Screen or Siri, and a clear-eyed understanding of when Notes is enough and when it is not.
Two sections in particular are worth the scroll.
- Section 4 covers the iOS 18 Math Notes workflow, which lets you type a named variable like Rent = 1450 and pull a running total with a single equals sign.
- Section 5 walks through the viral TikTok Notes app hack that helped one writer at Bustle cut $432 in impulse spending in a single month.
Both are genuinely useful, and neither is covered well anywhere else on the internet.
Table of Contents
- 1. What Apple Notes can and cannot do for expense tracking
- 2. Apple Notes vs. YNAB, Copilot, Monarch, and Numbers: which one you actually need
- 3. The basic setup: your first expense tracking note in 5 minutes
- 4. The iOS 18 Math Notes workflow for instant category totals
- 5. The viral “impulse avoidance” Notes hack (does it actually work?)
- 6. Shared expense tracking for couples and roommates
- 7. Subscription tracker with renewal reminders
- 8. Receipts, Live Text, and tax-deductible workflows for 1099 earners
- 9. Automating capture with Shortcuts, Siri, and widgets
- Closing
- FAQ
1. What Apple Notes can and cannot do for expense tracking
Before you build anything, you need to know what you are working with.
Apple Notes is one of the most underrated capture tools on iPhone, but it is also genuinely bad at things that dedicated budgeting apps do well.
I am telling you upfront because the whole point of this guide is that you stop fighting Notes and start using it for what it is actually good at.
Here is the honest split.
1.1 What Apple Notes does well
| Fast capture | Under five seconds from the Home Screen widget, Control Center button, or a Siri phrase. Faster than opening any finance app. |
| Zero cost, zero subscription | YNAB runs $14.99 a month or $109 a year. Copilot is around $95 a year. Notes is already on your phone and does not ask for a dime. |
| No bank linking | Nothing connects to Plaid, nothing touches your bank credentials, nothing leaves your iCloud. For the privacy-wary, this is the whole reason to use it. |
| iCloud sync everywhere | Log an expense on your iPhone, review it on your Mac, update it on your iPad. No export, no extension, no friction. |
| Shared notes up to 100 people | Per Apple’s own documentation. Enough for couples, roommates, or a household spending log without anyone onboarding to a new app. |
| Receipts with searchable text | Scan a receipt, and Live Text indexes it. You can find a receipt later by searching for a dollar amount or a store name, no typing required. |
| Face ID locking | Lock any individual expense note behind Face ID. Useful if you are tracking debt payoff or anything you do not want visible on a shared device. |
| Works fully offline | Log expenses on a plane, in a basement, on a hike. It all syncs when you reconnect. Most finance apps cannot do this. |
1.2 What Apple Notes cannot do
| No column formulas | You cannot SUM a column of expenses the way you can in Numbers or Excel. The workaround is iOS 18 Math Notes with named variables, covered in section 4. |
| No CSV export | Export options are limited to PDF and plain text. At tax time this matters. Your accountant cannot import a PDF into QuickBooks. |
| No charts or trend reports | You cannot see a bar chart of spending by category or a line chart of monthly totals. You get raw text. Nothing more. |
| No category filtering | Tags and Smart Folders work at the note level, not inside a note. You cannot filter a table to show only “Groceries” rows. |
| Fixed table column widths | On iPhone and iPad, table columns auto-size to the widest content in the column. You cannot drag a column wider or narrower. Long merchant names will eat your screen. |
| Tags do not work on locked notes | If you lock a note with Face ID, you lose the ability to tag it. For receipts you want private and tagged, you have to pick one. |
| Folders cannot be locked | Only individual notes can. A whole “Finance” folder cannot be Face ID gated as a unit. |
| OCR sometimes drops on PDF export | Your scanned receipts are searchable inside Notes, but the searchable text layer can disappear when you export as PDF. Painful at tax time. |
| No multi-currency view | Math Notes can convert one value at a time, but you cannot log expenses in mixed currencies and see a unified total. |
1.3 The honest verdict
Apple Notes is a capture layer, not a budgeting system.
It is excellent at the part of personal finance that most apps actually get wrong, which is making it fast and painless to write down what you just spent.
It is terrible at the part that dedicated apps get right, which is analyzing that data and telling you what to do with it.
If your goal is to become aware of your spending, build the daily habit of logging purchases, and keep a private archive of receipts and shared expenses, Notes is more than enough.
If your goal is to plan a budget with allocated category limits and watch variance against those limits, you need Apple Numbers or a dedicated app.
2. Apple Notes vs. YNAB, Copilot, Monarch, and Numbers: which one you actually need
If you are reading this guide, you have probably already tried one of the big finance apps or are seriously considering it.
Before you commit to a $100 a year subscription or spend a weekend learning zero-based budgeting, it is worth understanding what each tool is actually for and where Apple Notes fits in.
I am going to be direct about this. There is no single best tool. There is only the right tool for what you are trying to do right now.
Most people in the US who land here are coming from one of three places:
- They were using Mint before it shut down in March 2024, and are looking for a replacement
- They tried YNAB and bounced off the learning curve
- They have never tracked spending at all and want the lowest-friction way to start
Here is how the five tools actually compare.
2.1 The comparison at a glance
| Tool | Cost | Bank linking | Formulas and reports | Learning curve | Best for |
|---|---|---|---|---|---|
| Apple Notes | Free | No | No formulas, no reports | Minutes | Capturing expenses, logging receipts, shared household spending, private tracking |
| Apple Numbers | Free | No | Full spreadsheet formulas, basic charts | 1-2 hours | DIY budgets, month-over-month analysis, tax prep, anyone who wants full control without a subscription |
| YNAB | $14.99/month or $109/year | Optional | Strong reports, goal tracking, variance analysis | 5-10 hours | Zero-based budgeters, people serious about paying off debt or hitting savings goals |
| Copilot Money | ~$95/year | Yes, via Plaid | AI categorization, trends, net worth | 1-2 hours | Former Mint users who want automation and do not mind bank linking |
| Monarch Money | ~$100/year | Yes, via Plaid | Full reports, net worth, investment tracking | 1-2 hours | Couples managing combined finances, net worth watchers, former Mint users |
2.2 Choose Apple Notes if
- You care about privacy and refuse to link your bank accounts to another service
- You want to start tracking spending today without learning anything new
- You need a shared expense note with a partner or roommate
- You are self-employed and need a receipt archive with searchable text
- You have tried bigger apps and abandoned them because the upkeep was more friction than the insight was worth
Notes is the right answer when the goal is awareness, not analysis.
Writing down what you spent is 80% of the value most people actually get from finance apps, and Notes does that part as well as anything on the App Store.
2.3 Choose Apple Numbers if
- You want actual budgeting with category allocations, variance tracking, and month-over-month trend charts, but you do not want to pay for a subscription
- You are comfortable spending a couple of hours building a template once and using it for years
Numbers is what I recommend for anyone who has outgrown a Notes-based system but is not ready to hand over bank credentials to a third-party app.
2.4 Choose YNAB if
- You have meaningful debt you want to pay off
- Specific savings goals with deadlines
- Chronic overspending that you have not been able to fix with tracking alone
YNAB is not a tracker. It is a methodology that assigns every dollar a job before you spend it.
The learning curve is real. Most people need 3 to 6 weeks before the system clicks.
If you are willing to invest that time, YNAB users report the strongest results of any app on this list. If you want a system that just shows you where your money went, this is the wrong tool.
2.5 Choose Copilot or Monarch if
You were a Mint user, and you want the closest replacement.
Both apps use Plaid to connect to your bank accounts, auto-categorize transactions, and show you spending trends without any manual entry.
Copilot runs natively on iPhone, iPad, Mac, and the web, and is widely considered the best-looking of the Mint replacements.
Monarch works on iOS, Android, and web, and is stronger for couples who want to merge finances in one view.
Both cost around $100 a year. Both require you to trust Plaid with your bank credentials, which is the trade-off every manual tracker in this guide is trying to avoid.
2.6 What most US users actually end up doing
In practice, the people who stick with a finance system long-term almost always use two tools, not one.
The most common combinations I see on Reddit and in blog comments are Apple Notes plus Apple Numbers (capture in Notes throughout the month, review and analyze in Numbers monthly) or Copilot plus Numbers (automation for daily tracking, spreadsheet for deeper analysis and tax prep).
If you are starting from zero, begin with Apple Notes. Build the logging habit first.
Once you have 30 to 60 days of data and a clear sense of where your money is going, you will know whether you actually need to graduate to Numbers or a paid app, or whether Notes is enough on its own.
For a meaningful share of people, it is.
3. The basic setup: your first expense tracking note in 5 minutes
Before we get to Math Notes, Shortcuts, or shared household tracking, you need the foundation.
This is the simplest possible expense tracking setup in Apple Notes, and for a surprising number of people, it is the only one they will ever need.
I am going to walk you through it in five steps. The whole thing takes about five minutes.
If you stop after this section, you will still have a working system that beats most paid apps on the three things that actually matter:
- Speed of capture
- Privacy
- The likelihood that you will still be using it in six months
3.1 Create a dedicated Finance folder
Open Apple Notes. On iPhone, tap the back arrow until you see your folder list.
On Mac, the sidebar is already visible. Tap or click the folder icon with the plus sign at the bottom of the screen and name the new folder “Finance.”
Keep it in your iCloud account, not On My iPhone.
This is the one non-negotiable piece of setup, because it is what lets your expenses sync across every Apple device you own.
If you only take notes on one device, this still matters because iCloud is also what protects your data if you lose your phone.
Everything related to money in Notes from this point forward lives in this folder:
- Monthly expense notes
- Receipt scans
- Subscription trackers
- Shared note you set up with your partner
One folder, clearly named, easy to find.
3.2 Create your first monthly expense note
Inside the Finance folder, tap the compose button to create a new note. On the first line, type the month and year as the title.
For example: Expenses November 2026
Apple Notes automatically treats the first line as the note title, so this will show up as “Expenses November 2026” in your folder list. Clear, sortable, and easy to search.
Hit return and add a short heading like “Monthly log” so the title does not run into your table. Then hit return again.
3.3 Insert a three-column table
Tap the table icon in the formatting bar at the bottom of the screen (on iPhone) or in the toolbar (on Mac). Notes creates a default two-by-two table.
Tap the three-dot icon that appears above the rightmost column and select “Add Column After.” You now have a three-column table.
In the header row, type your column names:
That is your structure.
Three columns is the sweet spot because it gives you enough information to be useful and few enough columns that the table stays readable on an iPhone screen.
Four columns (adding Category) works on iPad and Mac but gets cramped on iPhone, which is where most of you will actually be logging.
Do not worry about column widths. Apple Notes auto-sizes columns based on the widest content in each, and there is no way to manually adjust them.
If a long merchant name eats your screen, shorten the name when you type it. “Trader Joe’s” instead of “Trader Joe’s on Fillmore Street.”
3.4 Log your first three expenses
Tap inside the first data row and type. A typical entry looks like this:
Two things to notice.
First, you are writing this in your own shorthand. There is no dropdown, no auto-categorization, no “is this business or personal” prompt.
You type what you spent, and you move on.
Second, the dollar signs are optional. Many people drop them after the first few entries because they slow you down, and the context makes the numbers obvious anyway.
To add a new row, tap the last cell in the table and hit return. A fresh row appears. Keep going.
3.5 Pin the note to the top of your folder
This is the step most people skip, and it is the reason most Notes-based tracking systems fail.
If your current month’s expense note is not pinned, it gets buried under every other note you have created.
Opening Apple Notes becomes a search-and-scroll exercise, and that one second of friction is enough to make you stop logging.
On iPhone, long-press the note in your folder list, then tap Pin Note. On Mac, right-click the note and select Pin Note.
Once pinned, the note lives in a separate “Pinned” section at the top of your folder and stays there until you unpin it.
At the start of next month, you will duplicate this note, rename it “Expenses December 2026,” clear the data rows, and pin the new one.
This is the entire monthly ritual, and it takes about 30 seconds.
4. The iOS 18 Math Notes workflow for instant category totals
This is the section that changes the math on whether Apple Notes is “good enough” for expense tracking.
Before iOS 18, the single biggest limitation of Notes-based tracking was dead simple: you could not add up a column.
If you wanted to know your monthly total, you pulled out the calculator app and typed every number yourself. It was the reason most people graduated to Numbers within a few months.
In September 2024, Apple shipped Math Notes as part of iOS 18.
It runs on every iPhone, iPad, and Mac that can install iOS 18 or later, and crucially, it is not gated behind Apple Intelligence, so you do not need an iPhone 15 Pro or newer to use it.
Math Notes turns any note into a calculator that recognizes variables, solves equations inline, and converts currencies on the fly.
I cover the full feature set, including both ways to access it, in my Apple Math Notes guide.
4.1 Setting up a Math Notes expense tracker
Math Notes watches what you type inside an Apple Notes document and solves any expression it recognizes.
Type “200 + 50 + 75 =” and hit space, and Notes replaces the equals sign with 325. That is the simple case.
The useful case is named variables.
Open your November 2026 expense note from the previous section. Below your table, hit return a few times to give yourself some space.
Then type this structure, replacing the numbers with your own:
Monthly totals:
Rent = 1450
Groceries = 380
Gas = 92
Subscriptions = 47
Dining = 165
Shopping = 210
Rent + Groceries + Gas + Subscriptions + Dining + Shopping =
The moment you hit space after the equals sign, Math Notes calculates the total and displays it in yellow.
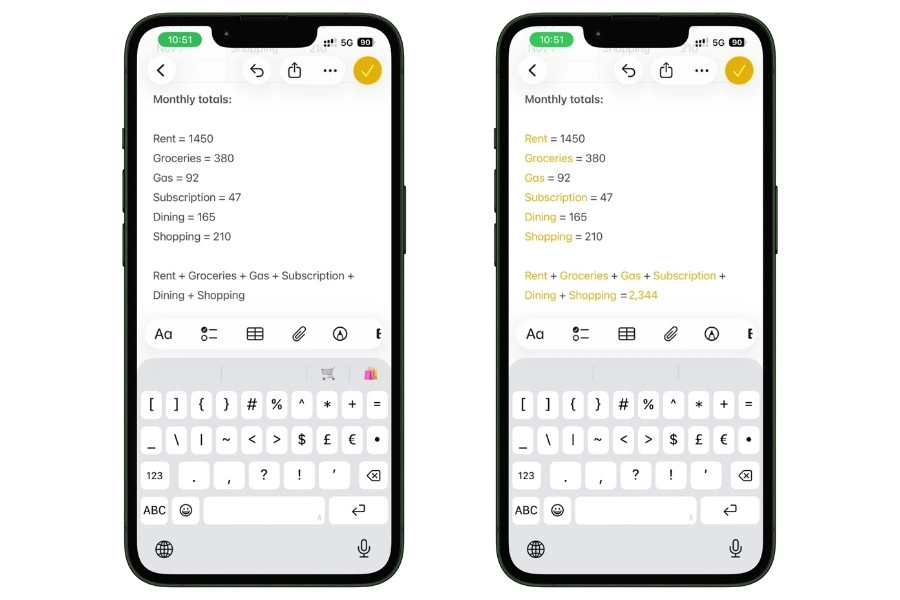
That is your monthly spending, live, at the bottom of the note. Update any variable, and the total recalculates automatically.
This is the closest thing Notes has to a spreadsheet formula. It is not as powerful as a Numbers SUM, but for a monthly expense tracker it is genuinely enough.
The variable names have to be single words using only letters from the Latin alphabet. No spaces, no numbers, no punctuation.
Rent, Groceries, Dining all work. Dining Out, Rent 2026, and Eating Out do not.
For multi-word categories, run the words together and capitalize each word (DiningOut, GasAndTransit).
Categories that never change month to month, like rent, can be typed once at the start of the month and forgotten.
Variable categories like groceries or dining, you update as the month goes on, and the total recalculates every time.
4.2 How to handle rolling daily totals
The setup above works if you think in categories. Some people think in daily totals, which Math Notes handles equally well.
Instead of categories, declare one variable per day:
DayOne = 0
DayTwo = 62.40 + 48.12
DayThree = 15.49
DayFour = 0
DayFive = 92.30 + 12.50
Then sum them at the bottom:
DayOne + DayTwo + DayThree + DayFour + DayFive =
The advantage of this structure is that each day’s variable can itself contain a small expression.
DayTwo = 62.40 + 48.12 automatically computes to 110.52 the moment Math Notes processes the line.
You get your daily total and your monthly total in the same note, with no calculator app required.
The tradeoff is that this only scales cleanly to about 30 to 35 variables per note before the structure gets unwieldy, and the variable names get harder to remember (DayTwentyThree is less readable than Nov23 would be if Math Notes allowed numeric characters in variable names, which it does not).
For most people, categories work better than days.
4.3 Currency conversion for travel expenses
If you travel, this one feature alone might justify using Math Notes.
Type 50 EUR in USD = and Math Notes returns the current USD value using live exchange rates.
It supports over 100 currencies and pulls fresh rates when you have an internet connection, caching the most recent rates for offline use.
For a trip expense log, this means you can log costs in local currency as you go and convert at the end:
Barcelona Trip:
Hotel = 340 EUR
DinnerTuesday = 68 EUR
DinnerWednesday = 52 EUR
Museum = 24 EUR
Hotel + DinnerTuesday + DinnerWednesday + Museum =
That single line at the bottom gives you the total in euros.
To see the same total in USD, type it again as a conversion:
Hotel + DinnerTuesday + DinnerWednesday + Museum in USD =
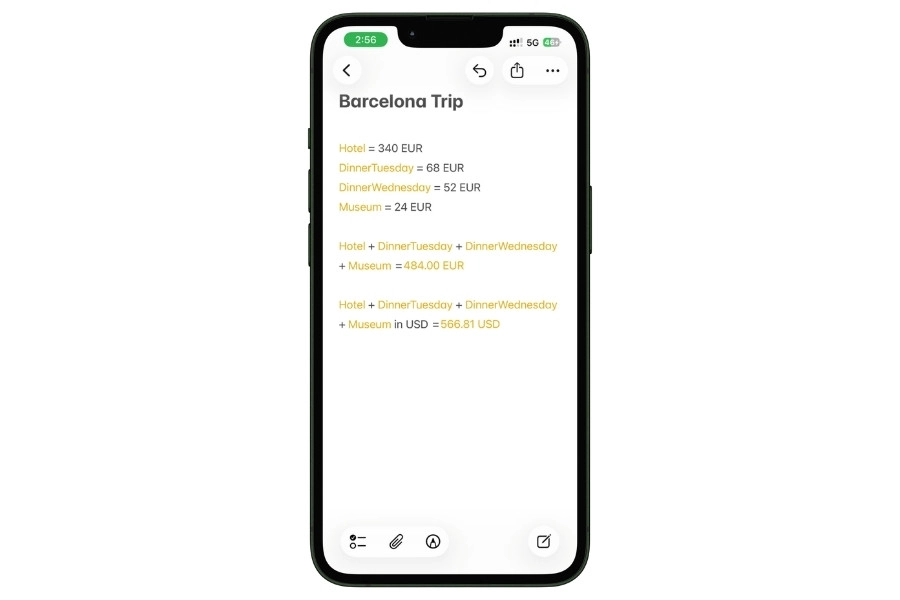
The real magic is that if you update any of the individual expenses, both the sum and the USD conversion recalculate automatically.
Now you have both numbers in the same note, both auto-updating, with zero manual math at any point.
For anyone who travels internationally even occasionally, this is genuinely the fastest trip expense tracker you will find on iPhone.
One limitation to know: Math Notes converts one expression at a time. You cannot log a mixed-currency monthly note (some expenses in USD, some in EUR, some in GBP) and get a single unified total without manually converting each line.
4.4 Apple Pencil handwriting on iPad
On iPad with an Apple Pencil, Math Notes does something that feels borderline magical.
Handwrite an equation like “45 + 67 + 89 =” on the screen, and the iPad recognizes your handwriting and writes the solution in next to it, in what the system does a reasonable job of matching to your own handwriting style.
For expense tracking, specifically, this is useful in one scenario: handwritten daily logs.
Some people track better with a pen than a keyboard.
If you are in that camp and you use an iPad Pro or iPad Air with a Pencil, you can keep a handwritten monthly log and still get automatic totals.
Handwrite your daily amounts down the page, draw a horizontal line at the bottom, and the iPad adds them up in recognized handwriting.
It is a narrow use case, but for the people it fits, nothing else on the market does this.
4.5 The honest limitation you need to know
Math Notes cannot sum a column of numbers in a table. This is the single most requested feature on Reddit threads about Notes, and Apple has not shipped it.
What this means in practice: the expenses you log in your three-column table at the top of the note are not automatically summed at the bottom. You have to maintain the variable declarations separately. If you log $62.40 at Trader Joe’s in your table and want that to count toward Groceries, you also have to add 62.40 to the Groceries variable manually.
Two workarounds are worth knowing.
The first is to skip the table entirely and use Math Notes variables as your primary log, updating each category’s value as you spend.
The second is to treat the table as your detail log and the variables as your rollup, updating the rollup once a week rather than in real time.
Most people settle on the second approach.
Log details in the table daily, update the variables once every Sunday, and the note stays accurate enough for monthly review without becoming a second job.
5. The viral “impulse avoidance” Notes hack (does it actually work?)
In July 2024, a TikTok creator named Sierra Boudreaux (@averagesisi) posted a 45-second video about a Notes app money hack she had been using for months.
The video crossed 174,000 likes and kicked off a content cycle that lasted 18 months.
- Bustle wrote about it
- Her Campus wrote about it
- The Everygirl wrote about it
A Bustle writer who tested the method publicly claimed it cut her impulse spending by $432 in a single month.
The method is absurdly simple. It has nothing to do with tables, Math Notes, or Shortcuts.
You can set it up in about 45 seconds and it might do more for your spending habits than any budgeting app you have ever tried.
Here is how it works, why it works, and when it does not.
5.1 The basic setup
Create a new note in your Finance folder. Title it “Want list” or “Impulse log” or whatever makes sense to you. Pin it.
Inside the note, add a three-column table with these headers:
| Item | Date wanted | Price |
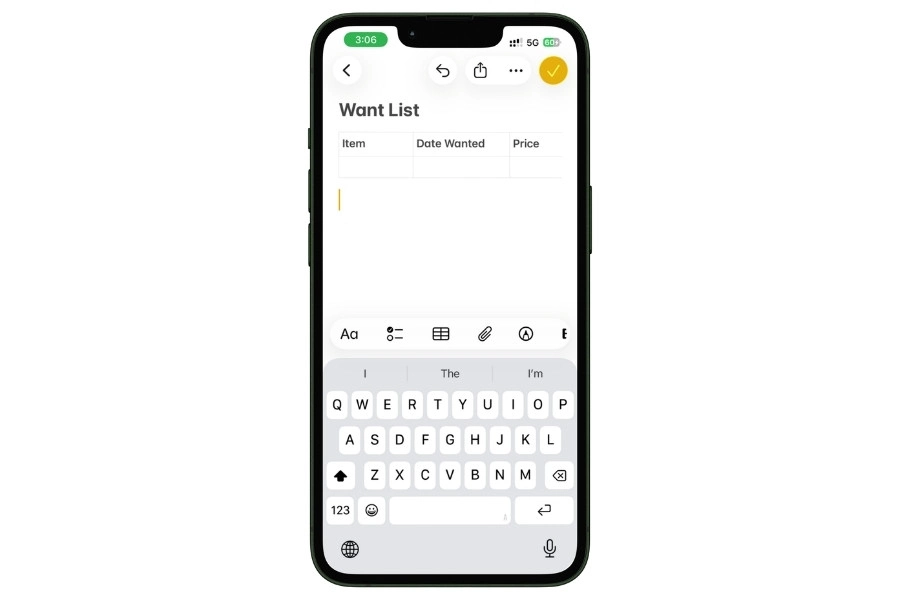
That is the whole setup.
When you feel the urge to buy something on impulse, the trip to Target, the 2 a.m. Amazon cart, the sale email from the brand you follow on Instagram, you log the item in this note instead of buying it.
5.2 The rule
The rule is a single sentence: you cannot buy the item until 72 hours after you logged it.
Three days. That is it.
When the 72 hours are up, you go back to the note, find the item, and ask yourself one question:
Do I still actually want this?
If the answer is yes, you buy it with zero guilt because you made the decision with a clear head.
If the answer is no, you delete the row.
You just saved whatever that item cost without any willpower at all.
For most impulse purchases, this is what you will find: somewhere between 60 and 80 percent of the things you write down, you stop wanting within three days.
The urge was real in the moment. The product was not.
5.3 Why it actually works
The hack sounds too simple to do anything. It works for three reasons that behavioral economics researchers have been writing about for decades.
The first is that writing something down partially satisfies the urge to acquire it.
Your brain treats the act of logging as a small form of ownership. You have claimed the item, even if only on a list, and the craving dips just enough to get you past the buy button.
The second is that impulse purchases depend on immediacy.
The whole thing is engineered around “buy now or you will miss out.” Introducing a 72-hour delay breaks the spell.
Most products that felt essential on Tuesday night look like clutter on Friday morning.
The third is that the visible price column adds up in your head as the list grows.
When your Want list has 14 items totaling $1,240 that you did not buy, the list becomes its own form of savings account.
You start to feel the money you kept, not just the stuff you did not get.
5.4 The 50/50 savings variation
Some people go one step further and turn the hack into an active savings tool. It works like this.
Every time you successfully skip an item on the list (72 hours pass and you decide you do not want it), you transfer half the price of that item to savings.
The other half you keep as a “guilt-free treat” to spend however you want, on coffee, on a nicer lunch, on nothing at all.
This variation does two useful things.
It makes the hack feel rewarding instead of restrictive, which is the reason most budgeting systems fail. And it quietly builds a savings cushion out of money you were going to spend anyway.
The Bustle writer’s $432 month came partly from this mechanic.
5.5 Where the hack breaks down
I want to be honest about this because every other article covering this hack has been uncritical about it.
The impulse avoidance list works brilliantly for one specific category of spending: non-essential online and in-store purchases where you have time to deliberate.
Clothing, gadgets, home decor, books, beauty products, subscriptions you are about to sign up for.
It does not work for the three biggest categories of spending creep for most people.
Grocery overspending does not show up on a want list because you are already at the store holding the item.
You do not pull out your phone to log “another bag of chips” before adding it to the cart.
For grocery creep, you need a different intervention, usually a shopping list you wrote before leaving the house.
Subscription bloat does not show up either, because subscriptions charge you passively.
You are not deciding to buy Netflix again this month, you already bought it six months ago and forgot.
Eating out and delivery are only partially helped.
If you are scrolling DoorDash at 9 p.m., the want list can intercept you, but the friction of opening a different note while you are hungry is often not enough.
For this one, closing the app and drinking a glass of water is usually more effective than logging.
5.6 When to use it
Set up the want list if you are someone who reads “I just bought this on Amazon” as a complete sentence describing half your monthly spending.
Set it up if most of your spending regret comes from things you did not need and stopped using within a month. Set it up before any major sale period, Black Friday and Prime Day especially, when impulse spending genuinely doubles.
Do not bother with it if your money problem is the slow bleed of small recurring costs.
For that, you need the tools in section 7 (subscriptions) and section 8 (receipts and tax-deductible tracking), not this one.
The want list is a single-purpose tool. For the one thing it does, it does better than any app on the market.
For everything else, use the other sections.
6. Shared expense tracking for couples and roommates
Splitting household expenses is one of the most friction-heavy parts of living with another person.
- Splitwise wants you both to install an app
- Venmo turns into a ping-pong of $18.42 requests
- A shared Google Sheet requires everyone to be on Google
None of these options feels natural if you and your partner or roommates are already on Apple devices.
Apple Notes solves this cleanly, and almost nobody writes about how.
A shared expense note lives on everyone’s iPhone and Mac without any new app to install, it updates in real time when either person adds an expense, and it supports up to 100 collaborators per note, according to Apple’s own documentation.
For a couple or a household of three to five roommates, this is more than enough.
This section covers the setup, the template that works, and the failure modes nobody warns you about.
6.1 Setting up a shared expense note
Open Apple Notes and go into your Finance folder. Create a new note and title it something like “Household Expenses” or “Us Money.”
Do not put a date in the title because this note is going to live forever, not monthly.
Tap the share icon at the top right. Choose “Collaborate” from the dropdown, not “Send Copy.”
This is the single most common setup mistake: Send Copy sends a static version, Collaborate is what makes the note live-editable for everyone.
Select how you want to share the invite:
- Messages is the fastest and most reliable
- AirDrop does not work for collaboration invites, even though it appears in the share sheet
- Mail works, but can land in spam
The person you invite has to have an Apple ID and iCloud enabled on their device.
Before you send, tap the permissions option and make sure “Can make changes” is selected, not “View only.”
View only is the right setting if you are sharing a reference document, but it defeats the point of a shared expense log.
Your partner or roommate receives the invite, taps the link, and the note appears in their own Notes app. From that moment, both of you can edit it from any of your devices.
Changes appear live, with a small orange dot next to the note in the folder list whenever the other person has made an edit you have not seen yet.
6.2 The template that actually works
The template I recommend for a couple or a small household has five columns, not three. You need the extra columns to make splitting work without a calculator.
An entry looks like this:
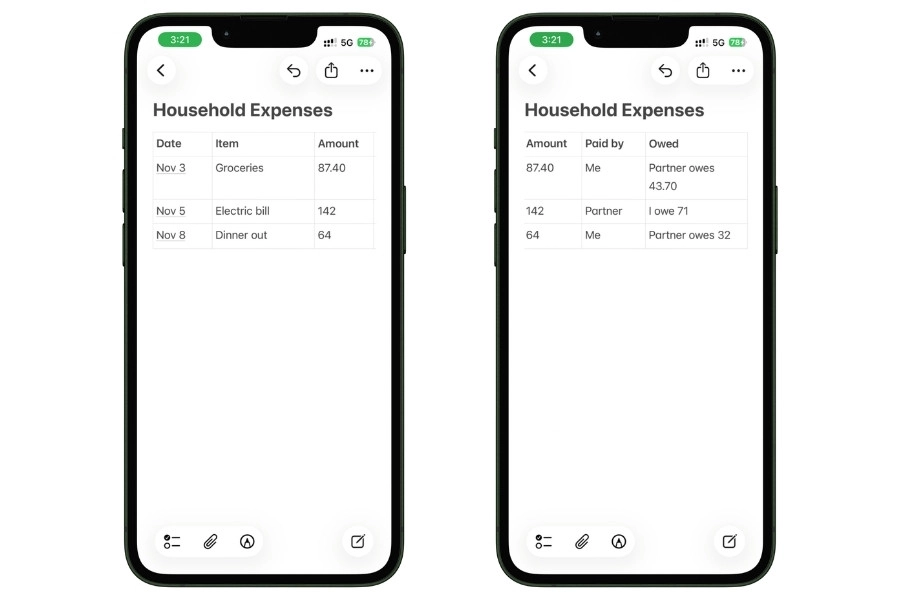
The “Paid by” column tracks who fronted the cash. The “Owed” column tracks what the other person needs to pay back for a 50/50 split.
For three or more roommates, expand “Owed” into separate columns per person.
At the end of the month, you settle up. You tally how much each person owes, net it out, and one Venmo transfer closes the books.
This is faster than Splitwise because you are not waiting for anyone to confirm transactions, and it is faster than Venmo-per-expense because you only do one transfer a month.
For couples who do not split evenly, the same template works with adjusted math in the “Owed” column.
If you split 60/40 based on income, a $100 grocery bill paid by one partner becomes “Partner owes $40” rather than “$50.”
The template is flexible, you just do the math once per row.
6.3 Using Math Notes for the monthly settle-up
Below the table, add a Math Notes rollup for the month. This is where iOS 18 earns its keep for shared expenses.
Nov settle-up
MeOwed = 43.70 + 32.00
PartnerOwed = 71.00
MeOwed – PartnerOwed =

If the result is positive, your partner owes you that amount. If negative, you owe them. One transfer, done.
The same approach scales to roommates.
Each person gets their own variable for what they are owed that month. Subtract them against each other, and you have net balances.
This is the moment where a shared note genuinely beats Splitwise for most couples.
Splitwise is better if you are tracking complex splits across many people over long periods. For two people settling up monthly, a Math Notes expression is faster, more transparent, and does not require anyone to open another app.
6.4 The privacy question nobody talks about
Sharing a note means both people can see everything in it forever. That sounds obvious, but it matters more than most people think.
If your partner uses the shared note for household expenses and also occasionally logs a personal expense (“surprise birthday dinner planning”) in the same note, that visibility can ruin surprises, create awkward moments, or just feel like a lack of privacy.
The fix is simple: the shared note is for shared expenses only. Personal spending lives in each partner’s own separate monthly note.
I also recommend against putting bank account numbers, credit card last-four digits, or any sensitive financial identifiers in the shared note.
Apple Notes syncs through iCloud, which is end-to-end encrypted for most content, but treating shared notes like a shared diary rather than a shared password manager is the right default.
One more thing: you cannot lock a shared note with Face ID.
Apple does not allow locking on notes that have collaborators. If privacy from anyone else who might use your phone matters, the shared note is not the right tool.
Keep the shared note on the non-sensitive stuff and track anything truly private in your own locked note elsewhere.
6.5 Failure modes to watch for
Three things go wrong with shared expense notes more than anything else.
The first is one partner on an older iOS version, where collaboration does not work well. Shared notes require iOS 13 or later for full functionality, and iOS 15 or later for the cleanest experience.
If your partner is still on an old iPhone because it works fine, shared notes may sync slowly or miss edits. Check each other’s iOS version before you commit to this system.
The second is simultaneous editing.
If both of you open the note at the exact same moment and start typing, Apple Notes handles it with last-write-wins behavior, which means one person’s edit can overwrite the other’s.
This rarely happens in practice because you are both unlikely to be logging expenses in the same 10-second window, but it is worth knowing.
If you see something disappear, it is probably this.
The third is drift. Shared expense tracking only works if both people actually log.
The most common failure pattern I see in Reddit threads is that one partner logs diligently for three months and the other forgets, and resentment builds.
The fix is to have the conversation before you start, agree on a logging rule (log the same day you spend, not retroactively), and revisit after 30 days.
If one person is not logging, the system is broken, regardless of how well Apple Notes works.
6.6 When Splitwise is still the better choice
I want to be direct about this, even though it means recommending against Apple Notes in some cases.
Use Splitwise instead of Apple Notes:
- If you are tracking expenses across a group larger than five people
- If your group includes people who do not use Apple devices
- If you need receipt attachments with OCR on every expense (Notes handles this, but not as elegantly per-expense)
- If you are splitting in uneven ratios across many people (think a six-person trip where three people are splitting the Airbnb three ways and all six are splitting groceries equally)
For everything else, which is most couples and most small households, a shared Apple Note is the lower-friction, lower-app-count, lower-monthly-mental-overhead option.
Set it up once, log as you go, settle up at month’s end, move on with your life.
7. Subscription tracker with renewal reminders
The average US household now spends about $219 a month on subscriptions, according to 2024 research by C+R. Most people estimate they spend less than half that.
Most people cannot name every subscription they pay for. A huge number are paying for services they stopped using months ago and forgot to cancel.
This is the single category of spending where tracking has the highest direct payoff.
Every subscription you audit and cancel saves you money every month for the rest of your life. A 15-minute subscription review can easily find $40 to $80 a month in dead weight, which is $480 to $960 a year walking back into your pocket.
Apple Notes, plus the Reminders app, is a surprisingly strong combination for this.
Here is how to build it.
7.1 Why dedicated subscription apps are usually unnecessary
There is a whole category of apps that promise to “find and cancel your subscriptions.” Rocket Money, Truebill, Bobby, Subby.
Some of them charge a monthly subscription to help you cancel subscriptions, which is not a joke I am making up.
The issue with all of them is the same: to find your subscriptions automatically, they need to read your bank statements, which means linking your accounts.
If the whole reason you are reading this guide is that you do not want to link your bank accounts to a third-party app, these tools are out anyway.
A manual subscription audit done once a quarter, tracked in Apple Notes, combined with Reminders for renewal alerts, gives you almost everything these apps offer without any data sharing.
The one thing you lose is auto-detection of new subscriptions, which you solve by adding anything new to the note the moment you sign up.
7.2 The subscription tracker template
Create a new note in your Finance folder titled “Subscriptions.” Pin it. This note stays for years, not months.
Inside, add a five-column table. An entry looks like this:
The “Cancel link” column is the detail that makes this work in the real world.
When you decide to cancel something, you do not want to Google “how to cancel [service]” and get three pages of dark-pattern menus. You want a direct URL or a clear path.
Write it down when you sign up, while the information is in front of you.
For anything you subscribe to through the App Store or Apple ID (iCloud, Apple TV+, Apple Music, any app you bought a subscription to in-app), the cancel path is always Settings > your name > Subscriptions.
Noting that once in the template saves you looking it up for every Apple-billed service.
7.3 Using Math Notes to see the real damage
Below the table, add a Math Notes rollup. This is where people stop paying for subscriptions they had forgotten about.
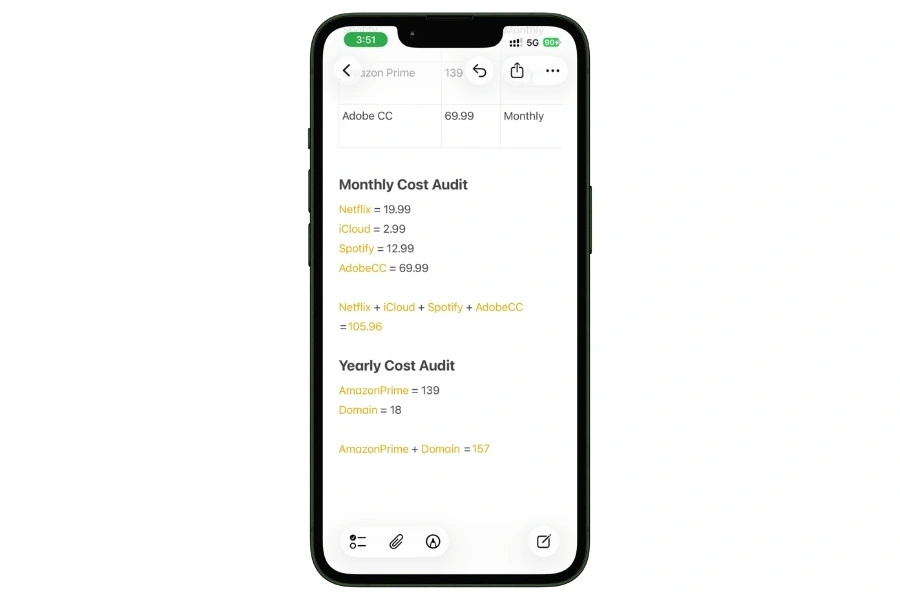
Now you have your true monthly and yearly subscription cost.
The first time you do this, the number is almost always larger than you thought. That is the point of the exercise.
7.4 Connecting Reminders for renewal alerts
Apple Notes cannot send you a push notification before a subscription renews. The Reminders app can, and the two apps are designed to work together.
For every subscription on your list, create a corresponding reminder in the Reminders app, set to repeat on the same cycle as the subscription, with an alert set for three days before the renewal date.
For a monthly Netflix subscription that renews on the 14th, the reminder looks like this:
- Title: “Netflix renews in 3 days, cancel if not using”
- Date: The 11th of each month
- Repeat: Monthly
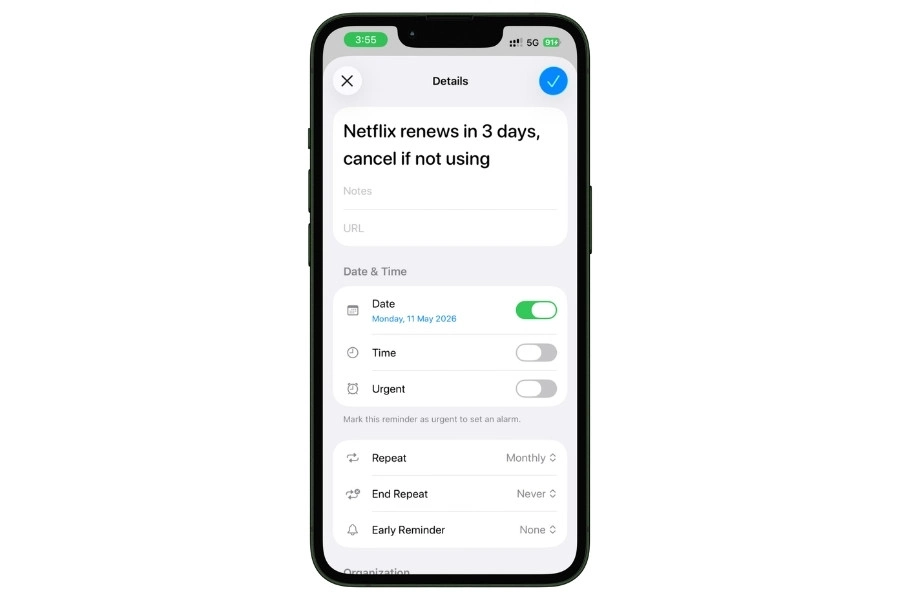
The friction here is real: you have to set up one reminder per subscription, which takes about 30 seconds each. For 10 to 15 subscriptions, that is 5 to 8 minutes of one-time setup. Worth it.
The reason this works is that the reminder fires before the charge hits, not after.
You have three days to think about whether you still use the service, and if not, the cancel link in your Notes tracker is one tap away.
Every month, the reminder repeats, and you get another chance to audit.
For anyone on iPad or Mac, you can also drag the Reminders app and Notes into Split View and see both at once during your quarterly audit.
On iPhone, this is less elegant, but the notification-plus-tracker combination still works.
7.5 The quarterly subscription audit
Once a quarter, set aside 15 minutes and open your Subscriptions note. Go through each row and ask one question:
Did I use this in the last 30 days?
If yes, move on. If no, click the cancel link and cancel it, then delete the row from the note.
This is the simplest and most effective personal finance habit I can recommend to anyone reading this guide.
Four times a year, 15 minutes each. A typical first audit finds $30 to $60 a month in dead subscriptions, which is $360 to $720 in annual savings from one hour of work per year.
Subsequent audits find less because you have cleaned house, but even one find per quarter justifies the ritual.
The quarterly cadence is important because it catches yearly subscriptions, too.
If you only audit during the month you happen to think about it, you will miss a $139 Amazon Prime renewal in March because your audit happens in July.
7.6 What this setup cannot do
Three honest limitations before you commit.
Apple Notes cannot detect new subscriptions automatically.
If you sign up for something and forget to add it to the tracker, it does not show up until you find it on a credit card statement.
This is the one thing the bank-linked apps genuinely do better.
Apple Notes cannot remind you on its own.
The renewal alerts require the separate Reminders app, set up manually per subscription. If you are the kind of person who does not check Reminders notifications, this system fails quietly.
Apple Notes cannot cancel anything for you.
Some of the paid apps in this space offer “we will cancel it for you” as a feature. A Notes-based system requires you to click the cancel link yourself.
For most people, this is fine. For the people who have 40 subscriptions and decision fatigue, it may not be.
For everyone else, which is most people reading this, a manual Notes tracker plus manual Reminders plus a quarterly audit is faster, cheaper, and more private than any paid alternative.
Twenty minutes to set up, fifteen minutes every three months to maintain, and you will almost certainly save more than $500 in the first year.
8. Receipts, Live Text, and tax-deductible workflows for 1099 earners
If you are self-employed, a freelancer, a 1099 contractor, or you run any kind of side business, receipts are not just receipts.
They are deductions. Every business meal you do not record, every piece of software you forgot to log, every mileage trip you could have written off but did not, is money the IRS keeps that should be yours.
The dedicated apps in this space charge real money.
- Expensify runs $5 per user per month for the basic plan
- QuickBooks Self-Employed is around $20 per month
- Shoeboxed is $25 per month and up
None of them do anything you cannot do in Apple Notes with three features Apple already shipped: document scanning, Live Text, and tags with Smart Folders.
This section is for anyone filing a Schedule C, anyone who needs to keep receipts for reimbursement at work, or anyone who just wants a searchable archive of everything they paid for.
The setup takes about 10 minutes and replaces a $60-to-$300 annual expense.
8.1 How Apple Notes handles receipts
Open Apple Notes and tap the paperclip icon in the formatting bar (or the toolbar on Mac). You get a few options, and the one you want is “Scan Documents.”
Point your camera at a paper receipt, and Notes automatically detects the edges, straightens the image, enhances contrast, and captures it.
You can scan multiple pages into one document. The whole thing takes about three seconds per receipt.
What Notes does next is the magic part.
Every scanned document is processed by Live Text, Apple’s built-in OCR system that runs entirely on-device. The text on the receipt becomes searchable.
Three days later, you can open Apple Notes, tap the search bar, type “$47.82” or “Home Depot” or “11/14”, and Notes finds the receipt.
Live Text requires an iPhone with an A12 Bionic chip or later, which means iPhone XS, XR, or anything newer.
Every iPhone Apple has sold since late 2018 supports it. If your phone is older than that, you get the scan but lose the searchability.
8.2 The receipt archive setup
Create a new note in your Finance folder titled “Receipts 2026” (or whatever the current tax year is). Pin it.
Each tax year gets its own note because receipts pile up, and you will want a clean break on January 1 for tax purposes.
The old year’s note stays in the folder as your archive, unpinned, for at least seven years (the IRS audit window for most taxpayers).
When you get a receipt:
- Open the Receipts 2026 note
- Tap the paperclip icon, choose Scan Documents
- Scan the receipt
- Below the scan, type one line of context: the vendor, the amount, and the business purpose
That last line is the one most people skip and later regret.
The receipt itself shows what you bought. What it does not show is why it was a business expense.
Your future self, or your accountant, or the IRS auditor you will probably never meet, needs to know that the $87 at Whole Foods was “client lunch with Sarah, Acme project” not your weekly groceries.
That is it. No categories, no forms, no dropdowns. Scan, type one line, done.
8.3 Tagging for tax categories
Apple Notes supports hashtag-style tags that you can filter on later. For tax purposes, this is how you separate the note into categorizable buckets.
The tags you want correspond to Schedule C line items. The most common ones:
- #meals for business meals (50% deductible in most cases)
- #software for SaaS and subscriptions used for work
- #equipment for hardware purchases
- #mileage for auto expenses
- #travel for business travel
- #office for home office and supplies
- #education for courses, books, conferences
- #services for contractors, legal, accounting
When you add a receipt, add the relevant tag on the same line as your context note:
At tax time, Notes lets you search by tag. Tap any tag, and you see every note containing it.
Your accountant gets a clean pile of meal receipts, software receipts, mileage receipts, all separated.
One important limitation: tags only work on notes that are not locked. If you lock the Receipts 2026 note for privacy, you lose the ability to tag it or have it show up in tag-based Smart Folder filters. For most 1099 earners, the trade-off is that receipts stay unlocked but live in a folder you trust. If you need true privacy on receipts, you have to choose.
8.4 Smart Folders for automatic receipt organization
Smart Folders take the tagging system one step further by automatically collecting every note with a specific tag into its own filtered view.
For a full Schedule C workflow, create one Smart Folder per tax category: Business meals, Software, Equipment, Mileage, Travel, Office, Education, Services.
Each Smart Folder pulls every note tagged with the matching tag, without moving anything. At tax time, each folder is its own pre-organized pile.
One setup note worth flagging here: if you put all your receipts in a single “Receipts 2026” note and tag individual lines inside it, Smart Folders will only surface that one note (because tags work at the note level, not the line level).
The workflow that actually makes Smart Folders useful is a new note per receipt, or per day of receipts, with each note tagged individually.
For the full walkthrough of Smart Folder filters, I have a dedicated guide on How I Use Tags and Smart Folders to Keep My Apple Notes Ridiculously Organized.
The setup above is the minimum you need for a tax-category receipt workflow, but Smart Folders can do considerably more.
8.5 The export problem (and the workaround)
When you export an Apple Notes document as a PDF, the searchable Live Text layer sometimes does not make it into the PDF.
The scanned images come through, but the underlying text that made them searchable in Notes becomes invisible to any other app.
Your accountant opens the PDF, searches for “Home Depot,” and gets nothing, even though you know the receipt is in there.
This is an intermittent issue, not a consistent one, which makes it worse. Some exports work fine, some do not, and there is no reliable way to tell from inside Notes.
The workaround is to not rely on PDF export for the receipts themselves. Instead, do one of two things.
First option: keep the Receipts note in Apple Notes and give your accountant access to a shared note for the duration of tax season.
They can see everything, search everything, and the Live Text stays intact because nothing is being exported.
Second option: use Notes to capture and categorize receipts during the year, then at tax time, open each receipt scan individually and use the “Copy Text” feature (long-press the scanned image, select Copy Text) to pull the machine-readable text into a separate plain-text document.
Tedious for 200 receipts, but airtight for an audit trail.
For most 1099 earners, I would recommend option one. Most accountants are willing to look at a shared note if you explain the workflow and the reason.
8.6 When to graduate to a dedicated app
Apple Notes works well up to a point. For some self-employed readers, that point comes faster than for others.
You have probably outgrown a Notes-based receipt system:
- If you are itemizing more than 300 receipts a year
- If you need mileage tracking with GPS auto-capture (Notes cannot do this, apps like MileIQ can)
- If you bill clients directly from receipts and need invoicing integration
- If you have an accountant who requires QuickBooks or Xero input
For everyone else, the Notes setup is durable.
It scales to around 500 receipts per year without becoming unwieldy, it costs nothing, it stays entirely private, and it survives for as long as you keep paying your iCloud bill.
For a side hustle, a freelance career in its first few years, or anyone whose deductions are straightforward, this is the system.
The dedicated apps are not wrong, they are just overkill for most people, and they require you to hand over financial data to a third party that Apple Notes does not ask for.
9. Automating capture with Shortcuts, Siri, and widgets
Everything in the previous sections assumes you open Apple Notes, find the right note, and type your expense manually.
For most people, this works because the whole system is built for speed.
But if you are logging 10 or more expenses a day, or if opening an app at the point of sale feels like too much friction, iOS gives you three ways to make capture essentially instant.
This section covers the full automation stack:
- Shortcut that logs expenses with one tap
- Siri integration for voice-based capture
- Widgets that put your current monthly note on your Home Screen or Lock Screen
Build all three, and you will never forget to log again.
9.1 Building the Expense Logger Shortcut
Open the Shortcuts app, tap the plus icon in the top right, and build the actions in order.
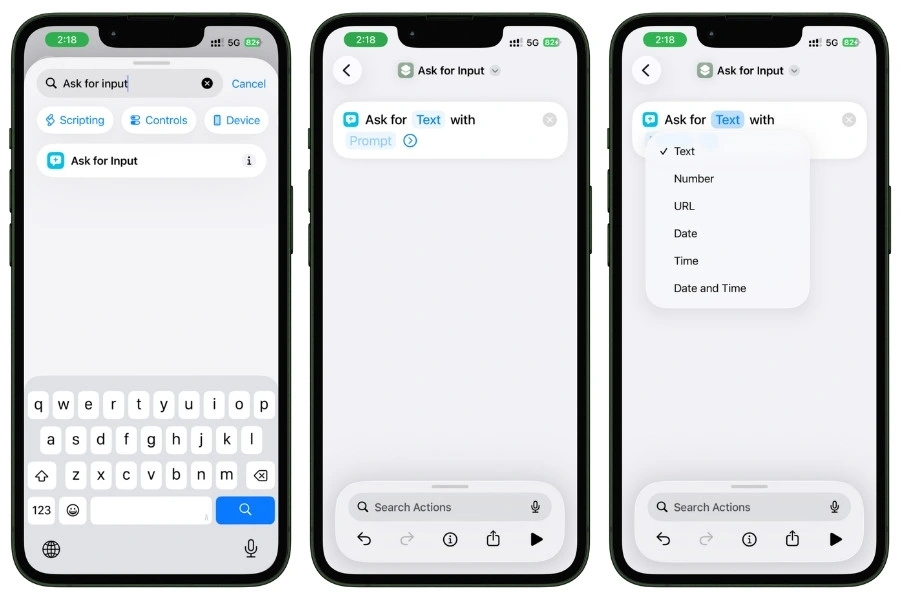
Action 1 — Search for “Ask for Input” and tap it. Change the input type from Text to Number. In the prompt field, type: How much? (keep it short, the number keypad truncates long prompts).
Action 2 — Search for “Set Variable.” Name it “Amount.” For the value, tap Select Variable and pick Provided Input.
Action 3 — Search for “Ask for Input.” Leave type as Text. In the prompt field, type: What category?. Tap the chevron to expand options and set Default Answer to “Food” or your most common category.
Action 4 — Search for “Set Variable.” Name it Category. Value: Provided Input via Select Variable.
Action 5 — Search for “Ask for Input.” Leave type as Text. Set the prompt to Where?.
Action 6 — Search for “Set Variable.” Name it Merchant. Value: Provided Input via Select Variable.
Action 7 — Search for “Append to Note.” Tap Note and select your current monthly expense note (for example, “Expenses November 2026”).
Tap the Text field and build this line, using Select Variable to insert each variable chip:
[Current Date] | [Merchant] | $[Amount] | [Category]
- Type the pipes, spaces, and dollar sign from the keyboard
- Insert Current Date, Merchant, Amount, and Category from Select Variable
- Tap the Current Date chip after inserting it and set Date Format to Short and Time Format to Short (or None if you prefer just the date)
Tap the chevron at the top, name the Shortcut “Log Expense”, pick an icon, and hit Done.
Tap the play button to test: enter an amount, category, and merchant, then open your note and check the bottom. You should see a clean single-line entry.
To add it to your Home Screen, tap the chevron again and choose Add to Home Screen.
Get the Expense Logger Shortcut
Skip the build. Tap below to install the same Shortcut I use every day. After install, open it once to set your monthly note as the destination, and you’re done.
Install the ShortcutWorks on iPhone, iPad, and Mac running iOS 15 / iPadOS 15 / macOS 12 or later. Free, no signup required.
9.2 Running the Shortcut with Siri
Every Shortcut in your library is automatically available to Siri. The phrase is whatever you named the Shortcut.
“Hey Siri, log expense.” Siri launches the Shortcut. You speak the amount, the category, and the merchant when prompted, and Siri dictates them into the prompts for you.
This is genuinely the fastest way to log an expense hands-free, which matters when you are driving, holding groceries, or walking out of a restaurant.
One caveat worth knowing: Siri has had reliability issues with “add to my Notes” as a direct command since iOS 14.8, and that issue has not been fully fixed in later versions. Some users can say “Siri, add a note that I spent $6 at Starbucks” and it works. Other users get “I can’t add to that note right now” or have the text appended to the wrong note entirely.
The Shortcut approach bypasses this problem because Siri is launching a Shortcut, not trying to interpret a natural-language Notes command.
The Shortcut knows exactly which note to append to, and Siri just fills in the prompts. This is significantly more reliable than trying to use Siri to edit Notes directly.
9.3 Home Screen widgets
Apple Notes includes a built-in Home Screen widget that you can configure to display a specific note.
For expense tracking, you want this pointed at your current monthly note.
Long-press any empty area of your Home Screen until the icons jiggle. Tap the plus icon in the top corner, search for Notes, and select a widget size.
The medium and large sizes work best because they show actual note content, not just the folder list.
Once added, long-press the widget and tap “Edit Widget.” Change the displayed note from “Most Recent” to your specific monthly expense note.
Now your Home Screen shows a live preview of your current month’s expenses, updating as you log new entries. Tap the widget, and it opens the note directly.
Combined with the Shortcut on an adjacent Home Screen icon, this turns your phone’s main screen into an expense tracking dashboard.
Tap the Shortcut icon to log. Glance at the widget to see your running total. Tap the widget to review or edit.
9.4 Lock Screen and Control Center
This is where Apple is surprisingly inconsistent, and it is worth knowing the limitations before you try to set it up.
There is no first-party Lock Screen widget for a specific Notes note.
Apple added Lock Screen widgets in iOS 16, but the Notes app never shipped a widget that targets a single note on the Lock Screen.
You can add a generic Notes widget that opens the app, but not one that shows your expense note specifically.
The workarounds are two.
First, you can use a third-party app like Widgetsmith to create a Lock Screen widget that deep-links to your expense note via Shortcuts.
Second, in iOS 18 and later, you can add the Notes app as a Control Center button and put the Control Center on your Lock Screen via the customizable Lock Screen buttons (iOS 18 lets you replace the Flashlight or Camera button with something else, including a Notes shortcut).
The second option is cleaner and does not require a third-party app.
For most people, the Home Screen widget plus Siri via Shortcut is more than enough, and you can skip the Lock Screen setup entirely.
9.5 Apple Watch
Worth a quick mention because anyone with an Apple Watch will ask.
Shortcuts you build on iPhone sync to Apple Watch automatically if the Shortcut is marked “Show in Watch App” in its settings.
For the Expense Logger Shortcut, this means you can raise your wrist, tap the Shortcut complication, and dictate the amount and category to log an expense without pulling out your phone at all.
Two things to know: the Watch cannot display a full Notes widget, so you cannot glance at your monthly total from the watch face. And the prompts in a Shortcut appear on the Watch as text-input prompts, which means you are dictating via the Watch microphone. Accuracy is good but not perfect, so expect to correct one word in ten.
For small purchases you make while out, the Watch-based logging is as fast as it gets. For anything more complex, go back to the phone.
Closing
Apple Notes is not a budgeting app. It never will be.
What it is, for the right person, is the fastest and most private way to capture what you spent on an iPhone. No subscriptions. No bank linking. No learning curve.
And with the additions Apple shipped in iOS 18, iOS 26, and the Shortcuts ecosystem, the system genuinely works better today than it ever has.
Most of you reading this do not need a better budgeting app.
You need to start logging your expenses, full stop. The setup in this guide takes about 15 minutes, and the daily maintenance takes under five seconds per expense.
That is all most people ever need.
FAQ
Can Apple Notes sum a column of numbers like a spreadsheet?
No. Apple Notes tables do not support formulas of any kind. The closest workaround is iOS 18 Math Notes, which lets you declare named variables like Groceries = 380 and then sum them with an expression like Rent + Groceries + Gas =. This works outside the table, not inside it. If you need true column summing with cell references, you need Apple Numbers.
Is Apple Notes secure enough for financial information?
For most people, yes. Notes stored in your iCloud account are encrypted in transit and at rest, and you can Face ID lock individual notes for an additional layer of privacy. The one thing to avoid is putting full bank account numbers, credit card numbers, or passwords in any note, locked or not. Transaction amounts, merchants, and categories are fine. Account credentials belong in a password manager like 1Password or iCloud Keychain.
Can I use Apple Notes expense tracking on an iPad without an iPhone?
Yes. Everything in this guide works identically on iPad. Some features actually work better on iPad, specifically Math Notes with Apple Pencil for handwritten entries, and Split View so you can have Notes and Reminders side by side during your monthly review.
Does Apple Intelligence help with expense tracking in Notes?
Marginally. The Writing Tools feature in Apple Intelligence can summarize a long monthly note into a shorter recap, which is occasionally useful for a year-end review. It does not auto-categorize expenses, auto-sum columns, or do anything transformative for a tracking workflow. Apple Intelligence requires an iPhone 15 Pro or newer, so most users do not have access to it yet anyway. The expense tracking system in this guide works identically on every iPhone, regardless of Apple Intelligence support.
How do I back up my expense notes outside iCloud?
The simplest backup is exporting each monthly note as a PDF or Markdown file to Files or a cloud service like Dropbox. At the end of each month, open the completed note, tap the share icon, choose “Send a Copy,” and save the export to your preferred backup location. For a full-archive backup, the same process works for receipt notes, subscription trackers, and anything else in your Finance folder.
Can I track expenses in multiple currencies in Apple Notes?
Partially. Math Notes can convert one expression at a time using live exchange rates, which is excellent for trip-specific tracking like the Barcelona example in section 4.4. What Notes cannot do is maintain a single monthly tracker with mixed currencies and show you a unified total. If you are a frequent international traveler or work across multiple currencies, you will hit this wall fast. Notes is fine for single-trip international expense tracking. It is not fine for ongoing multi-currency management.