Apple Notes for Students: The Complete Guide (2026)
Apple Notes can handle your entire college workflow. Lectures, research, assignments, group projects, exam prep, all of it. No subscriptions, no extra apps, no setup.
Most students don’t realize this.
They download Notion, try GoodNotes, maybe pay for Evernote, and end up juggling three apps that don’t talk to each other.
Meanwhile, Apple Notes is sitting right there on every device they own, doing way more than they think.
I’m not a student. But for this guide, I went deep.
I went through hundreds of Reddit threads from r/AppleNotesGang and r/college, studied how students actually organize their notes, and tested every single workflow myself — audio transcription in a noisy room, Math Notes with real physics equations, Smart Folders with 200+ notes, the whole thing.
What you’re reading is the result of that.
This guide covers everything: how to set up a folder system that doesn’t fall apart by midterms, how to take lecture notes with audio transcription, how to write research papers entirely inside Apple Notes, and a bunch of features most students have never touched.
Let’s get into it.
Want a printable cheat sheet with the folder system, starter tags, Smart Folder recipes, and keyboard shortcuts from this guide? Drop your email, and I’ll send it to you.
Table of Contents
- 1. Why Apple Notes Actually Works for Students
- 2. How to Organize Apple Notes for School
- 3. Taking Lecture Notes in Apple Notes
- 4. Using Apple Notes for Research Papers & Essays
- 5. Study Techniques & Exam Prep in Apple Notes
- 6. Math Notes: The Built-In Calculator for STEM Students
- 7. Tracking Assignments & Group Projects
- 8. Apple Freeform: Your Visual Study Companion
- 9. Hidden Apple Notes Features Every Student Should Know
- 10. Power User: Shortcuts, Automation & Extensions
- 11. Apple Notes vs. Notion vs. GoodNotes vs. OneNote for Students
- 12. What Apple Notes Can’t Do (Honest Limitations)
- Final Words
- FAQs
1. Why Apple Notes Actually Works for Students
There’s a running joke in productivity circles that Apple Notes is “just for grocery lists.”
That hasn’t been true for a while now.
Apple Notes is a genuinely powerful app that can handle lecture recordings with live transcription, solve math equations inline, link notes together like a wiki, and let you collaborate with 100 people in real time. All for free. Already installed on your phone.
But most students never get past the basics. They open it, type some text, maybe make a checklist, and then assume they need Notion or GoodNotes for “real” work.
They don’t. And this section explains why.
1.1 The Case Against Third-Party Apps
Let me be clear, Notion is great. GoodNotes is great. There’s nothing wrong with using them if they genuinely fit your workflow.
But here’s what actually happens with most students:
You download Notion because someone on TikTok said it changed their life. You spend three hours building a pretty dashboard with color-coded databases and Kanban boards. It looks amazing.
Then the semester gets busy.
You stop updating it because there’s too much friction.
The app needs wifi to load properly, the mobile experience is clunky, and now your notes are split between Notion and whatever you quickly typed into Apple Notes during a lecture because Notion took too long to open.
Sound familiar?
This isn’t a knock on Notion. It’s a reality check about how most students actually work.
When you’re rushing between classes or trying to capture something a professor just said, you need something that opens instantly and syncs without thinking about it.
That’s where Apple Notes wins. It’s not the most powerful note-taking app out there. It’s the most frictionless one.
And for students, low friction beats fancy features almost every time.
Why frictionless matters
- Zero cost, zero setup. No “Pro” tier you need to unlock halfway through the semester. Everything in this guide works on the free app that’s already on your iPhone, iPad, and Mac.
- Instant sync across all your Apple devices. Edit a note on your iPhone during a lecture, open your Mac at home, and it’s already there. No manual syncing, no “waiting for changes to load.”
- It opens in under a second. Sounds trivial until you’re in a lecture and need to capture something fast. Apple Notes is a native app, it doesn’t need to load a web interface or connect to a server before you can start typing.
- No context switching. Your notes, scanned documents, audio recordings, PDFs, checklists, and links all live in one app. You’re not bouncing between a note-taking app, a scanning app, a voice recorder, and a to-do list.
- Deep integration with everything else on your Apple devices. Spotlight search finds your notes. Siri can create notes. Shortcuts can automate workflows. Share Sheet sends content from Safari, Mail, or any app straight into a note. None of this works as seamlessly with third-party apps.
1.2 What Apple Notes Can Actually Do Now
If you haven’t looked at Apple Notes recently, you might be surprised.
Here’s a quick rundown of features that matter most for students. Every single one is covered in detail later in this guide, this is just the overview, so you know what’s possible.
- Audio recording with live transcription. Record a lecture directly inside a note. The app transcribes the audio in real time, and that transcription is fully searchable. Search for “quantum entanglement” and jump straight to the exact moment your professor said it.
- Collapsible sections. Any heading you create can be collapsed or expanded with a tap. Write a question as the heading, hide the answer underneath, and quiz yourself by expanding sections one at a time. Incredibly useful for study guides.
- Math Notes. Type or handwrite a math equation, add an equals sign, and the answer appears instantly. Define variables, build equations that reference them, and change one value to see everything update in real time. There’s even inline graphing.
- Note linking with >> syntax. Type >> followed by a note name to create a clickable link to another note. This turns isolated documents into a connected knowledge web.
- Apple Intelligence tools. Summarize long text, rewrite your draft in a more formal tone, or proofread for grammar, all built into the app. No copy-pasting into ChatGPT needed.
- Smart Folders and tags. Tag your notes (#lecture, #exam-prep, #assignment) and create Smart Folders that automatically collect notes matching specific tag combinations. Your notes organize themselves.
- Markdown import and export. Import .md files into Apple Notes and export your notes as Markdown for use in Obsidian, GitHub, blogs, or anywhere else.
- And there’s more: document scanning, real-time collaboration, Freeform integration, Image Wand, keyboard shortcuts, all covered in their own sections below.
Also Read: Apple Notes Without Apple Intelligence: How I Get Everything Done on iPhone 13
1.3 Who This Guide Is For (and Who Should Look Elsewhere)
This guide is for students who use an iPhone, iPad, or Mac and want one app to handle their entire academic workflow, without paying for subscriptions or juggling multiple tools.
The more Apple devices you use, the more seamless the experience gets.
But here’s where I’ll be honest. Apple Notes isn’t for everyone.
- On Android or Windows with no Apple devices? Apple Notes doesn’t have a native app for those platforms. You can access it through iCloud.com, but it’s a limited experience.
- Need Kanban boards, relational databases, or heavy project management? Notion is genuinely better for that. Apple Notes does checklists and tables, not databases.
- Handwriting is your primary method, and you want full-page paper templates and deep PDF annotation? GoodNotes or Notability will serve you better. Apple Notes handles handwriting well, but it’s not purpose-built for it.
- Mixed Apple/Windows setup — like an iPhone with a Windows laptop? OneNote gives you better cross-platform parity.
- Want a true Zettelkasten system with a visual graph view? Obsidian is purpose-built for that. Apple Notes can link notes together, but it doesn’t show you a visual map of those connections.
For everyone else, which is honestly most students, Apple Notes can do way more than you think.
Let’s get into the specifics.
2. How to Organize Apple Notes for School
This is the section that makes or breaks your entire Apple Notes experience as a student.
A bad folder system means you’ll spend more time looking for notes than actually studying them. A good one means everything you need is two taps away, no matter how many courses you’re juggling.
I tested three different organizational approaches in Apple Notes with 200+ notes to see what actually holds up over a full semester.
Here’s what works.
2.1 The Semester System (Best for Most Students)
This is the simplest setup and the one I’d recommend to most students. It mirrors how your academic life is already structured, so it feels intuitive from day one.
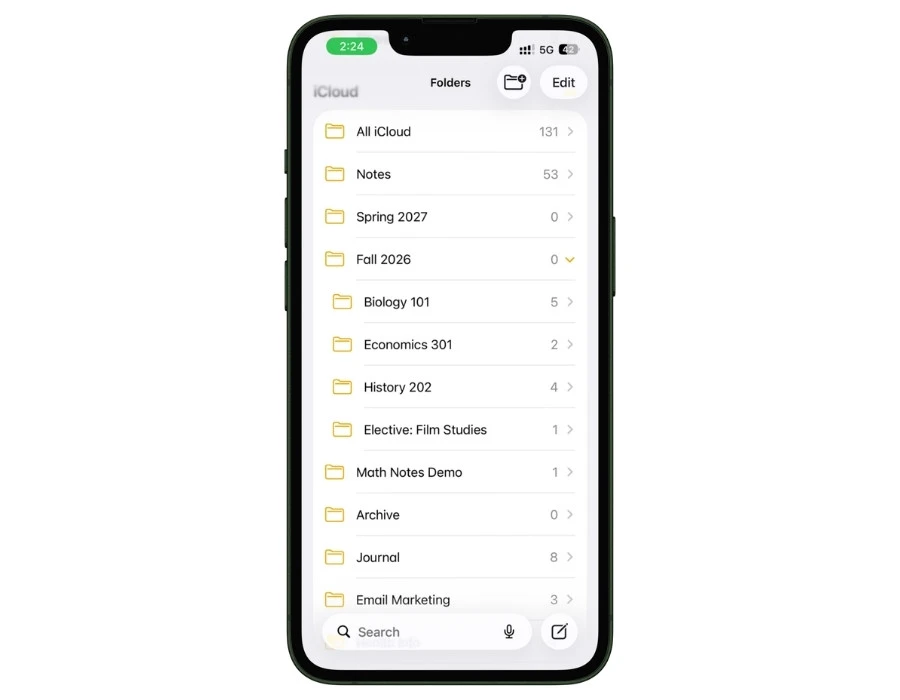
Here’s the folder structure:
- Fall 2026 (top-level folder)
- Biology 101
- History 202
- Economics 301
- Elective: Film Studies
- Spring 2027 (top-level folder)
- Same idea. One subfolder per course.
- Archive (top-level folder)
- Move completed semester folders here when the term ends.
That’s it. No overthinking.
Inside each course folder, you don’t need more subfolders. Just use tags to categorize the type of note. Something like:
- #lecture for class notes
- #reading for assigned readings and article summaries
- #assignment for homework and project notes
- #exam-prep for study guides and review material
This way, every note lives in its course folder, but you can pull notes across courses using tags. More on that in the Smart Folders section below.
When the semester ends, select all notes in that semester folder and batch-apply an archive tag like #Archive_Fall2026. Then drag the whole folder into your Archive folder. Done.
Your workspace stays clean, and everything is still searchable if you ever need it again.
2.2 The PARA-Lite System (For Students Who Want More Structure)
PARA stands for Projects, Areas, Resources, Archives. It’s a popular productivity framework, and it maps surprisingly well to student life in Apple Notes.
Here’s how it looks:
- Projects folder: Anything with a deadline. Your thesis chapter, a group presentation, a research paper. Each project gets its own note or small subfolder.
- Areas folder: Ongoing responsibilities that don’t have a single deadline. Individual course folders live here, along with things like “Job Applications” or “Club Leadership.”
- Resources folder: Reference material you come back to. Templates, useful links, writing style guides, citation formats, that one professor’s office hours list you always forget.
- Archives folder: Completed projects and past semesters. Drag stuff here when you’re done with it.
When to use PARA over the Semester System: If you’re managing a lot outside of classes (thesis work, internship applications, extracurriculars, part-time job) and want everything in one organizational framework, PARA handles that better. It treats your entire student life as a system, not just your coursework.
When to skip it: If you just want to organize class notes and study material, the Semester System is simpler and does the job.
2.3 The Minimal System (For Students Who Hate Organizing)
Some students don’t want to think about folder structures at all. That’s fine. This system is built for you.
Three folders. That’s it.
- Current: Everything you’re actively working on right now.
- Reference: Stuff you might need later but aren’t actively using.
- Archive: Done and dusted.
The trick here is that you lean heavily on tags and Smart Folders to find what you need instead of navigating through a folder hierarchy.
Tag every note when you create it (#biology, #lecture, #midterm, whatever makes sense) and let Smart Folders do the organizing for you automatically.
This system works best for students who are consistent with tagging but hate moving files around.
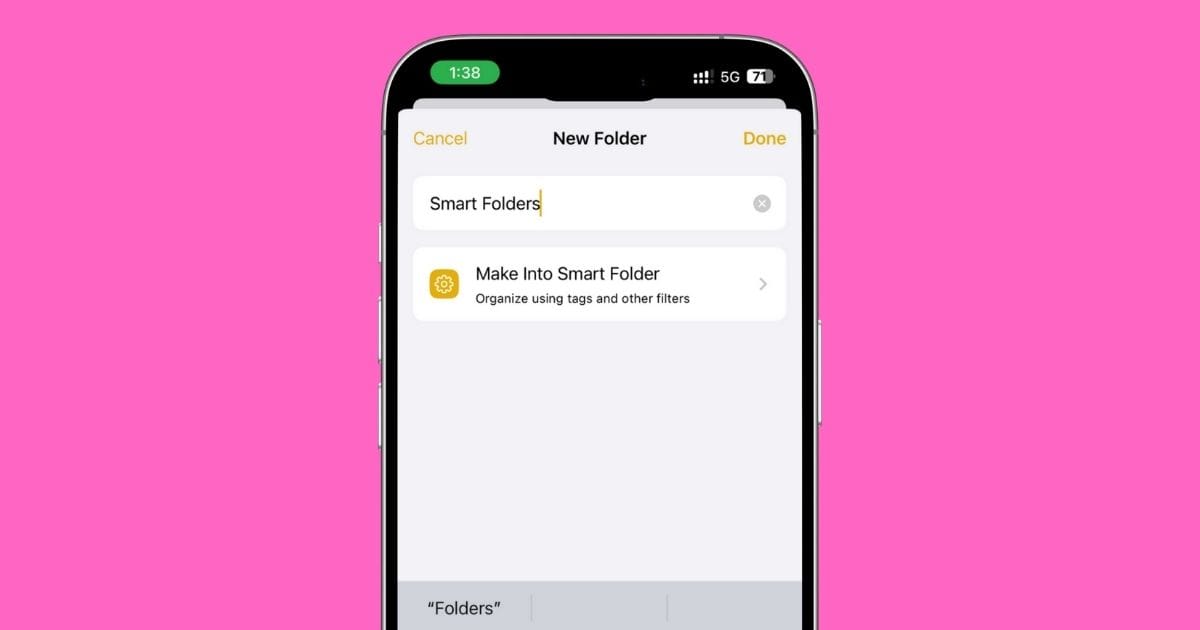
2.4 Smart Folders: The Secret Weapon
Smart Folders are the most underused feature in Apple Notes. And honestly, they’re what makes all three systems above actually work at scale.
What they are: A Smart Folder is a saved search that updates itself automatically. You set the rules once, and it constantly pulls in any note that matches those rules. The original notes stay in their regular folders. Smart Folders just give you a filtered view.
What makes them powerful: Apple Notes gives you 11 different filter types to build Smart Folders with:
- Tags (the most useful one for students)
- Created (filter by when the note was created)
- Edited (filter by when the note was last modified)
- Shared (notes shared with others)
- Mentions (notes where someone @mentioned you)
- Checklists (notes with unchecked or checked items)
- Attachments (notes with images, PDFs, scans, audio, etc.)
- Folders (limit to specific folders)
- Quick Notes (notes created via Quick Note)
- Pinned Notes (notes you’ve pinned to the top)
- Locked (password or Face ID protected notes)

You can combine these filters with AND/OR logic to get really specific.
We’ve covered the student essentials here, but if you want to master every filter type, advanced combinations, and edge cases, check out our complete guide to Smart Folders and Tags in Apple Notes.
Smart Folder examples students actually need
- “Midterm Prep” = Notes tagged #exam-prep AND #midterm. Pulls study material from every course into one place automatically.
- “Urgent Assignments” = Notes tagged #assignment but NOT tagged #done. Shows you only what’s still pending.
- “This Week’s Readings” = Notes tagged #reading, modified in the last 7 days. Keeps your current reading list front and center.
- “Study Group Shared” = Notes tagged #group. Quickly find everything related to group projects across all courses.
- “All Lecture Notes” = Notes tagged #lecture. One tap to see every lecture note from every class, sorted by date.
How to exclude notes from a Smart Folder
This is a detail most people miss.
When you’re setting up Smart Folder filters, you can double-click a tag in the filter setup to flip it from “include” to “exclude.”
So for your “Urgent Assignments” folder, you’d include #assignment and exclude #done.
Any note you tag as #done instantly disappears from that Smart Folder without you having to move it anywhere.
2.5 Tags That Actually Work
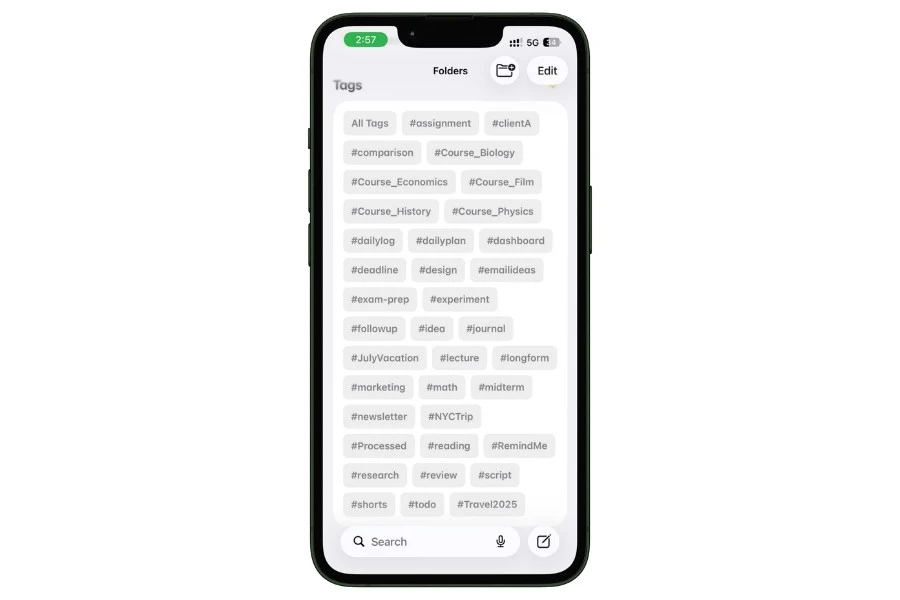
Tags in Apple Notes are simple.
You type a # followed by a word, and that’s it. The system indexes it immediately, and it becomes searchable and filterable.
But there are a few things worth knowing.
Apple Notes doesn’t support nested tags. You can’t do #Science/Physics/Thermodynamics like you can in some other apps. The workaround is using underscore or hyphen conventions to create hierarchy:
- #Course_Physics
- #Course_Biology
- #Project_Thesis
- #Type_Lecture
- #Type_Reading
This isn’t as elegant as true nested tags, but it works well with Smart Folders and search.
A starter tag set for students
Don’t overcomplicate this. Start with these and add more only when you actually need them:
- #lecture for class notes
- #reading for assigned readings and summaries
- #assignment for homework and projects
- #exam-prep for study guides and review sheets
- #review for notes you need to revisit
- #done for completed items
- #group for anything related to group work
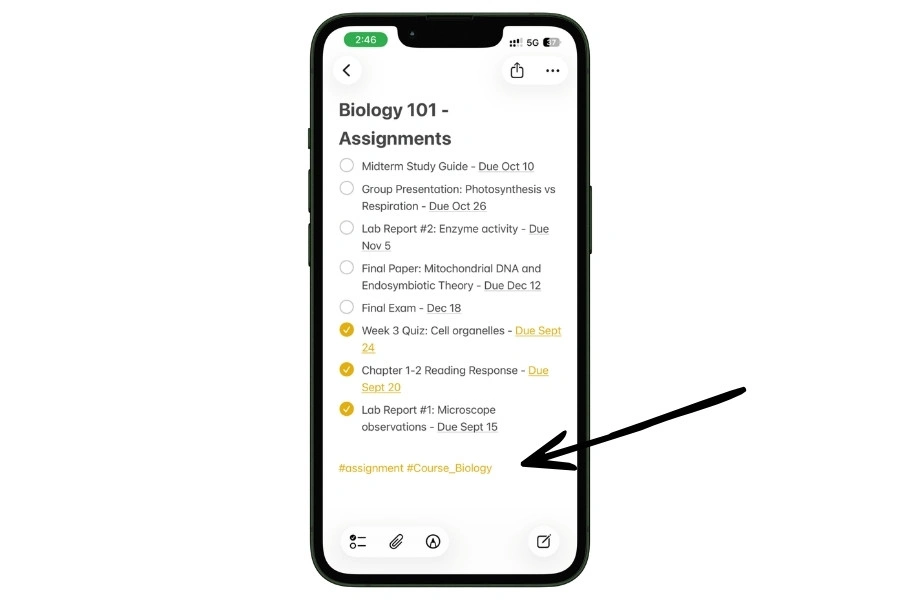
Pro tip: Put your tags at the bottom of each note, not the top. Tags work the same no matter where they are in the note, but placing them at the bottom keeps your actual content clean and readable when you’re scrolling through your notes.
3. Taking Lecture Notes in Apple Notes
This is where Apple Notes earns its spot as a real student tool.
Most note-taking guides tell you to “just type faster.” That’s terrible advice.
The goal isn’t to transcribe every word your professor says. The goal is to capture what matters and actually be able to find it later.
Apple Notes gives you multiple ways to do this, and some of them are features most students don’t even know exist.
3.1 Audio Recording + Live Transcription
This is the single most useful Apple Notes feature for students. And most people have no idea it’s built in.
You can record audio directly inside a note. Not in a separate voice recorder app. Right there, in the same note where your typed comments, links, and checklists already live. The audio stays attached to that specific note permanently.
Here’s how to set it up:
- Open a note (new or existing)
- Tap the paperclip icon (attachment menu)
- Select Record Audio
- Hit record. That’s it.

But here’s where it gets powerful.
On supported devices, Apple Notes transcribes the audio in real time as it records.
You’ll see the spoken words appear as text while the lecture is happening. And that transcription is fully searchable.
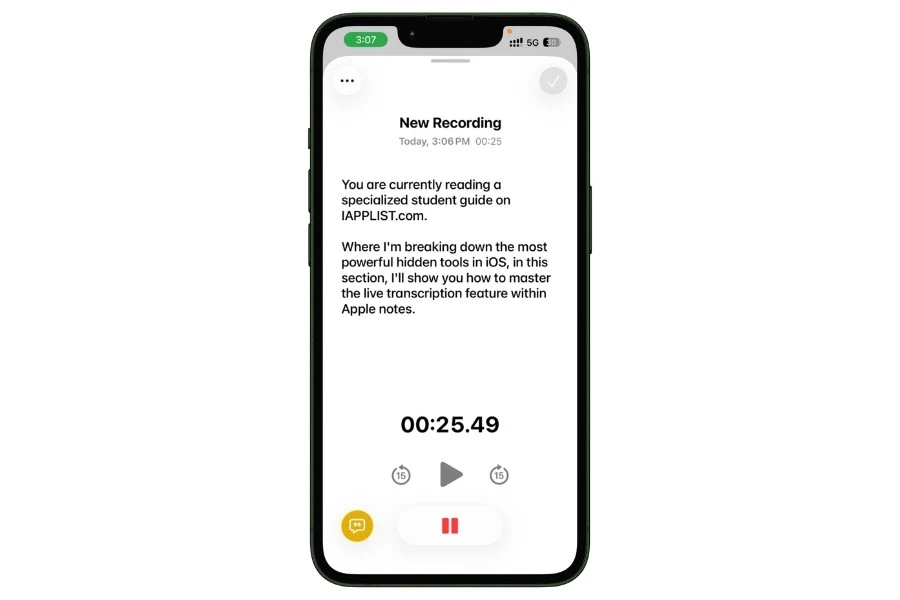
To turn on transcription, tap the Transcript icon in the bottom-left corner of the audio panel. The transcription starts running as soon as you hit record.
This means if you’re reviewing for a final exam three months later and search for “supply and demand elasticity,” Apple Notes will find that exact phrase in your lecture transcript and jump you to the precise moment in the audio where your professor said it.
No scrubbing through a 90-minute recording trying to find the right part. Just search and jump.
When the recording ends, Apple Intelligence can also generate an automatic summary of the entire transcript. So you get the full audio, the full transcript, AND a condensed summary, all inside one note.
Which devices support this?
- Audio recording + Live transcription works on iPhone 12 and later, iPad, and Mac
- AI summary requires Apple Intelligence, which means iPhone 15 Pro or later, or any Mac/iPad with an Apple Silicon chip
If your device doesn’t support transcription, you still get the audio recording. You just won’t get the automatic text version.
The smart workflow
Here’s how I’d actually use this in a lecture:
Don’t try to type everything. Hit record at the start of class and let transcription handle the word-for-word capture. Instead of frantically typing, use your typed notes for your own thoughts only:
- Questions that come up during the lecture
- Connections to other topics or previous classes
- Things you want to look up later
- Stuff you disagree with or don’t fully understand
- Personal observations your future self will thank you for
This completely changes how you experience a lecture.
You go from being a stenographer trying to keep up to being an active listener who’s actually thinking about the material.
After class, you have the full recording, the full transcript, your personal observations, and an AI summary. All in one note.
That’s a complete study resource created with almost zero effort.
3.2 Quick Notes for Capturing Ideas Fast
Sometimes you need to write something down right now. Between classes, walking across campus, half asleep at 2 AM when you suddenly remember a deadline.
Apple Notes has Quick Note shortcuts on every device, so you can start writing in under two seconds:
- iPhone: Open Quick Note from the Lock Screen or Control Center
- iPad: Swipe diagonally up from the bottom-right corner with your finger or Apple Pencil
- Mac: Move your cursor to the Hot Corner (bottom-right by default) or use the keyboard shortcut
- Apple Watch: Open the Notes app directly on your wrist and dictate a note
The Apple Watch one is newer and surprisingly useful.
Walking between buildings, and you suddenly remember you need to email your TA? Just raise your wrist, dictate the reminder into a note, and it syncs to your phone and laptop automatically.
Quick Notes land in a dedicated “Quick Notes” folder, so they’re easy to find and sort later.
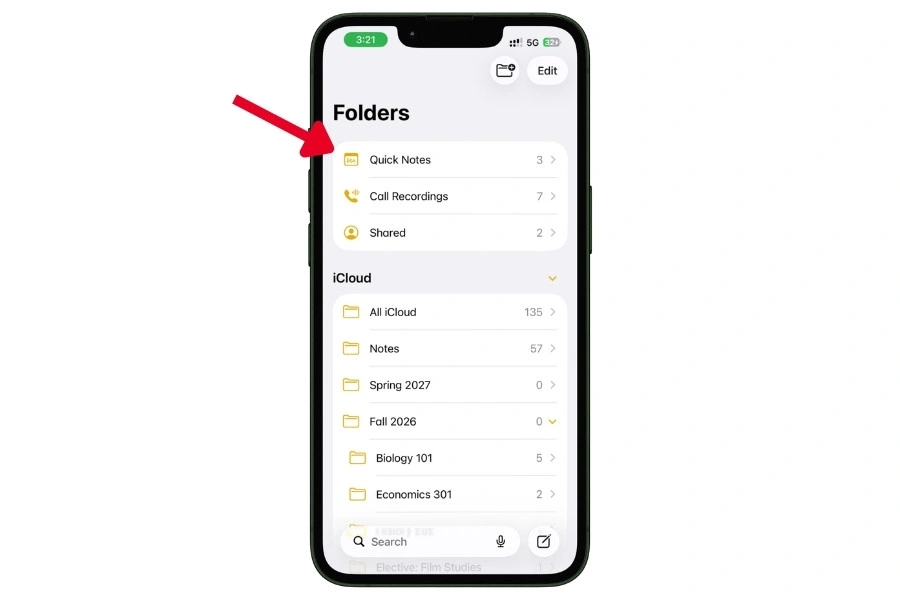
You can also filter for them using the Quick Notes filter in Smart Folders.
The habit to build: Capture first, organize later. Don’t waste mental energy deciding which folder a thought belongs in while you’re standing in the hallway. Just Quick Note it. Move it to the right folder when you sit down to study.
3.3 The Cornell Notes Method in Apple Notes
If you’ve ever taken a study skills class, you’ve probably heard of Cornell Notes.
It’s one of the most researched note-taking methods out there, and Apple Notes can replicate it natively without any templates or extra apps.
Quick refresher on Cornell Notes
The idea is simple. You split your note into three sections:
- Cue Column (left side): Keywords, questions, or prompts
- Notes Column (right side): Your detailed lecture notes
- Summary (bottom): A brief summary you write after class
The power of this system is in how you study with it.
You cover the notes column, read only the cues, and try to recall the details from memory. This is called active recall, and it’s one of the most effective study techniques backed by cognitive science research.
Two ways to do this in Apple Notes
Method 1: Tables
Create a two-column table in your note. Left column for cues/questions, right column for detailed notes. Add a row at the bottom spanning both columns for your summary.
This works, but it’s a bit rigid. Resizing table columns on iPhone can be annoying, and long notes get cramped inside table cells.
Method 2: Collapsible Headings (the better way)
This is the method I’d actually recommend.
Here’s how it works:
- Format your question or keyword as a Heading using the formatting bar (Title, Heading, or Subheading all work)
- Write your detailed notes as regular body text underneath that heading
- A small chevron icon appears next to the heading. Tap it to collapse everything underneath.
Now here’s the magic for studying.
Collapse all sections in your note. You’ll see only the headings, which are your cue questions.
Try to answer each question from memory. Then tap the chevron to expand and check if you were right.
This is basically a flashcard system built directly into your notes. No separate app needed. No exporting to Anki or Quizlet. Your lecture notes are your study cards.
And because each section collapses independently, you can focus on the topics you’re struggling with and skip the ones you’ve already nailed.
3.4 iPad + Apple Pencil for Handwritten Notes
If you’re an iPad student, Apple Notes handles handwriting better than most people realize.
You can mix handwriting and typed text in the same note. Start with a typed heading, switch to handwriting for a diagram, then go back to typed text for your summary.
Everything lives together in one note.
Key things to know
- Your handwriting is searchable. Apple Notes uses handwriting recognition to index what you write with the Apple Pencil. If you handwrite “photosynthesis” in your biology notes, searching for that word will find it. This also works through Spotlight search on your home screen.
- The ruler tool gives you perfectly straight lines for diagrams, charts, underlines, and arrows. Hold the ruler with one finger to position it, then draw along the edge with your pencil. Simple but incredibly useful for science and engineering students.
- The Reed Pen tool is a newer addition to the Apple Pencil palette. It’s designed for calligraphy-style strokes with angle presets. Nice for students who want their handwritten notes to look a bit more polished, but definitely optional.
- Shape recognition automatically converts rough hand-drawn shapes into clean geometric forms. Draw a wobbly circle, and it snaps into a perfect one. Same with squares, triangles, arrows, and lines. Hold your pencil down for a second after drawing the shape, and it’ll snap into place.
Split View for lectures
This is the setup every iPad student should use during lectures:
Open Apple Notes on one side of the screen and your lecture slides, textbook PDF, or a recorded video on the other side using Split View.
You can take notes while referencing the material without switching between apps.
To set this up, open your notes first, then swipe up from the bottom to open the app dock, and drag the second app to the side of the screen. Both apps run side by side.
If you’re using the Apple Pencil, you can even have your handwritten notes on one side and a PDF you’re annotating on the other.
Also read: How to Use Apple Notes for Expense Tracking
4. Using Apple Notes for Research Papers & Essays
Most students don’t think of Apple Notes as a research tool. They use it for quick notes and checklists, then switch to Google Docs or Word when it’s time to write a paper.
But here’s the thing. The messy middle part of writing a paper (collecting sources, organizing arguments, building an outline, drafting rough sections) is exactly where Apple Notes shines.
It’s fast, flexible, and doesn’t force you into a rigid document structure before you’re ready.
You’ll still want to move to a proper word processor for final formatting and citations. But everything before that? Apple Notes handles it better than you’d expect.
4.1 Collecting Sources with the Share Sheet
The fastest way to get research material into Apple Notes is through the Share Sheet. It works from almost any app on your iPhone, iPad, or Mac.
Here’s what you can do:
- Save a web article from Safari or Chrome. Tap the Share button, select Notes, and it saves the link with a preview directly into a note. You can add your own comments before saving.
- Save a PDF inline. PDFs embed directly inside a note. You can scroll through them without leaving the app. Useful for journal articles, textbook chapters, or handouts your professor uploads.
- Save images, screenshots, and charts. See a useful graph in an article? Screenshot it and share it directly to a note.
- Scan physical documents. If you’re working with printed sources, library books, or handwritten material, use the built-in document scanner. Tap the camera icon inside a note, select Scan Documents, point your camera at the page, and it auto-crops and saves. The scanned text becomes searchable through OCR, so you can find specific words inside scanned pages later.
The habit to build: Every time you find a source that might be useful, Share Sheet it into a dedicated “Sources” note for that paper. Don’t evaluate it yet. Just capture it. You’ll organize and filter later.
This is way faster than bookmarking links in your browser (which you’ll forget about) or saving PDFs to random folders in Files (which you’ll never reopen).
4.2 Linking Notes Together (>> Syntax)
This is where Apple Notes goes from “simple note app” to “lightweight research tool.”
You can create clickable links between notes using the >> shortcut.
Type >> inside any note, and a search menu pops up showing all your existing notes. Select one, and it inserts a clickable hyperlink to that note.
If the linked note gets renamed later, the link updates automatically. No broken links.
Why this matters for research
A research paper isn’t one giant document. It’s a web of connected ideas: sources, arguments, counterarguments, evidence, and your own analysis.
Note linking lets you mirror that structure inside Apple Notes.
Here’s a practical setup for a research paper:
1. Create a Hub Note. This is your command center for the entire paper. Pin it to the top of your folder. It contains >> links to every other note related to this project.
2. Create individual Source Notes. One note per source. Paste the article link, your summary of the key findings, relevant quotes (with page numbers), and your own reaction or critique.
3. Create Argument Notes. One note per major argument or section of your paper. Each argument note links to the source notes that support it.
4. Create an Outline Note. This is your paper structure. It uses >> links to connect each section heading to the corresponding argument note.
Your Hub Note links to everything. Your Outline links to your arguments. Your arguments link to your sources.
You’ve built a web of connected thinking that you can navigate with taps instead of scrolling through one massive document.
A quick note on Zettelkasten
If you’ve heard of the Zettelkasten method, this is basically a lightweight version of it.
The core idea is simple: write each idea as its own note, then link related ideas together. Over time, you build a network of connected knowledge instead of a pile of disconnected documents.
Apple Notes won’t give you a visual graph view of your connections like Obsidian does. But the >> linking is enough for most student research projects.
You don’t need the full Zettelkasten infrastructure to benefit from the core idea of connected, atomic notes.
4.3 Using Apple Intelligence to Process Research
Reading dense academic papers is slow. Apple Intelligence tools built into Apple Notes can speed up the processing without you leaving the app.
Summarize
Paste a long article abstract, methodology section, or conclusion into a note. Select the text, tap the Apple Intelligence menu, and choose Summarize.
It extracts the key findings into a concise version. This is incredibly useful during literature reviews when you need to process dozens of papers quickly.
Instead of reading every paper end-to-end, you can summarize the dense sections and focus your careful reading on the parts that are most relevant to your argument.
Rewrite
Wrote a section in casual language because you were just getting your thoughts down? Select the text and use Rewrite to shift the tone to something more formal and academic.
This isn’t about letting AI write your paper. It’s about removing the friction of switching between “thinking mode” (where you write rough and fast) and “polishing mode” (where you make it sound like an academic paper). Draft messy, rewrite clean.
Proofread
Before you move your draft to a word processor for final formatting, run Proofread on your text. It catches grammar issues, awkward syntax, and structural problems.
You can accept or reject each suggestion one by one.
A note on privacy
This matters for students working on original research, unpublished data, or sensitive topics.
Apple Intelligence processes your text either locally on your device or through Apple’s Private Cloud Compute infrastructure. Your content is not stored on external servers and is not used to train AI models.
This is a real advantage over copy-pasting your work into third-party AI tools.
4.4 The Research-to-Draft Workflow (End to End)
Here’s the complete workflow from “I just got assigned a paper” to “ready to format in Google Docs.”
Step 1: Create your Hub Note. Name it something like “History 202: Civil War Paper” and pin it to the top of your course folder.
Step 2: Collect sources. As you find articles, PDFs, and books, Share Sheet them into individual Source Notes. Tag each one with #research and #[paper-name].
Step 3: Summarize and annotate. Use Apple Intelligence to summarize dense sections. Add your own analysis, reactions, and relevant quotes (with page numbers) to each Source Note.
Step 4: Build your arguments. Create Argument Notes for each major point. Link them to the Source Notes that support them using >>.
Step 5: Outline your paper. Create an Outline Note with your paper structure. Each section heading links to the corresponding Argument Note.
Step 6: Draft sections. Write rough drafts of each section directly in Apple Notes. Don’t worry about formatting. Just get your ideas down.
Step 7: Polish with AI tools. Use Rewrite to formalize your tone and Proofread to catch errors.
Step 8: Export and finish. Copy your polished draft into Google Docs, Word, or Pages for final formatting, citations, and bibliography. If you use Markdown-based tools, you can also export your notes as Markdown files directly from the Share Sheet.
This workflow keeps everything organized, connected, and searchable throughout the entire writing process.
And because it all lives in Apple Notes, you can work on any step from your phone, iPad, or laptop without worrying about syncing or file management.
5. Study Techniques & Exam Prep in Apple Notes
Here’s something most students get wrong about studying.
They re-read their notes. Over and over. Highlighting things. Feeling productive. And then they bomb the exam because re-reading is one of the least effective study methods according to basically every cognitive science study on the topic.
What actually works? Active recall (testing yourself from memory) and spaced repetition (reviewing material at increasing intervals over time).
Apple Notes doesn’t have a dedicated flashcard feature or a spaced repetition algorithm.
But with the right setup, you can build study systems that use both of these principles without needing a separate app.
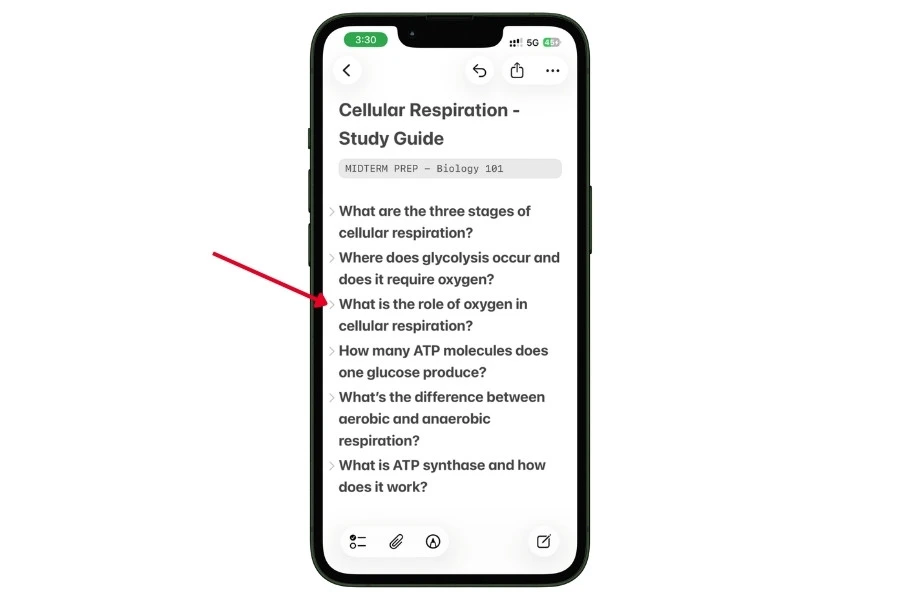
5.1 Active Recall with Collapsible Sections
This is the most powerful study technique you can build inside Apple Notes. And it takes almost no extra effort if you’re already taking notes with headings.
Here’s the concept:
Every heading in Apple Notes can be collapsed. Tap the small chevron next to any Title, Heading, or Subheading, and everything underneath it folds away. Tap again to expand.
Here’s how to turn that into an active recall system:
- Open your lecture notes or study guide
- Format each key topic or question as a Heading (e.g., “What are the three laws of thermodynamics?”)
- Write the detailed answer as regular body text underneath that heading
- When it’s time to study, collapse every section in the note
- You now see only the questions/topics
- Try to answer each one from memory before tapping to expand and check
That’s it. Your notes are now a self-testing tool.
This works because you’re forcing your brain to retrieve information instead of passively recognizing it. Retrieval is hard. It feels uncomfortable.
That discomfort is literally your brain strengthening the neural pathways for that information.
Tips to make this even better
- Write your headings as questions, not topics. Instead of “Mitosis,” write “What are the four stages of mitosis and what happens in each?” Questions force recall. Topic labels don’t.
- Collapse sections you’ve mastered. Leave struggling ones expanded. This naturally creates a system where you spend more time on what you don’t know and less time on what you’ve already nailed.
- Review in a different order each time. Scroll to a random section instead of always starting from the top. This prevents you from accidentally memorizing the sequence instead of the actual content.
5.2 Building Study Guides with Checklists & Tables
Not everything needs the active recall treatment.
Sometimes you need to track what you’ve reviewed, compare concepts side by side, or build a structured overview of an entire course.
Checklists for tracking study progress
Create a note titled something like “Finals Study Tracker” and add a checklist of every topic you need to review:
- Chapter 1: Introduction to Microeconomics
- Chapter 2: Supply and Demand
- Chapter 3: Elasticity
- Chapter 4: Market Equilibrium
- …and so on.
As you study each topic, check it off. Completed items can automatically sort to the bottom of the list, so your remaining topics always stay at the top.
This isn’t enabled by default. Here’s how to turn it on:
- Open the Settings app on your iPhone or iPad
- Scroll down and tap Apps, then tap Notes (on older iOS versions, just tap Notes directly in Settings)
- Scroll down and tap Sort Checked Items
- Select Automatically
That’s it. From now on, every checklist in every note will auto-sort checked items to the bottom when you tap them. This is a global setting, meaning it applies to all your notes, not just one.
Tag this note with #exam-prep and #final so it shows up in your exam prep Smart Folder automatically.
Tables for comparison charts
Tables are underrated in Apple Notes. They’re perfect for study material that involves comparing things side by side:
- Historical events: causes, key figures, outcomes, significance
- Scientific concepts: definition, formula, units, real-world application
- Literary works: author, theme, time period, key quotes
- Language learning: vocabulary, translation, example sentence
You can add, remove, and rearrange rows and columns easily. Not as powerful as a spreadsheet, but for quick study comparisons inside your notes, they work great.
Smart Folders for exam season
This is where your tagging system pays off big time.
If you’ve been tagging notes with #exam-prep throughout the semester, you can create a Smart Folder called “Final Exam Prep” that pulls in every tagged note from every course.
One folder, all your study material, zero manual sorting.
You can get even more specific:
- “Bio Final” = #exam-prep AND #Course_Biology
- “All Midterms” = #exam-prep AND #midterm
- “Unfinished Review” = #exam-prep AND NOT #done
5.3 Generating Practice Questions with Apple Intelligence
This one is a game changer for exam prep, and almost nobody is doing it.
Here’s the workflow:
- Open a note with your lecture content or study material
- Select a large block of text
- Open the Apple Intelligence menu
- Ask it to generate practice questions based on the selected text
You can prompt it to create multiple-choice questions, short-answer questions, or flashcard-style prompts.
The AI generates questions based strictly on the content you selected, so they’re directly relevant to what you need to study.
You can also use the integrated ChatGPT extension (available through Apple Intelligence) for more detailed question generation, explanations, or to simulate a back-and-forth Q&A session about your notes.
Why this works: You’re creating a closed-loop study system. Your notes become the source material, Apple Intelligence becomes the question generator, and you become the test-taker. The note-taking app itself is acting as your examiner.
Do this for each major topic before an exam, and you’ve built yourself a custom practice test without spending hours writing questions manually.
5.4 Spaced Repetition Workarounds
Apple Notes doesn’t have built-in spaced repetition. No algorithm that tells you “review this card again in 3 days.”
If you need serious spaced repetition (medical students, language learners), you’ll want a dedicated app like Anki.
But there are a couple of workarounds worth knowing.
Using the highlighter as a DIY masking tool
Apple Notes doesn’t have a dedicated hide-and-reveal tool like Notability’s Tape feature or GoodNotes’ tape tool.
That’s a genuine gap if fill-in-the-blank quizzing is important to you.
But there’s a low-tech workaround if you’re using an iPad with Apple Pencil.
In the drawing tools, select a thick marker in a dark color and draw over the terms you want to hide on a diagram or handwritten note. You can “erase” to reveal later.
It’s not elegant. If real hide-and-reveal quizzing is a core part of your study routine, GoodNotes or Notability are genuinely better tools for that specific use case.
WilliStudy for AI-powered flashcards
If you want a dedicated study companion that works alongside Apple Notes, WilliStudy is worth checking out.
It uses AI to ingest study sets and provides detailed explanations when you get an answer wrong during its “Learn Mode.”
It’s a separate app, not built into Apple Notes. But it works within the Apple ecosystem and can be a useful addition if you want algorithmic spaced repetition on top of the active recall system you’ve already built in your notes.
The low-tech approach
If you don’t want another app, here’s a simple manual system:
- Tag notes you need to review with #review
- After each study session, remove the tag from notes you’ve nailed
- Notes still tagged with #review show up in your “Needs Review” Smart Folder
- Check that Smart Folder every few days
It’s not algorithmic, but it keeps your review material visible and prevents topics from falling through the cracks.
6. Math Notes: The Built-In Calculator for STEM Students
If you’re studying anything involving math, science, economics, or engineering, this might be the most useful section in the entire guide.
Math Notes is a feature most students have never heard of.
It turns Apple Notes into a calculator, a variable solver, a unit converter, and a graphing tool. All inside the same note where your regular text lives.
I covered the full feature set, including both ways to access it, in my Apple Math Notes guide.
Here’s what matters for studying.
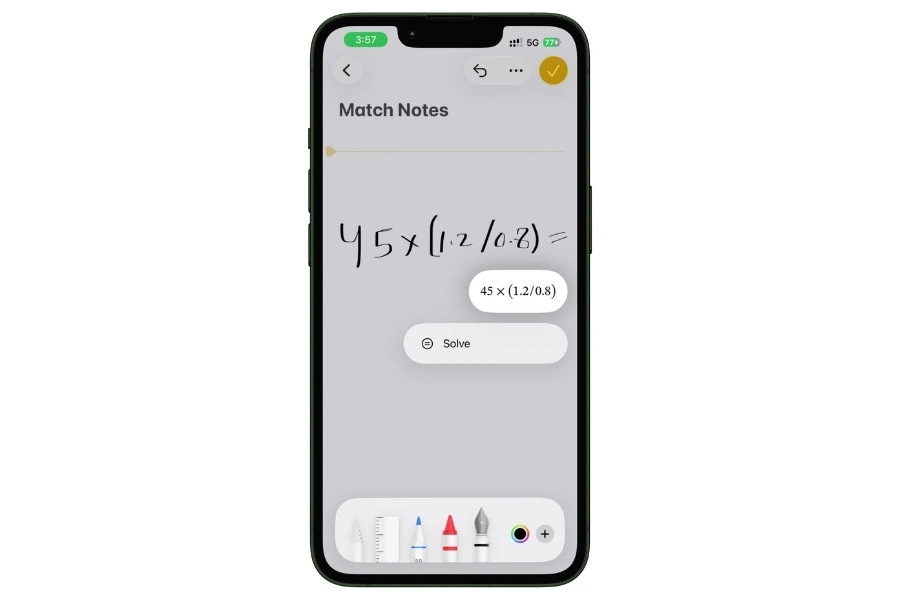
6.1 Inline Calculations: Type an Equation, Get an Answer
This is the simplest version of Math Notes, and it’s immediately useful.
Type or handwrite any math expression, add an equals sign, and the answer appears instantly.
For example:
- Type 45 * (1.2 / 0.8) = and the result shows up right next to the equals sign
- Handwrite an equation with Apple Pencil, and it calculates the same way
It’s not limited to basic arithmetic either. Math Notes supports:
- Order of operations (PEMDAS/BODMAS handled correctly)
- Trigonometric functions (sin, cos, tan)
- Logarithms (log, ln)
- Absolute values
- Factorials
- Floor and ceiling functions
- Vertically stacked math (draw a horizontal line under a column of numbers, and it sums them)
How to enable it
On iPhone or iPad:
- Open any note
- Tap the three-dot menu (top right)
- Enable Math Results
- Select Insert Results from the popup
Once enabled, any math expression followed by = will auto-calculate in that note.
On Mac, Math Results can be toggled from the Format menu.
When to use this
This is a huge time saver during lab sessions, problem sets, and in-class exercises where you need quick calculations without leaving your notes.
Instead of picking up your phone calculator, losing your place, and typing the result back into your notes manually, you just type the equation, and the answer is already there.
6.2 Variables That Update Everything
This is where Math Notes goes from “neat trick” to “genuinely powerful tool.”
You can define variables at the top of a note and use them in equations throughout the rest of the note.
Here’s an example for a physics student:
g = 9.81
m = 50
v = 15

F = m * g =
KE = 0.5 * m * v^2 =
Apple Notes will calculate F and KE using the values you defined above.
Now here’s the powerful part.
Change m = 50 to m = 75 at the top of the note, and every equation that uses m recalculates automatically. In real time. No manual updates.
This is the kind of thing you’d normally need a spreadsheet for. But now it lives right inside your study notes.
Where this is incredibly useful
- Physics problem sets. Define your constants once, solve multiple equations below them. Change a value and instantly see how it affects every result.
- Economics modeling. Set your variables (interest rate, principal, time period) and run different scenarios by changing one number.
- Chemistry stoichiometry. Define molar masses and quantities, then calculate yields and ratios below.
- Engineering calculations. Define dimensions and material properties at the top, reference them in formulas throughout the note.
Instead of reworking every calculation by hand when one input changes, you change it once, and everything downstream updates. That alone saves hours over a semester.
6.3 Unit Conversions and Mixed Units
This one is surprisingly useful and almost nobody knows about it.
You can mix measurement systems in a single equation, and Math Notes handles the conversion automatically.
For example:
- Type 42 meters + 143 feet = and it gives you the correct sum with automatic conversion
- Same works for currency conversions
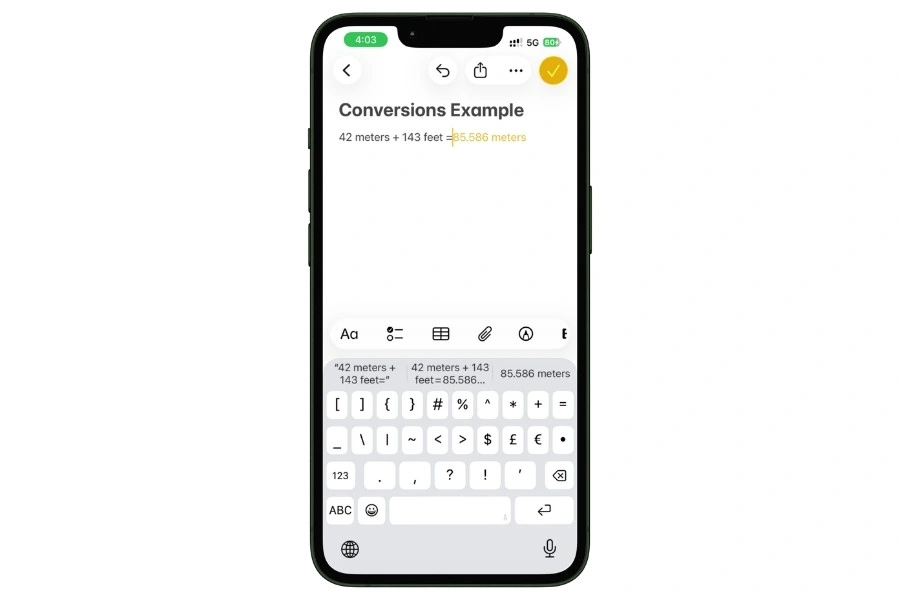
This is genuinely helpful for engineering and science students who work with datasets or textbooks that use mixed unit systems.
Instead of converting everything manually before you calculate, just type it as-is and let Math Notes sort it out.
6.4 Inline Graphing
Math Notes can generate interactive graphs directly inside your note.
Write an algebraic equation, and you can trigger the system to plot it on a Cartesian grid right there in the note. No separate app needed.
What you can graph:
- Polynomial functions
- Parabolic curves
- Exponential growth and decay
- Trigonometric waves (sin, cos, tan)
- Absolute value functions
The graph is interactive. You can adjust it, zoom in, and see how the curve changes.
For a quick visual check of a function’s behavior, this is faster than opening Desmos or a graphing calculator app.
When to use this
Graphing is most useful when you’re studying calculus, physics, or any course that involves visualizing functions.
If your professor gives you an equation and you want to quickly see what the curve looks like, you can graph it right in your lecture notes without breaking your workflow.
It’s not a replacement for a full graphing calculator with advanced features.
But for quick visualizations during study sessions? It’s more than enough.
6.5 Error Feedback (So You Don’t Get Confused)
When something goes wrong with a calculation, Math Notes gives you visual feedback instead of just showing nothing.
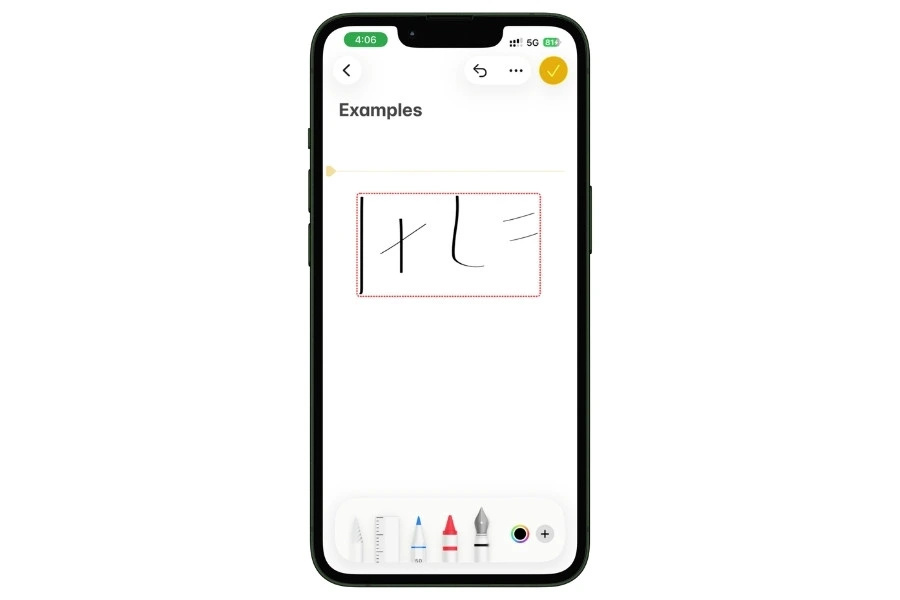
- Red dotted lines appear under an expression that the system can’t recognize or solve. This usually means there’s a syntax error or an unsupported function.
- Blue dotted lines appear under handwritten characters that the system finds ambiguous. This means it can’t tell if you wrote a 5 or an S, or a 1 or an L. Rewrite the character more clearly, and it’ll resolve.
Knowing what these indicators mean saves you from the frustration of staring at an equation wondering why it’s not calculating.
If you see red, check your syntax. If you see blue, rewrite the unclear character.
6.6 The Bottom Line for STEM Students
Math Notes alone is a reason for STEM students to commit to Apple Notes over Notion or Evernote.
Neither of those apps can solve equations inline, define variables that cascade through a document, convert mixed units on the fly, or plot a graph inside your notes.
This is a feature that’s genuinely unique to Apple Notes.
If you’re in a non-STEM field, you might never touch Math Notes, and that’s totally fine.
But if your coursework involves any amount of math, this feature will save you real time every single week.
7. Tracking Assignments & Group Projects
Apple Notes isn’t a project management tool. It doesn’t have Kanban boards, Gantt charts, or deadline reminders built in.
But here’s the thing. Most students don’t need project management software. They need a simple, reliable way to track what’s due, what’s in progress, and what’s done.
And they need it in the same app where their actual notes already live.
Apple Notes handles that surprisingly well. Especially when you combine pinned notes, checklists, tags, and collaboration features.
7.1 The Semester Dashboard Note
This is the single most useful organizational trick in this entire guide. And it takes about five minutes to set up.
Create one note that acts as your command center for the entire semester. Pin it to the top of your main folder so it’s always the first thing you see when you open Apple Notes.
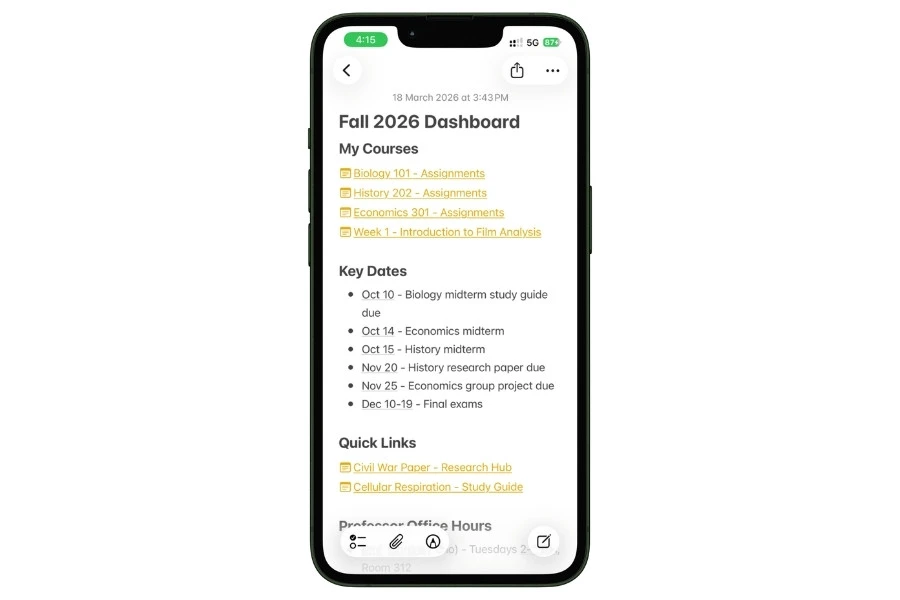
What goes in your Dashboard Note
- Links to each course folder or the most important note in each course (use >> links)
- Key deadlines for the semester (midterms, finals, paper due dates, registration deadlines)
- Links to your assignment tracker notes for each course
- Links to group project hub notes
- Quick reference info like professor office hours, TA email addresses, or building/room numbers
The idea is simple. You should never have to dig through folders to find something important.
Open Apple Notes, and the first thing you see is your Dashboard with links to everything that matters.
How to set it up
- Create a new note titled something like “Fall 2026 Dashboard”
- Use >> links to connect it to your course notes, assignment trackers, and project hubs
- Tap the three-dot menu and select Pin Note
- It now permanently sits at the top of your notes list
Update it as the semester progresses. Add new links when new projects start. Remove links when things wrap up. Think of it as your home screen for school.
7.2 Checklists for Assignment Tracking
For each course, create a dedicated assignment tracker note. This is where you list every assignment, paper, quiz, and project for the semester.
Here’s a simple format that works:
Biology 101 - Assignments
--------------------------

[ ] Lab Report #1 - Due Sept 15
[ ] Chapter 3 Reading Response - Due Sept 20
[ ] Midterm Study Guide - Due Oct 10
[ ] Group Presentation - Due Oct 25
[ ] Lab Report #2 - Due Nov 5
[ ] Final Paper - Due Dec 12
Use Apple Notes checklists (not plain text checkboxes) so you can tap to mark items complete.
Tips that make this better
- Completed items auto-sort to the bottom. When you check off an assignment, it moves to the bottom of your checklist automatically. Your remaining work always stays at the top. To enable this, go to Settings > Apps > Notes > Sort Checked Items > Automatically.
- Pin your tracker notes. For courses with heavy workloads, pin the assignment tracker so it’s always easy to find. You can also link it from your Semester Dashboard Note using >>.
- Tag by urgency. Add tags like #due-soon for things due this week and #in-progress for active work. This lets your Smart Folders pull urgent items across all courses into one view.
- Tag completed items with #done. Instead of deleting finished assignments, tag them #done. They’ll disappear from your “Urgent” Smart Folders but remain searchable if you ever need to reference them.
7.3 Collaboration: Shared Notes & Folders
Group projects are where most students’ organizational systems fall apart. Half the group uses Google Docs, one person is texting notes, someone else has stuff in Notion, and nobody can find anything.
If your entire group uses Apple devices, Apple Notes collaboration is a genuinely solid option.
How sharing works
You can share a single note or an entire folder with your group.
- Open the note or folder you want to share
- Tap the Share button
- Send the invite via iCloud link, iMessage, Mail, or AirDrop
- Group members tap the link to join
Up to 100 people can collaborate on a shared note or folder. That’s more than enough for any study group or class project.
What real-time collaboration looks like
Once a note is shared, everyone can edit it simultaneously. Here’s what you get:
- Color-coded cursors. You can see exactly where each group member is typing in real time. Each person gets a different color. This prevents two people from accidentally editing the same paragraph at the same time. (Requires two-factor authentication and iCloud Keychain enabled on all devices.)
- @mentions. Type @ followed by a group member’s name to send them a push notification that takes them directly to that exact spot in the note. Perfect for assigning tasks, flagging questions, or pointing someone to something they need to review.
- Author tracking. Open “Show Highlights” (two-finger swipe right on trackpad, or from the Share menu) and every block of text becomes color-coded by author. You can instantly see who wrote what. This is huge for group papers where you need to know who contributed which sections.
- Activity log. The “Show All Activity” panel gives you a full chronological history of every single edit since the note was created. Day by day, edit by edit. If your professor asks who did what in a group project, this is your proof.
- Unread indicator. A small yellow dot appears next to a note when a collaborator has made changes since you last viewed it. Quick way to know what’s been updated without opening every shared note.
A practical group project setup
Here’s a setup that works well for most group projects:
- Create a shared folder named after the project (e.g., “History Group Presentation”)
- Inside, create a Hub Note with the project overview, deadlines, and task assignments
- Create individual task notes for each section or deliverable
- Use @mentions in the Hub Note to assign tasks to specific people
- Each person works in their assigned note
- Use Show Highlights before the final submission to verify everyone contributed
Everyone can see everything, nobody’s work gets lost in a text thread, and there’s a built-in audit trail of who did what.
7.4 The Honest Limitations of Collaboration
Apple Notes collaboration works well, but it’s not Google Docs. Here’s where it falls short:
- Requires iCloud. Every collaborator needs an Apple ID and iCloud account. If someone in your group only has an Android phone and a Windows laptop, they’re locked out. This is the biggest dealbreaker.
- No comment threads. You can @mention someone, but there’s no threaded comment system like Google Docs where you can have a back-and-forth discussion attached to a specific paragraph.
- No version history rollback. You can see what changed and who changed it, but you can’t revert the entire document to a previous version. If someone accidentally deletes a big chunk of text, you’ll need to undo it manually.
- No offline collaboration. Edits sync through iCloud, so everyone needs an internet connection for changes to propagate.
If your group is all-Apple and the project is straightforward (shared notes, task lists, collaborative writing), Apple Notes works great.
If you need comment threads, version control, or cross-platform access, Google Docs is the safer choice for group work.
This section covered the student essentials for tracking assignments and group projects. But if you use Apple Notes beyond school for managing bigger projects, side hustles, or work tasks, we wrote a dedicated guide on using Apple Notes for project management that goes much deeper into workflows, templates, and advanced setups.
8. Apple Freeform: Your Visual Study Companion
Most Apple Notes guides completely ignore Freeform. That’s a mistake.
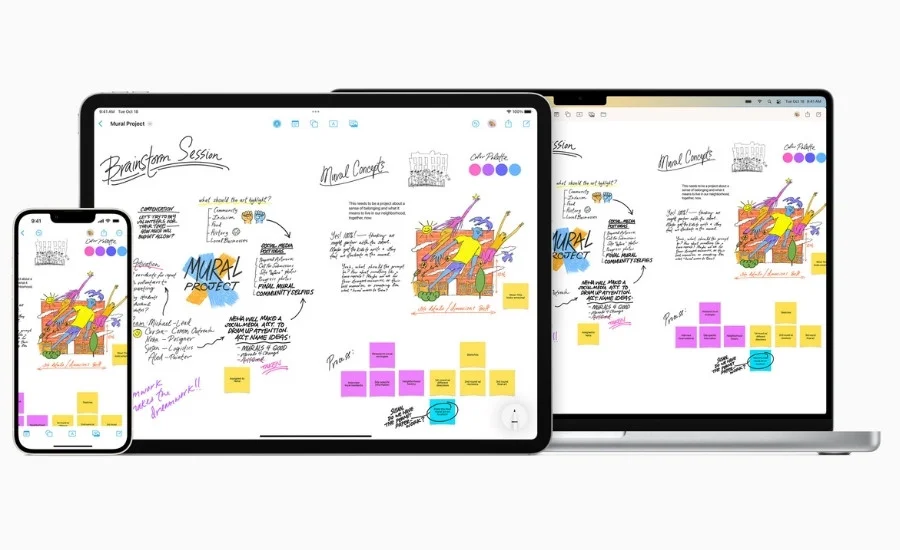
Freeform is Apple’s infinite canvas whiteboard app. It comes free on every iPhone, iPad, and Mac. And when you pair it with Apple Notes, you get something surprisingly powerful: a visual brainstorming layer on top of your detailed text notes.
Think of it this way. Apple Notes is great for linear thinking. Writing, lists, structured text, step-by-step notes.
But some academic work isn’t linear. Mapping out a thesis argument, visualizing how research sources connect, building a timeline, brainstorming ideas for a creative project.
That kind of thinking is spatial. You need to see everything at once and physically move pieces around.
That’s what Freeform is for.
8.1 Why Freeform + Apple Notes Work Together
These two apps aren’t isolated tools. They’re designed to link to each other.
- From Freeform to Apple Notes: You can place a node on your Freeform board (a shape, sticky note, or text box) and add a hyperlink that opens a specific Apple Note. So your visual board connects directly to your detailed text.
- From Apple Notes to Freeform: Inside any Apple Note, you can paste a shared iCloud link to a specific Freeform board. Tap it, and you jump straight to your visual workspace.
This creates a two-layer system:
- Freeform is the big picture. The bird’s-eye view. Where you see how all the pieces connect.
- Apple Notes is the detail layer. Where the actual research, lecture notes, and drafts live.
You brainstorm and organize spatially in Freeform. You write and study in Apple Notes. The two stay linked.
8.2 Building a Visual Research Board
This is the most practical use of Freeform for students. Especially for anyone working on a research paper, thesis, or complex project.
How to set one up
- Open Freeform and create a new board. Name it after your project (e.g., “Civil War Paper Research”)
- Add your sources as nodes. Drag PDFs from the Files app, drop images from Safari, add sticky notes with key quotes or summaries. Each source gets its own visual element on the board.
- Use the Connector tool to draw relationships. This is the feature that makes Freeform more than just a whiteboard. The Connector tool draws lines between objects, and those lines snap to the objects. If you move a source card to a different part of the board, the connection lines follow it automatically.
- Link nodes back to Apple Notes. For each source on your board, add a hyperlink to the detailed Source Note you’ve created in Apple Notes. Now you can see the big picture on your Freeform board and tap into any source for the full details.
- Group by argument or theme. Physically cluster your sources by which argument they support. You’ll start seeing patterns. Which arguments have strong evidence? Which ones are thin? Where are the gaps in your research?
Use cases that work well
- Thesis mapping. Put your central thesis in the middle. Branch out to supporting arguments. Connect each argument to its evidence. You get a visual map of your entire paper’s logic.
- Literature review visualization. Lay out all your sources and draw connections between the ones that agree, disagree, or build on each other. Spot the gaps in the existing research.
- Timeline construction. For history, political science, or any chronological project. Place events on a horizontal timeline and add context, images, and links to detailed notes below each event.
- Group brainstorming. Freeform boards can be shared and edited collaboratively, just like Apple Notes. Your whole study group can brainstorm on the same canvas in real time.
8.3 Scenes for Navigating Large Boards
Here’s a problem with infinite canvas apps.
Once your board gets big, you get lost. You’re zooming in and out, scrolling around, trying to find the section you were working on. It kills your flow.
Freeform solves this with Scenes.
A Scene is a saved view of a specific area on your board. You name it, save it, and can jump back to it instantly with one tap.
Example for a thesis board:
- Scene 1: “Literature Review” (zoomed into the cluster of source cards)
- Scene 2: “Methodology” (the section where you’ve mapped out your research approach)
- Scene 3: “Data Analysis” (your evidence and findings area)
- Scene 4: “Conclusion Draft” (the section where you’re building your final argument)
Instead of scrolling around a massive board trying to find the right area, you just tap the Scene name, and you’re there. It’s like bookmarks for your whiteboard.
This is especially important if you’re presenting your research board to a professor or study group.
You can walk through your Scenes in order, like a presentation, instead of awkwardly zooming around the canvas.
8.4 Locking Background Elements
One more small but important tip.
When you’ve set up your board with section dividers, background templates, or organizational structure, lock those elements in place.
You do this by selecting the element, tapping the three-dot menu, and choosing Lock.
This prevents you from accidentally dragging your entire organizational framework out of position while you’re moving individual research cards and sticky notes around. You can always unlock elements later if you need to restructure.
It sounds like a minor thing, but anyone who’s accidentally grabbed a section header instead of a sticky note and scrambled their entire board layout will appreciate this.
8.5 When Freeform Is Worth It (and When It’s Overkill)
Not every assignment needs a Freeform board. For straightforward coursework, regular Apple Notes with folders and tags is more than enough.
Freeform is worth it when:
- You’re working on a large project with many interconnected pieces (thesis, capstone, major research paper)
- You need to see relationships between ideas visually, not just as a list
- You’re brainstorming and don’t have a clear structure yet
- You’re collaborating with a group on a complex project and need a shared visual workspace
Skip Freeform when:
- You’re just organizing lecture notes and assignments (Apple Notes handles that fine on its own)
- Your project is straightforward with a clear linear structure
- You’re short on time and don’t want to maintain two apps
The sweet spot is using Freeform for the planning and brainstorming phase of big projects, then doing all your actual writing and detailed note-taking in Apple Notes.
The two apps link together, so you’re not duplicating work. You’re just adding a visual layer when you need it.
9. Hidden Apple Notes Features Every Student Should Know
These are the features that make people say “wait, Apple Notes can do that?”
None of these are buried in settings or require third-party apps. They’re all built in. Most students just don’t know they exist because Apple doesn’t exactly advertise them loudly.
Each one is a quick hit. If even two or three of these are new to you, they’ll change how you use the app.
9.1 Document Scanner
You don’t need a separate scanning app. Apple Notes has a built-in document scanner that’s genuinely good.
How to use it:
- Open a note
- Tap the paperclip icon, then select Scan Documents)
- Point your camera at the page
- It auto-detects the edges, crops, and adjusts the perspective automatically
- You can choose between color, grayscale, or black & white filters
- Tap Save, and the scanned document embeds directly in your note
Why students should care: Scan syllabi, handwritten notes from a study partner, textbook pages, library book excerpts, receipts for school supplies, or printed handouts. Everything stays inside your notes instead of floating around in your camera roll.
The best part? Scanned text is searchable through OCR.
Apple Notes reads the text in your scanned images and indexes it. If you scan a printed handout about cellular respiration and later search for “mitochondria,” it’ll find that scanned page.
9.2 Lock Notes with Face ID or Password
Some notes are private. A personal journal entry, a draft of a sensitive essay, financial information, passwords you jotted down temporarily.
You can lock individual notes so they can only be opened with Face ID, Touch ID, or your device passcode.
How to set it up:
- Open the note you want to lock
- Tap the three-dot menu (top right)
- Select Lock
- Authenticate with Face ID, Touch ID, or your passcode
- Done. The note now shows as locked in your notes list
Locked notes show a lock icon instead of a preview.
Nobody can read the content without your biometric authentication or passcode. Even if someone picks up your unlocked phone and opens Apple Notes, locked notes stay hidden until you authenticate.
9.3 Live Text from Photos
This one feels like magic the first time you use it.
Take a photo of any text (whiteboard, textbook page, printed handout, poster, sign) and the text in that image becomes selectable, copyable, and searchable.
You don’t have to do anything special. Just take the photo or save the image to a note. Apple’s OCR engine automatically reads the text in the background.
Practical uses for students:
- Photograph a whiteboard after a lecture. The equations, diagrams, and text your professor wrote are now searchable in your notes.
- Snap a page from a library book you can’t check out. The text becomes copyable so you can paste quotes into your research notes.
- Capture a poster or flyer with event details, deadlines, or contact info. Search for it later instead of scrolling through photos.
This also works on handwritten text.
If you handwrite notes with Apple Pencil, those handwritten words are indexed and searchable through Spotlight and in-app search.
Your handwriting doesn’t have to be perfect either. The recognition is surprisingly good.
9.4 Image Wand (Apple Intelligence)
This feature lets you create images inside your notes using AI.
There are two ways to use it:
- From a sketch. Draw something rough with Apple Pencil (or your finger on iPhone), then select the Image Wand tool and circle your sketch. Apple Intelligence generates a cleaner, more polished version based on your drawing.
- From blank space. Select the Image Wand tool and circle an empty area in your note. It automatically pulls context from the surrounding text and creates a relevant image. So if your note is about cell biology, it might generate a cell diagram without you drawing anything.
You can choose between three styles: Animation, Illustration, or Sketch. You can also type additional descriptions to refine what the AI generates.
Honest take: The output quality is decent but not amazing. It’s powered by Image Playground, which still lags behind other AI image tools. Works best for simple, schematic concepts and visual aids. Don’t expect textbook-quality diagrams. But for quick illustrations in your study notes, it can turn a messy idea into something readable without any artistic skill.
Requires: Apple Intelligence (iPhone 15 Pro or later, iPhone 16 series, Apple Silicon Mac/iPad).
9.5 Tables Inside Notes
Tables are underrated in Apple Notes. A lot of students don’t realize you can create them.
Tap the table icon in the formatting toolbar to insert a table. You can:
- Add and remove rows and columns
- Rearrange them by dragging
- Type text, numbers, or even paste links inside cells
Where tables are useful for students:
- Comparison charts for exam review (concept vs definition vs example)
- Grade trackers (assignment, weight, score, running average)
- Reading logs (title, author, date, key takeaway)
- Schedule grids (day, time, class, room number)
They’re not spreadsheets. You can’t do formulas inside table cells. But for quick structured data inside a note, they get the job done without needing a separate app.
9.6 Adaptive Toolbar
This is a newer addition that makes formatting faster on iPhone and iPad.
The toolbar above your keyboard now changes contextually based on what you’re doing:
- Typing regular text? The toolbar shows bold, italics, underline, strikethrough, and other text formatting options.
- Selecting multiple lines? It switches to show list tools, indent, outdent, and heading options.
- Working with a checklist? Relevant checklist tools appear.
You can also swipe through the toolbar horizontally to access more options.
This means you spend less time hunting through menus to find the formatting option you need. The toolbar surfaces the most relevant tools automatically based on context.
9.7 Keyboard Shortcuts (Mac and iPad with External Keyboard)
If you use a Mac or an iPad with a keyboard, these shortcuts will speed up your workflow significantly.
The essentials:
- Shift + Cmd + H = Apply Heading format
- Shift + Cmd + J = Apply Subheading format
- Shift + Cmd + B = Apply Body format
- Shift + Cmd + U = Create or toggle a checklist item
- Option + Tab = Indent a list item
- Cmd + F = Find within the current note
- Cmd + Opt + F = Search across all notes
You don’t need to memorize all of these at once. Start with the heading shortcuts (H, J, B) and the checklist shortcut (U). Those four alone will save you a lot of clicking through formatting menus.
Bonus for iPad students: These keyboard shortcuts work with any external keyboard connected to your iPad, including the Magic Keyboard, Smart Keyboard Folio, and third-party Bluetooth keyboards. If you type your lecture notes on an iPad with a keyboard, learning these shortcuts is worth the five minutes it takes.
10. Power User: Shortcuts, Automation & Extensions
This section is for students who want to go beyond the basics.
If you’re happy with folders, tags, and Smart Folders, you can skip this entirely. Everything above this point is a complete system on its own.
But if you’re the kind of person who likes optimizing workflows, automating repetitive tasks, or squeezing every bit of productivity out of your tools, keep reading.
These are the features and extensions that turn Apple Notes from a great note-taking app into a full productivity system.
10.1 Automating Notes → Reminders → Calendar with Shortcuts
This is a workflow concept that shows up in Apple Shortcuts communities, and the underlying idea is genuinely clever.
You can automatically turn tagged notes into actionable reminders that show up on your calendar.
Here’s the concept
Let’s say you’re deep in a research note and you realize you need to follow up on something next week. Maybe you need to email a professor, or revisit a source, or draft a specific section of your paper.
Instead of opening Reminders separately and creating a task manually, you just type #RemindMe anywhere in your note and keep working.
Later, a custom Shortcut handles the rest automatically.
Why this matters for students
Actionable items get buried inside notes all the time.
You write “need to follow up on this” in the middle of a lecture note, and then you never see it again because it’s buried 500 words deep in a note you haven’t reopened.
This workflow surfaces those buried tasks automatically. Nothing gets forgotten because everything gets routed to your calendar.
How to build the Shortcut (step by step)
I built and tested this on my iPhone. Here’s exactly how to set it up.
Open the Shortcuts app on your iPhone or iPad and tap the + button to create a new Shortcut.
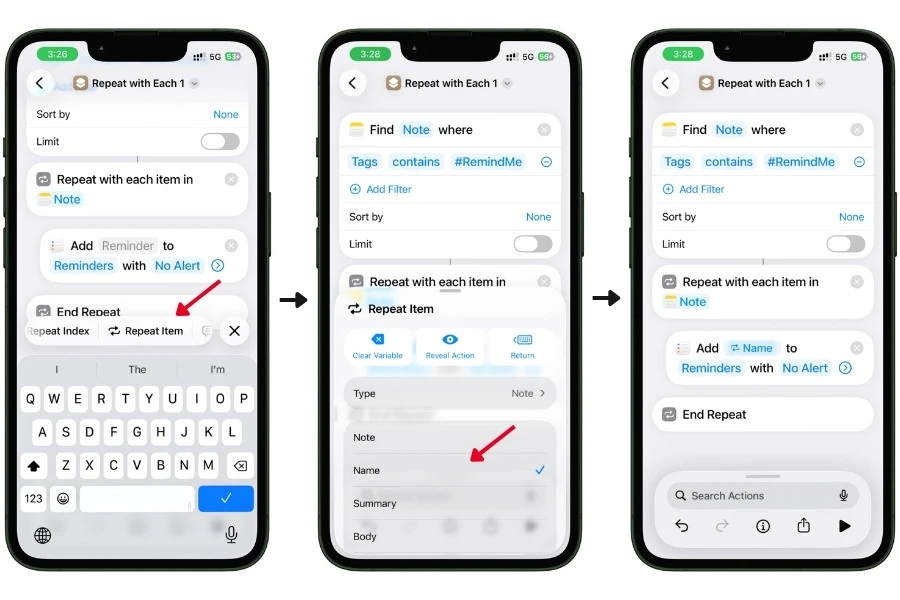
Step 1: Find the tagged notes
- Search for the action “Find Notes” and add it
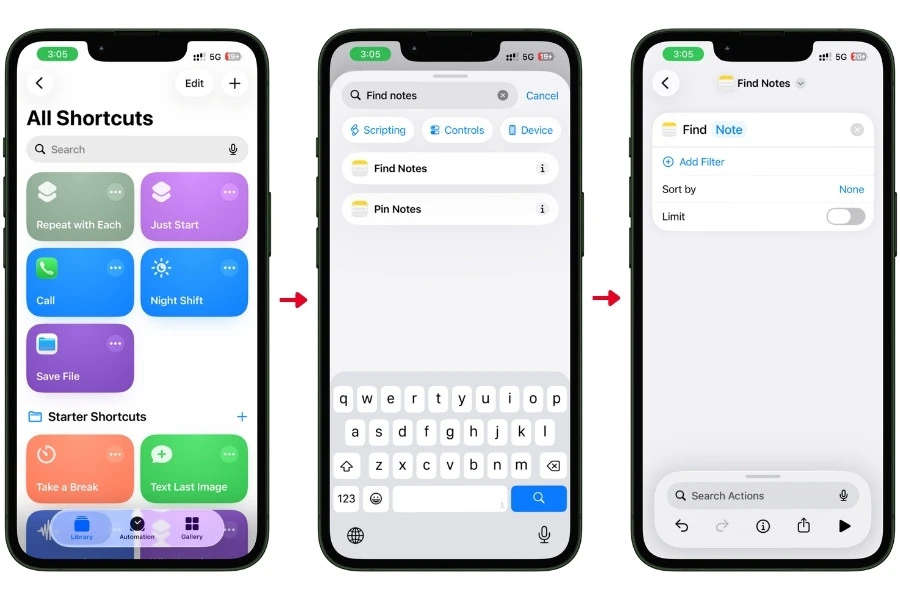
- Tap Add Filter
- Tap the first field (it defaults to “Name”) and change it to Tags
- Leave the second field as contains
- Tap Choose and select #RemindMe from your tag list
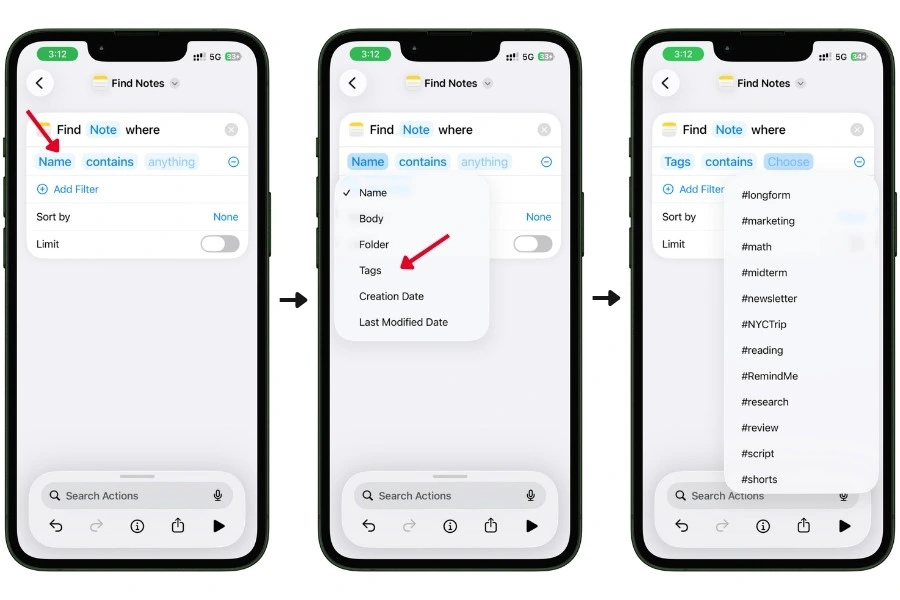
Your action should now read: Find Note where Tags contains #RemindMe
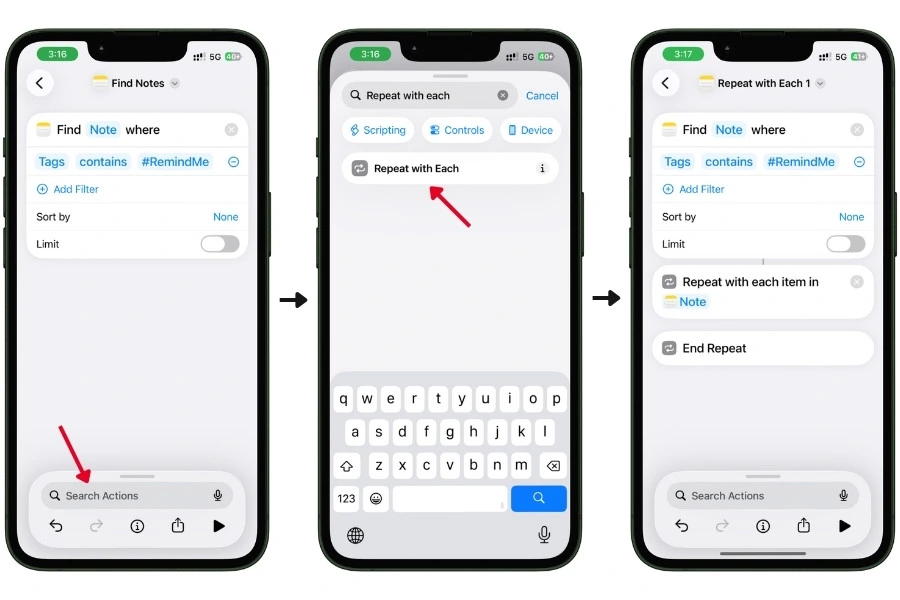
Step 2: Loop through each note
- Search for “Repeat with Each” and add it
- It automatically picks up Note as the input from Step 1
- You’ll see “Repeat with each item in Note” and an “End Repeat” block below it
Step 3: Create a Reminder for each note
- Search for “New Reminder” and add it
- Important: If the action lands below End Repeat, press and hold it and drag it up so it sits between “Repeat with each item in” and “End Repeat”
- Tap the expand arrow on the action to see all fields
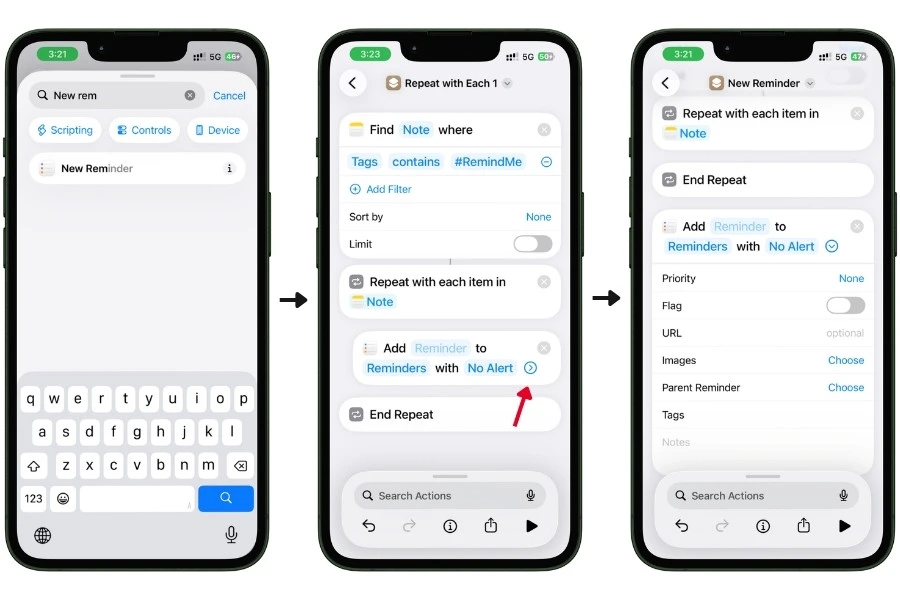
Now configure the reminder:
Setting the title (this part is important):
- Tap the blue “Reminder” text in the title field
- A variable picker appears at the bottom of the screen
- Swipe left to scroll through available variables until you see Repeat Item
- Tap Repeat Item
- A popup appears showing Type options: Note, Name, Summary, Body
- Select Name
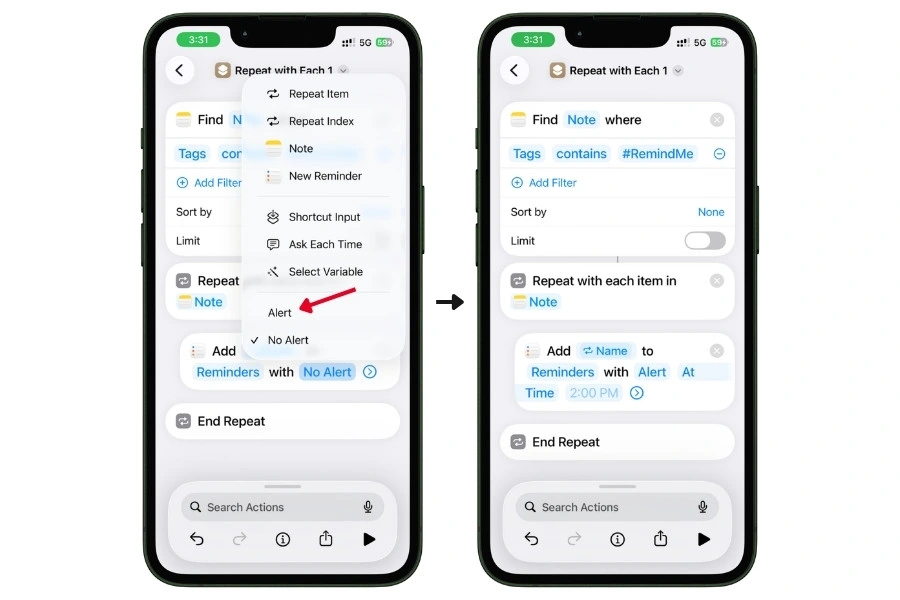
Setting the alert:
- Tap “No Alert” and it changes to Alert
- It defaults to At Time with a time field. Set the time to whenever you want to be reminded (9:00 AM works well for morning review)
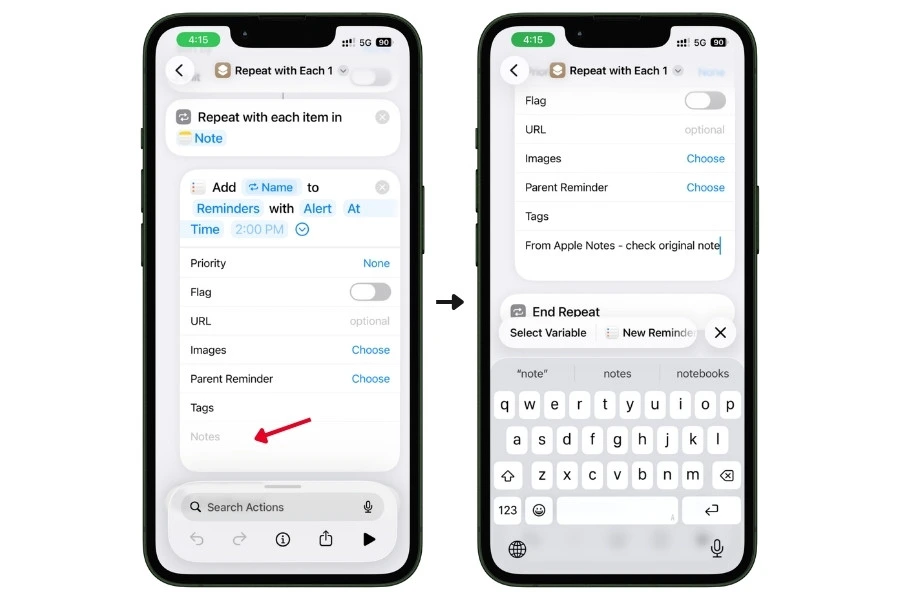
Adding a description (optional but useful):
- Scroll down in the expanded action until you see the Notes field at the bottom
- Tap it and type something like “From Apple Notes – check original note”
- This text will appear in the reminder so you know where it came from
Step 4: Preventing duplicate reminders
Every time you run this Shortcut, it will find ALL notes with #RemindMe and create reminders for them, including ones it already processed.
The simplest way to prevent duplicates:
After the Shortcut runs, go to each processed note and remove the #RemindMe tag manually. Just delete the tag from the note.
Next time the Shortcut runs, it won’t pick up that note anymore.
Step 5: Name and customize your Shortcut
Tap the dropdown arrow at the top (next to the Shortcut name). From here you can:
- Rename it to something like “Notes to Reminders”
- Change the icon to something recognizable (the Notes or Reminders icon works well)
- Pick a color so it stands out in your Shortcuts library
This makes it easy to find and tap when you need it, especially if you have a lot of Shortcuts.
How to run it
You have several options:
- From the Shortcuts app. Open the app and tap your Shortcut to run it.
- From your Home Screen. Long-press the Shortcut in the Shortcuts app, tap Share, then Add to Home Screen. Now it’s one tap from your home screen like any other app.
- From Control Center. Swipe down from the top-right corner of your screen to open Control Center. Tap the + icon in the top-left corner, scroll down to the Shortcuts section, and add a Run Shortcut control. Select your “Notes to Reminders” Shortcut. Now you can trigger it straight from Control Center without opening any app.
- Scheduled automation. Go to the Automation tab in Shortcuts, create a new Personal Automation, set it to Time of Day (e.g., every night at 11 PM), and select your Shortcut as the action. It runs automatically every day.
- Siri voice command. Say “Hey Siri, run Notes to Reminders” and it executes.
The scheduled option is the most powerful. Set it and forget it.
Every night, any note you tagged with #RemindMe during the day gets turned into a reminder for the next morning.
Because Apple integrates Reminders into the Calendar app, these reminders also show up on your daily calendar agenda alongside your classes and meetings. Nothing slips through the cracks.
10.2 ProNotes Extension (Mac Only)
If you use Apple Notes on a Mac, ProNotes is worth installing immediately. It’s a free extension that adds features Apple should have built in natively.
What it adds
- Markdown shortcuts. Type # followed by a space to create a heading. Type [] followed by a space to create a checklist. Wrap text in asterisks for italics. This is faster than clicking through formatting menus, especially if you’re already familiar with Markdown from other apps.
- Backlinks panel. This is the big one. When you open a note, ProNotes shows you every other note that links to it. Apple Notes lets you create links between notes with >>, but it doesn’t show you the reverse. ProNotes fills that gap. If your “Mitosis” note is linked from three different lecture notes, you can see all three connections in one place.
- Slash commands. Type / to bring up a quick menu of formatting options, tables, and templates. Faster than navigating the formatting toolbar.
- Global search bar. Press Cmd+P from anywhere on your Mac to search your entire Notes database without opening the Notes app first. It’s like Spotlight but dedicated to Notes.
- AI features (paid). ProNotes Gold ($7.99/month) adds AI-powered sentence completion, rewriting, summarizing, and proofreading directly inside Notes. If you already use Apple Intelligence for this, you probably don’t need it. But it’s there if you want it.
A note on Markdown overlap
Apple Notes now supports Markdown import and export natively.
So ProNotes’ Markdown value isn’t about import/export anymore. It’s about live formatting shortcuts while you type.
Apple’s native Markdown support lets you bring .md files in and send them out, but it doesn’t let you type in Markdown and see it format in real time. ProNotes does.
ProNotes is free for the core features (Markdown, backlinks, slash commands, search). The AI features are the only paid part. You can download it from pronotes.app.
10.3 Raycast Integration (Mac Only)
Raycast is a keyboard launcher for Mac (think Spotlight, but way more powerful). If you already use it, there’s an Apple Notes extension that lets you:
- Search your notes from anywhere on your Mac without opening the Notes app
- Append text to a specific note without switching to Notes
- Create new notes from the Raycast overlay
Why this matters for students
Picture this. You’re reading a journal article in Safari for your research paper. You come across a key insight you want to save to your “Literature Review” note.
Without Raycast, you’d switch to Apple Notes, find the right note, scroll to the bottom, paste your thought, and switch back to Safari.
That’s 30 seconds and a complete break in your reading focus.
With Raycast, you hit a keyboard shortcut, type your observation, tell it which note to append to, and you’re done. Your eyes never leave the article. Your focus stays intact.
It’s a small optimization, but for students doing heavy research sessions, those small focus breaks add up fast.
10.4 Markdown Import & Export (Built In)
This isn’t a third-party tool. It’s a native Apple Notes feature that a lot of students don’t know about yet.
- Import: If you have Markdown files from Obsidian, GitHub, or any text editor, you can import them into Apple Notes through the Share Sheet. The formatting (headings, links, lists, bold, italics) converts to Apple Notes’ native rich text automatically.
- Export: You can export any note as a Markdown file. Tap the Share button, and you’ll see the option to export as .md. You can also bulk-select multiple notes and export them all as separate Markdown files at once.
Why this matters
- Data portability. The biggest criticism of Apple Notes has always been “what if I want to leave?” Now you can export everything as Markdown and take it to Obsidian, Notion, or any other platform. Your notes aren’t trapped anymore.
- Publishing workflow. If you write blog posts, documentation, or anything that eventually ends up on the web, Markdown export means you can draft in Apple Notes and export a web-ready file without any reformatting.
- Collaboration with non-Apple users. If a group member doesn’t use Apple devices, you can export your notes as Markdown and share the .md files. They can open them in any text editor.
One thing to note: Apple Notes doesn’t have live Markdown editing. You’re not typing raw Markdown and seeing it render in real time. You write in rich text (the normal Apple Notes experience), and it converts to Markdown when you export. Import works the other direction. It’s a conversion tool, not a Markdown editor.
10.5 URL Schemes & NFC Tags (The Fun One)
This is purely optional and definitely niche. But it’s cool enough to mention.
Every Apple Note has a unique identifier (UUID) that you can extract using the Shortcuts app. Once you have that UUID, you can create a URL that opens that specific note directly.
The fun application: You can program a cheap NFC sticker to open a specific note when you tap your phone against it. Stick the NFC tag on your physics textbook, and tapping your iPhone against it instantly opens your Physics Hub note. Stick one on your desk, and it opens your semester dashboard.
A pack of NFC stickers costs a few dollars online. Programming them takes about two minutes per sticker using the Shortcuts app.
Is this necessary? No.
Is it a fun party trick that also happens to be genuinely useful if you commit to it? Absolutely.
11. Apple Notes vs. Notion vs. GoodNotes vs. OneNote for Students
This is the section where I’m going to be completely honest. No bias toward Apple Notes just because this is an Apple Notes guide.
Every app on this list is good. The right choice depends on how you take notes, what devices you use, and what you actually need. Not what looks cool on TikTok.
I’ve tested all four for student-style workflows. Here’s what I found.
11.1 Feature Comparison Table
| Feature | Apple Notes | Notion | GoodNotes | OneNote |
| Cost | Free | Free (limited) / $10/mo for Plus | $9.99 one-time or subscription | Free |
| Platforms | iPhone, iPad, Mac, Apple Watch, iCloud.com | All platforms (web, iOS, Android, Mac, Windows) | iPad, iPhone, Mac, Windows | All platforms (iOS, Android, Mac, Windows, web) |
| Offline access | Full offline support | Limited on free plan, better on paid | Full offline | Full offline |
| Handwriting + Apple Pencil | Good (mixed typed/handwritten, searchable) | No handwriting support | Excellent (purpose-built for handwriting) | Good (handwriting + typed, searchable) |
| Audio recording | Yes, with live transcription + AI summary | No | No | Yes (audio linked to typed notes) |
| AI features | Apple Intelligence (Summarize, Rewrite, Proofread, Image Wand) | Notion AI ($10/mo add-on) | No | Copilot integration (Microsoft 365 required) |
| Math/calculations | Math Notes (inline solving, variables, graphing) | No | No | Basic math with ink-to-math |
| Note linking | Yes (>> syntax) | Yes (advanced, with backlinks) | No | Yes (basic) |
| Collaboration | Up to 100 people, real-time, @mentions, author tracking | Excellent (comments, permissions, real-time) | Basic sharing | Good (real-time, shared notebooks) |
| Databases/Kanban | No | Yes (core feature) | No | No |
| Tags | Yes (#hashtags + Smart Folders) | Yes (via properties and filters) | No native tags | Yes (basic tags) |
| Document scanning | Built-in with OCR | No (needs third-party) | No | Built-in with Office Lens |
| Templates | Limited | Extensive template gallery | Paper templates (lined, grid, Cornell, etc.) | Customizable page templates |
| Export options | PDF, Markdown, print | PDF, Markdown, CSV, HTML | PDF, image, GoodNotes format | PDF, Word, OneNote format |
| Data portability | Markdown bulk export (new), Exporter app for older versions | Easy export in multiple formats | Limited (PDF or proprietary format) | Tied to Microsoft ecosystem |
| Learning curve | Very low | Moderate to steep | Low | Low to moderate |
| Search quality | Excellent (OCR on scans, handwriting, full-text, Spotlight) | Excellent (full-text, filters) | Good (handwriting search) | Good (handwriting + OCR search) |
A note on pricing: Notion’s free plan works for individuals but has limitations on file uploads and blocks. The Plus plan ($10/month) removes those limits. GoodNotes has shifted between one-time purchase and subscription models, so check the current pricing on the App Store before committing.
11.2 When to Choose Apple Notes
Apple Notes is the best choice when:
- You’re fully in the Apple ecosystem (iPhone + iPad or Mac). The deeper you are in Apple, the more seamless the experience. iCloud sync, Spotlight search, Siri, Shortcuts, Share Sheet integration, Quick Notes on every device.
- You want zero setup and zero cost. No account creation, no subscription, no learning curve. It’s already on your phone, and it works immediately.
- You’re a STEM student. Math Notes (inline calculations, variables, graphing) is a feature no other app on this list offers. If your coursework involves math regularly, this alone is a strong reason to choose Apple Notes.
- You want audio recording with transcription. Record lectures, get searchable transcripts, and have AI-generated summaries, all inside the same note. OneNote also records audio, but it doesn’t offer live transcription or AI summaries.
- You value speed and simplicity over customization. Apple Notes opens instantly, syncs automatically, and stays out of your way. If you want a tool that “just works” without configuring anything, this is it.
11.3 When to Choose Notion
Notion is the best choice when:
- You need databases, Kanban boards, or project management. If you’re managing a complex thesis, a club, an internship search, or multiple projects that need structured tracking, Notion’s database features are in a different league. Apple Notes can’t do this.
- You’re cross-platform. Android phone + Windows laptop + iPad? Notion works on everything equally. Apple Notes doesn’t.
- You love customization. Notion lets you build exactly the system you want. Dashboards, linked databases, custom views, filters, formulas. If you enjoy setting up systems, Notion rewards that investment.
- You collaborate heavily and need comments/permissions. Notion’s collaboration is more mature. Comment threads, granular permissions (view-only vs. edit), page-level sharing controls.
The tradeoff: Notion has a real learning curve.
Many students spend hours building elaborate setups they never maintain. It’s slower to open than native apps, and the mobile experience still feels heavier than Apple Notes.
If you’re honest with yourself about whether you’ll actually maintain a complex system, Notion is incredible.
If you know you won’t, it becomes another abandoned dashboard.
11.4 When to Choose GoodNotes
GoodNotes is the best choice when:
- Handwriting is your primary note-taking method. If you take most of your notes by hand with an Apple Pencil, GoodNotes is purpose-built for that. More pen tools, more brush options, paper templates (lined, grid, Cornell, dotted), pressure sensitivity settings, and a tape tool for hide-and-reveal quizzing that Apple Notes doesn’t have.
- You annotate PDFs heavily. GoodNotes treats PDFs as first-class content. Import a textbook chapter or lecture slides and write directly on them with full pen tool access. Apple Notes can view PDFs inline, but annotation is more limited.
- You want paper-like templates. Cornell Note templates, sheet music paper, graph paper, planner pages. GoodNotes has a large template library and supports custom templates. Apple Notes doesn’t offer this.
The tradeoff: GoodNotes doesn’t have audio recording, AI features, note linking, tags, Smart Folders, or the deep OS integration Apple Notes offers.
It’s a specialist tool for handwriting and PDF annotation, not a general-purpose note-taking system.
Many students use GoodNotes for in-class handwriting and Apple Notes for everything else.
11.5 When to Choose OneNote
OneNote is the best choice when:
- You’re on a mixed Apple/Windows setup. iPhone + Windows laptop is a common student combo. OneNote gives you the best cross-platform parity for this setup. Everything syncs through your Microsoft account.
- You already pay for Microsoft 365. If your university gives you free access to Microsoft 365 (many do), OneNote is included. You also get Word, Excel, PowerPoint, and OneDrive storage.
- You want a flexible canvas layout. OneNote lets you place text, images, and drawings anywhere on the page, not just in a linear top-to-bottom flow. Some students prefer this freeform layout for visual note-taking.
The tradeoff: OneNote can feel bloated compared to Apple Notes.
The app is heavier, syncing is sometimes slow (especially with large notebooks), and the interface isn’t as clean.
It also doesn’t have Smart Folders, hashtag-based tagging, or the seamless OS-level integration Apple Notes offers on Apple devices.
11.6 The Honest Bottom Line
There’s no single “best” app. But here’s a simplified decision framework:
- All-Apple, want simplicity and speed? → Apple Notes
- Need databases and project management? → Notion
- Primarily handwrite notes with Apple Pencil? → GoodNotes
- iPhone + Windows laptop? → OneNote
- Want Zettelkasten with graph view? → Obsidian (not covered in this comparison, but worth mentioning for students serious about connected knowledge systems)
And honestly? You can use more than one.
Plenty of students use GoodNotes for handwritten lecture notes and Apple Notes for everything else. Or Notion for project management and Apple Notes for quick capture.
There’s no rule that says you have to pick one app for everything.
The goal isn’t to find the perfect tool. It’s to find the setup that you’ll actually use consistently.
12. What Apple Notes Can’t Do (Honest Limitations)
No app is perfect. And if a guide only tells you the good stuff, you shouldn’t trust it.
Here’s everything Apple Notes still can’t do, along with whether each limitation is a dealbreaker or something you can work around.
I’ve tested every workaround listed here.
12.1 Limitations That Have Workarounds
No live Markdown editing
Apple Notes added Markdown import and export recently, which is a big step forward.
You can bring in .md files and export your notes as Markdown. But you can’t type in raw Markdown inside the app and see it format in real time like you can in Obsidian or Bear.
You write in rich text, and it converts to Markdown only on export.
Workaround: On Mac, the ProNotes extension adds live Markdown shortcuts (# for headings, [] for checklists, etc.). On iPhone and iPad, there’s no workaround. You use the formatting toolbar.
No backlinks panel
You can link notes together using the >> syntax, which is great. But Apple Notes doesn’t show you the reverse.
If Note A links to Note B, there’s no way to open Note B and see that Note A references it. You only see links going forward, never backward.
Workaround: ProNotes on Mac adds a backlinks panel that shows every note linking to the current one. No workaround on iPhone or iPad.
No nested tags
You can’t create tag hierarchies like #Science/Physics/Thermodynamics. Tags are flat.
Workaround: Use underscore or hyphen conventions like #Course_Physics, #Course_Biology, #Type_Lecture. It works well with Smart Folders and search, but it’s not as clean as true nested tags.
No native spaced repetition
There’s no algorithm that schedules review sessions for you. Collapsible headings create a great active recall system, but they don’t tell you when to review.
Workaround: Use the manual tag system described in the Study Techniques section (#review tag + Smart Folder). Or pair Apple Notes with a dedicated spaced repetition app like Anki for material that requires algorithmic scheduling.
Limited data export (mostly solved)
This used to be a major complaint.
Apple Notes had no good way to get your data out. Now you can bulk-select notes and export them as Markdown or PDF files. This covers most use cases.
Workaround for older devices: The third-party “Exporter” app can batch-convert your entire Apple Notes database to Markdown files if the native export doesn’t work for your setup.
No web clipper browser extension
There’s no dedicated Chrome or Safari extension for clipping web content into Apple Notes with one click.
Workaround: The Share Sheet works from Safari and most browsers. It’s not as fast as a dedicated web clipper like Notion’s or Evernote’s, but it gets the job done. You tap Share, select Notes, and choose which note to save it to.
12.2 Limitations With No Good Workaround
These are the genuine gaps where Apple Notes falls short, and there’s no clean solution.
No cross-platform support
Apple Notes doesn’t have a native app for Android or Windows. You can access it through iCloud.com in a browser, but the web experience is limited.
You can’t use the document scanner, audio recording, or Apple Pencil features from a browser.
If your group project includes people on Android phones or Windows laptops, they can’t meaningfully use shared Apple Notes.
This is the single biggest limitation of Apple Notes. If you’re not in the Apple ecosystem, this guide isn’t for you, and that’s okay.
No databases or table views
Apple Notes has basic tables (rows, columns, text).
But it doesn’t have anything like Notion’s databases, filtered views, Kanban boards, relational links between tables, or formulas inside cells.
If you need structured data management beyond simple tables, Apple Notes can’t do it.
No comment threads in collaboration
You can @mention someone in a shared note, and they get a notification. But there’s no way to start a threaded discussion attached to a specific paragraph like you can in Google Docs.
For group projects that involve back-and-forth feedback on specific sections, this is a real gap.
No version history rollback
The “Show All Activity” panel shows you who changed what and when. But you can’t click “restore to yesterday’s version.”
If someone accidentally deletes a large section of a shared note, you can’t roll it back.
You’d have to undo manually or hope the person who deleted it can Cmd+Z before closing the note.
No graph view
If you link notes together with >>, those connections exist, but you can’t visualize them.
There’s no map or graph showing how your notes relate to each other.
Obsidian’s graph view is its signature feature for exactly this reason. Apple Notes doesn’t have anything equivalent, and ProNotes doesn’t add this either.
No offline web clipper
Related to the web clipper point above, but worth calling out separately.
If you’re offline and want to save a webpage for later, there’s no Apple Notes feature that caches the full page content.
The Share Sheet saves a link, but if you lose internet access, that link is just a dead URL until you’re back online.
Limited formatting compared to word processors
No footnotes, no endnotes, no custom fonts, no page breaks, no columns, no headers/footers, no advanced layout options.
Apple Notes is a note-taking app, not a word processor. For final paper formatting, you’ll always need to export to Pages, Google Docs, or Word.
12.3 The Bottom Line on Limitations
Most of these limitations fall into two categories:
1. Things that only matter if you’re not in the Apple ecosystem. Cross-platform support is the big one. If you and everyone you work with uses Apple devices, this isn’t an issue. If not, it’s a dealbreaker.
2. Things that matter if you need advanced features Apple Notes wasn’t designed for. Databases, graph views, version history, comment threads. These are features built into apps like Notion and Obsidian specifically because those apps are designed for power users building complex systems.
Apple Notes is designed to be fast, simple, and deeply integrated into your devices. It trades complexity for speed. That’s a deliberate choice, not a flaw.
For 90% of student use cases (taking notes, organizing coursework, studying for exams, basic collaboration, quick capture), Apple Notes handles everything you need.
For the remaining 10%, now you know exactly where the gaps are and which alternative tools fill them.
That’s the honest picture.
Final Words
If you’ve read this far, you now know more about Apple Notes than 99% of students using it.
Here’s what you’ve learned:
- How to organize your notes with a folder system, tags, and Smart Folders that won’t fall apart by midterms
- How to record lectures and get searchable, AI-summarized transcripts inside your notes
- How to link notes together into a connected research web using >> syntax and hub notes
- How to solve math inline with Math Notes, variables that auto-update, and built-in graphing
- How to study smarter using collapsible headings for active recall instead of just re-reading notes
- How to collaborate with up to 100 people using real-time editing, @mentions, and author tracking
- How to automate your workflow by turning tagged notes into calendar reminders with Shortcuts
- Where Apple Notes falls short and which alternatives are genuinely better for specific use cases
Most of these features have been sitting on your phone the entire time. You just didn’t know they were there.
Here’s my honest take after testing everything in this guide.
Apple Notes isn’t the most powerful note-taking app out there. Notion has more features. Obsidian has a better knowledge graph. GoodNotes is better for pure handwriting.
But none of those apps are already installed on every device you own, syncing silently in the background, opening in under a second when you need to capture a thought between classes.
For most students, the best note-taking system isn’t the most advanced one. It’s the one you’ll actually use every day.
Apple Notes wins that fight more often than not.
Where to start
You don’t need to implement everything in this guide on day one. Start here:
- Set up your semester folders and pick 5-6 tags from the starter set
- Try audio recording in your next lecture and see the transcription in action
- Create one Dashboard Note and pin it to the top of your notes
- Add features as you need them. The system grows with you.
And if you found this guide useful, share it with a classmate who’s still juggling five apps and losing notes.
That’s exactly who this was written for.
FAQs
Can Apple Notes really replace Notion for students?
For most students, yes. If your needs are taking lecture notes, organizing coursework, studying for exams, and basic collaboration, Apple Notes handles all of that with zero cost and zero setup. Where it can’t replace Notion is if you need databases, Kanban boards, relational data, or cross-platform support on Android/Windows.
Does Apple Notes work offline?
Yes. Full offline support. You can create, edit, and read notes without an internet connection. Changes sync automatically through iCloud the next time you’re online. This is a real advantage over Notion, which has limited offline functionality on its free plan.
Can I use Apple Notes on a Windows PC?
Sort of. You can access your notes through iCloud.com in a web browser. But the web version is limited. No document scanning, no audio recording, no Apple Pencil features, and the interface is basic. If Windows is your primary device, OneNote or Notion will give you a better experience.
Is Apple Notes secure? Can other people see my notes?
Your notes sync through iCloud with end-to-end encryption (if you have Advanced Data Protection enabled). You can also lock individual notes with Face ID, Touch ID, or your device passcode. Locked notes can’t be read by anyone without your biometric authentication, even if they have access to your unlocked phone.
Can I recover a deleted note?
Yes. Deleted notes go to a “Recently Deleted” folder where they stay for 30 days before being permanently removed. Open your folders list, tap Recently Deleted, select the note, and tap Recover.
Does the audio transcription work in noisy environments?
It depends. In a quiet lecture hall, transcription accuracy is very good. In noisy environments (crowded cafe, outdoor spaces, large auditoriums with echo), accuracy drops noticeably. Tip: Sit closer to the front of the room and keep your device on the desk facing the speaker for best results. The transcription is still useful even when imperfect because you can always play back the original audio for unclear sections.
How many notes can Apple Notes handle before it slows down?
Apple doesn’t publish an official limit. In my testing, the app handled 500+ notes with attachments without noticeable slowdown in search or navigation. Users on Reddit have reported databases of 2,000+ notes working fine. If you’re a typical student producing notes for 4 years of college, you’re unlikely to hit any performance issues.
Can I use Apple Notes for handwriting without an iPad?
On iPhone, you can draw and sketch using your finger in the markup tools, but it’s not practical for actual handwritten note-taking. For real handwriting, you need an iPad with an Apple Pencil. That’s the setup where handwriting recognition, searchable handwriting, and features like the ruler tool and shape recognition actually shine.
What happens to my notes if I switch to Android later?
Before switching, export all your notes as Markdown files using the bulk export feature. This gives you portable .md files you can import into Obsidian, Notion, or any other app. You can also export notes as PDFs. Your data isn’t trapped anymore, but you do need to export before leaving the Apple ecosystem. Notes don’t automatically transfer to non-Apple platforms.
Does Apple Notes support Apple Pencil hover?
Yes. On iPad Pro models with M2 chip or later and Apple Pencil (2nd generation) or Apple Pencil Pro, the hover feature works in Apple Notes. You can preview your mark before touching the screen, which is useful for precise handwriting placement and drawing.
Can I create templates in Apple Notes?
There’s no dedicated template system like Notion or GoodNotes has. But there’s a practical workaround. Create a note with your desired format (headings, sections, checklists, tables, whatever structure you want), then duplicate that note whenever you need a fresh copy. Some students create a “Templates” folder with pre-built note structures for things like lecture notes, reading responses, meeting notes, and weekly planners.
Is Apple Intelligence required to use Apple Notes?
No. Apple Intelligence is completely optional. Every core feature of Apple Notes (folders, tags, Smart Folders, audio recording, Math Notes, note linking, collaboration, scanning, checklists, tables) works without Apple Intelligence. The AI-specific features (Summarize, Rewrite, Proofread, Image Wand, AI-generated transcription summaries) require a compatible device (iPhone 15 Pro or later, Apple Silicon Mac/iPad), but the app itself is fully functional without them.