Apple Notes for Travel Planning: The Complete System (+ Free Templates)
I first published this guide in May 2025, right after I planned an entire trip using nothing but Apple Notes.
No TripIt. No Wanderlog. No app I had to download, sign into, or pay for. Just the notes app that was already sitting on my phone.
It worked. Mostly. And that “mostly” is the reason I rewrote the whole thing.
Here’s what I do: I take Apple’s built-in apps, the ones everybody has and nobody bothers to learn, and I push them as far as they go. Then I tell you exactly where they shine and where they fall apart. Not the marketing version. The real version, from actually using them on real trips.
But I didn’t stop at my own experience this time. I went deep:
- Hundreds of Reddit threads across travel and Apple communities, reading how actual travelers set up their notes, what broke for them, and the clever tricks that never make it into blog posts
- Facebook groups where people plan trips together and argue about the best tools
- Apple’s own updates, because Notes has changed since May 2025, and some of those changes matter a lot for travel
So this is no longer just “how I planned one trip.” It’s the complete system, tested across every kind of travel I could throw at it:
- Solo, where the note only has to make sense to me
- Group, where four people needed the same itinerary without a single group-chat meltdown
- Family, where my mom needed to see the plan without me texting her the hotel address six times
And I tested it both ways, a traveler actually travels.
Domestic, with a long weekend in New Orleans. International, with a week in Tokyo and Kyoto, where the language barrier and the currency math are where most apps quietly give up.
By the end of this guide, you’ll know how to build a travel note that holds up when your flight gets moved, and you’re half asleep trying to find your hotel confirmation.
You’ll also know the exact moments Apple Notes is the wrong tool, and what to use instead, because sometimes it is.
I’m not here to sell you on it. I’m here to tell you the truth about it.
Key takeaways
- Notes is the planner, not the watchdog. It holds your entire trip in one place that opens instantly offline. What it can’t do is track flights. Pair it with TripIt purely for gate-change and cancellation alerts, and you get the best of both.
- Its real superpower is offline access. Your itinerary, addresses, confirmation codes, and document scans open with zero signal. Before you leave, open the note and its scans on WiFi once so everything caches on the device instead of waiting in the cloud.
- Split packing into three lists, not one. Pre-departure tasks, luggage, and morning-of items. That third list, the stuff still on the nightstand and plugged into the wall, is what actually saves you at the gate.
- Math Notes turns your budget into a live calculator. Total spend with a single equals sign, and convert currency at live rates abroad (“50000 JPY in USD =”). The catch: it handles one expression at a time, so it can’t mix multiple currencies into one running total.
- Scans are searchable inside Notes, but not once exported. Notes reads the text inside a scanned passport so you can search it. Export it as a PDF and that text layer vanishes into a flat image. For travel backups this rarely matters.
- For groups, choose Collaborate, never Send Copy. Collaborate makes one live note everyone edits. Send Copy sends frozen snapshots and recreates the chaos. Keep sensitive scans in a separate locked note, since shared notes can’t be locked.
- It’s an Apple-only world. The moment one traveler is on Android, shared planning falls apart. Move that to a cross-platform tool and keep Notes for your own private plan.
The whole philosophy: use the simplest thing that works, and reach for a specialized tool only when you actually hit a wall.
Table of Contents
- 1. Should You Use Apple Notes for Travel at All?
- 2. Apple Notes vs. TripIt, Wanderlog, Notion, and Google Sheets
- 3. Setting Up Your Travel Note Before You Go
- 4. What Goes in the Note: The Sections That Matter
- 5. Packing Lists That Actually Work
- 6. Tracking Your Trip Budget
- 7. Storing Travel Documents Safely
- 8. Using Apple Notes Abroad
- 9. Planning Group and Family Trips Together
- 10. Where Apple Notes Falls Short for Travel
- 11. Travel Note Templates You Can Copy
- The Honest Bottom Line
- FAQs
1. Should You Use Apple Notes for Travel at All?
Let me save you some time.
Apple Notes is not for every traveler, and I would rather tell you that now than have you build a whole system and abandon it halfway through booking.
Here is the honest split.
1.1 Apple Notes is a great fit if:
- You are already on an iPhone, and you do not want to download, learn, or pay for one more app
- You want everything in one place, you can open instantly, even in airplane mode with zero signal
- You care about privacy, and you do not love the idea of forwarding all your travel emails to some company’s server
- You are the kind of planner who likes building things your own way, not filling in someone else’s template
- You travel a few times a year, not every week, and your trips are more “figure it out as I go” than “manage 14 connecting flights”
1.2 Apple Notes is the wrong tool if:
- You want your flights tracked automatically, with alerts when a gate changes or a flight gets cancelled. Notes cannot do this. TripIt can, and it is genuinely great at it.
- You want to forward a confirmation email and have your itinerary built for you. Notes has no email import. Everything is manual.
- You are coordinating a big, complex group trip with shared expenses split six ways and a map of forty pinned restaurants. That is Wanderlog territory.
- You live on an Android phone or share plans constantly with people who do. Notes is an Apple-only world, and the moment a non-Apple friend is involved, it gets clumsy.
Here is the part most people skip: you do not have to pick just one.
I plan inside Apple Notes because it is fast, private, and it is my space to think.
And when I am flying somewhere that matters, I also keep TripIt running in the background purely for flight alerts, because that one feature has saved me more than once.
Notes is the planner. TripIt is the watchdog. They are not enemies.
If you read that fit list and recognized yourself in the “great fit” column, the rest of this guide is going to be genuinely useful to you.
If you saw yourself in the “wrong tool” column, I will still show you what Notes does well, but I will also point you to the better option each time, no ego about it.
Most people land somewhere in the middle.
They want the simplicity and privacy of Notes for planning, and they are happy to lean on one specialized app for the one thing Notes cannot do.
That combination, which I will come back to in the next section, is what I actually recommend for most travelers.
2. Apple Notes vs. TripIt, Wanderlog, Notion, and Google Sheets
Before you commit to building your whole trip in Apple Notes, it is worth knowing how it actually stacks up against the tools people usually reach for.
I have used all of these for real trips. None of them is the single best answer. There is only the right one for how you travel.
Here is the honest comparison.
2.1 The Comparison at a Glance
| Tool | Cost | Auto-imports bookings? | Tracks flights live? | Works fully offline? | Best for |
|---|---|---|---|---|---|
| Apple Notes | Free | No | No | Yes | Private, flexible planning, you build your own way |
| TripIt | Free; Pro is $49/year | Yes (email forwarding) | Yes (Pro) | Limited | Automatic itinerary building and flight alerts |
| Wanderlog | Free; Pro is $39.99/year | Yes | Partial | Partial | Map-based itineraries and group trip planning |
| Notion | Free for personal use | No | No | Yes (App only, manual toggle) | Database-style trip dashboards for power users |
| Google Sheets | Free | No | No | Partial | Detailed budgets and anything formula-heavy |
A few things stand out the moment you lay them side by side.
Apple Notes is the only one that is free, fully offline, and asks nothing of you. No account, no subscription, no bank or email connection. You open it, and it is just there, even at 35,000 feet with the WiFi off.
TripIt is the only one that watches your flights for you. You forward a confirmation email, it builds the itinerary automatically, and on the Pro plan, it pings you when a gate changes or a flight gets cancelled, sometimes before the airline does. That is the one thing no notes app can replicate.
Wanderlog is built for maps and groups. If your trip is forty pinned restaurants and a route between them, or six friends all adding ideas to the same plan, this is what it was made for.
Notion and Google Sheets are for control freaks (the good kind). Notion, if you want a relational dashboard with linked databases. Sheets, if you want real formulas and a budget that does proper math.
2.2 Choose Apple Notes If
- You want to start planning in the next ten seconds without setting anything up
- Privacy matters to you, and you do not want your travel data living on a third party’s server
- You like building your trip your own way instead of filling in a rigid template
- Offline access is non-negotiable; you want the plan to open instantly with no signal
- You are already deep in the Apple ecosystem, and everyone on the trip is too
2.3 Choose TripIt If
- You fly often, and you want flights tracked automatically
- You want gate changes, delays, and cancellation alerts pushed to you in real time
- You would rather forward a confirmation email than type flight details by hand
The flight-alert feature alone is worth it for frequent flyers. This is exactly why I keep TripIt running alongside Notes when I fly somewhere that matters.
2.4 Choose Wanderlog If
- Your trip is heavily map-based, and you want to see everything plotted geographically
- You are planning with a group and want everyone adding and voting on ideas in one place
- You want route optimization between stops, so you are not crisscrossing a city
2.5 Choose Notion or Google Sheets If
- Notion, if you want a full trip dashboard with linked databases, and you already know your way around it. The learning curve is real. It does have offline support now, but you have to enable it manually in the app, and it is mobile-app only, so it is not as effortlessly available as a note that is just always there.
- Google Sheets, if your trip is budget-heavy and you want real formulas. A spreadsheet sums a column properly, which, as you will see later, is something Notes genuinely cannot do.
2.6 What Most Travelers Actually Need
Here is what I have landed on after testing all of these.
For most people, the best setup is not one app. It is:
Apple Notes as your planning hub, plus one specialized app for the single thing Notes cannot do.
- Planning a road trip or a domestic long weekend? Apple Notes alone is genuinely all you need.
- Flying somewhere that matters? Apple Notes for the plan, TripIt for flight alerts.
- Big group trip with a complex map and split costs? Wanderlog for the logistics, Apple Notes for your own private notes on top.
Notes is the home base. You add a second tool only when a real need shows up, not because an app told you to.
That is the whole philosophy of this guide:
Use the simplest thing that works, and reach for more only when you actually hit a wall.
3. Setting Up Your Travel Note Before You Go
This is the foundation.
Get this part right and everything else (packing, budget, documents) just slots into place. Get it wrong, and you end up with a messy note you avoid opening, which defeats the entire point.
Here is how I set up every trip now, refined over a lot of trips that started messy.
3.1 Create a Travel Folder (and Keep It in iCloud)
Open Apple Notes and create a new folder called Travel.
This is where every trip lives, so you are never hunting through grocery lists and random ideas to find your itinerary.
One thing matters here, and it trips people up because of how Apple Notes is structured. Notes can store your notes in two places:
- Your iCloud account, which syncs everything across your iPhone, iPad, and Mac
- An “On My iPhone” account, which keeps notes only on that one device
If you have ever turned on the “On My iPhone” account, you will see both as separate sections in the Notes app, and a folder belongs to whichever one you created it under.
Create your Travel folder under your iCloud account, not under On My iPhone.
If you only see one set of folders, you are already all-iCloud, and there is nothing to change.
Why iCloud matters for travel:
- It syncs your trip across every device, so you can plan on your laptop and pull it up on your phone at the gate
- It protects your plans if your phone is lost, stolen, or drowned in a hotel pool
- It is required for sharing, which you will want the moment anyone else joins the trip
If you ever find a note in the wrong place, you can move it: long-press the note, tap Move, and choose a folder under your iCloud account.
There is one specific exception involving document scans where local storage actually has a backup advantage, but I will cover that nuance in the documents section. For your itinerary and everything else, iCloud is the right home.
3.2 Build Your Master Trip Note
Inside the Travel folder, create one note that is the heart of the trip. Title it something you will recognize instantly:
- New Orleans Long Weekend
- Japan, Tokyo + Kyoto
- Summer Italy with family
The first line of any note automatically becomes its title in your folder list, so make that first line count.
Then pin it (long tap on the note in the list and tap the Pin Note) so it sits at the top of the folder instead of sinking under everything else.
This master note is your home base.
For a short trip, it might be the only note you need. For a bigger trip, it becomes the hub that links out to other notes, which I will show you in a moment.
A clean master note has a few core sections, and I will cover exactly what goes in each in Section 4.
For now, just know the structure uses headings so you can collapse the parts you are not looking at. Tap the Aa formatting button, choose Heading, and type your section name.
Once a section is a heading, you can tap the little arrow beside it to collapse or expand it, which is what keeps a long note from becoming an endless scroll.
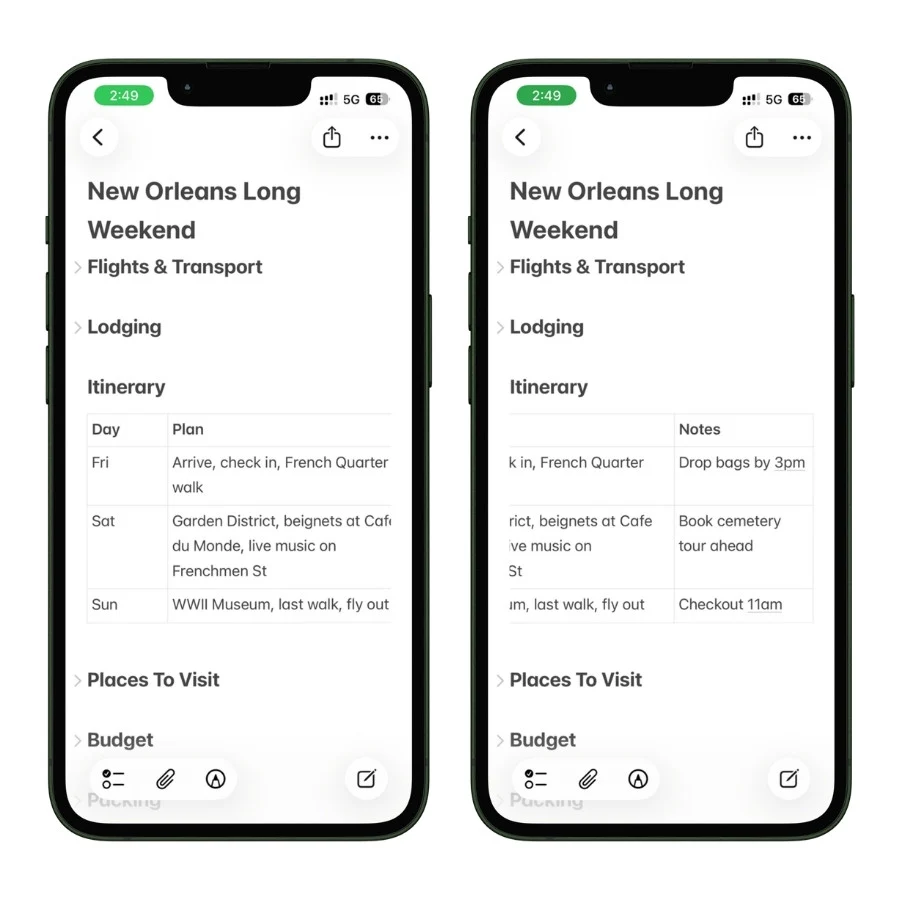
3.3 Build a Day-by-Day Itinerary Table
The single most useful element in my travel notes is a simple table for the daily plan. Instead of a wall of text for each day, you get a clean grid you can read at a glance.
To add one, tap the table icon in the formatting bar. Notes drops in a small starter table, and you build from there.
I keep it to three columns: the day, the plan, and a notes column for the easy-to-forget stuff like “book ahead” or “checkout 11am.”
Here is the actual itinerary table from my New Orleans trip:
On a Mac, there are keyboard shortcuts that make building these fast:
- Option + Command + Right Arrow adds a column to the right
- Option + Command + Down Arrow adds a row below
- Option + Return adds a new line inside a single cell without jumping to the next one
One honest heads-up on tables: you cannot resize columns. Apple Notes auto-sizes them to fit the longest entry, so a long line in one cell can squeeze the others. The fix is simple, keep cell text short. “Book tour ahead,” not “remember to book the cemetery walking tour in advance because they sell out.” Put the long version below the table if you need it.
3.4 Link Sub-Notes for Bigger Trips
For a long weekend, one note is plenty. But for a two-week, multi-city trip, cramming everything into a single note makes it slow and painful to navigate.
For a trip that big, set it up in three moves.
First, give the trip its own folder. Inside your Travel folder, create a folder for the trip itself, say, Japan, and keep all of that trip’s notes inside it: the overview note, a note per city, a packing note, a documents note.
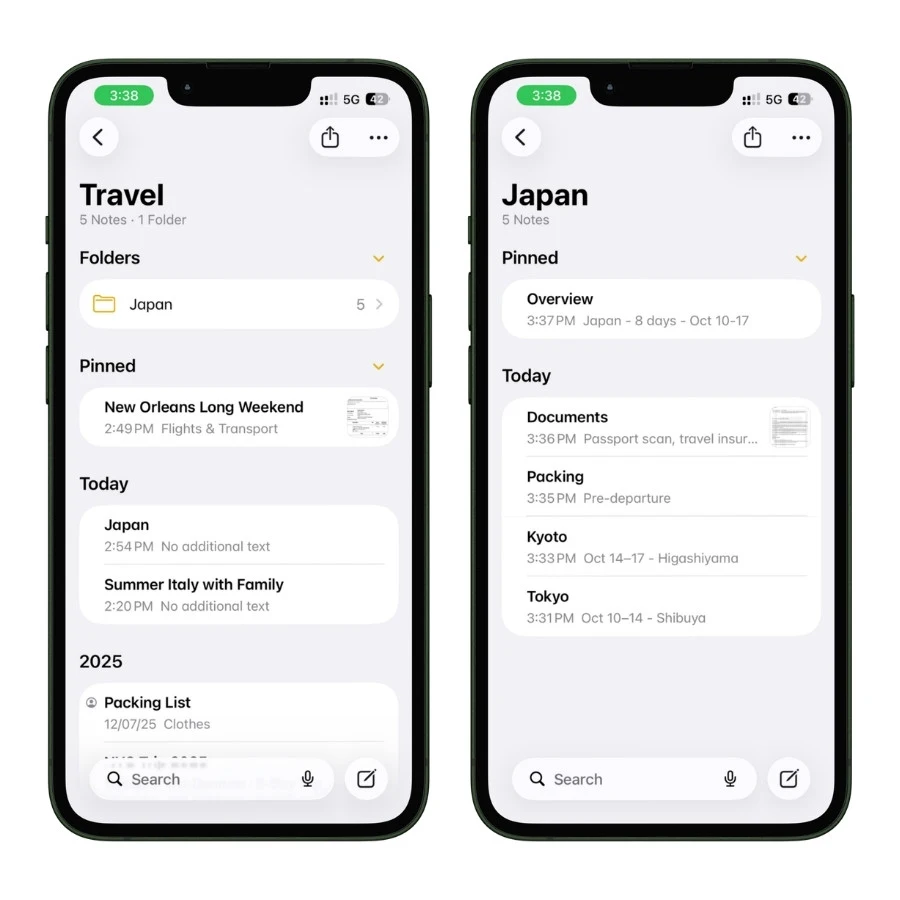
Now the whole trip is contained in one place instead of scattered through your main Travel folder.
Second, create a master note and pin it. Inside the Japan folder, make one note called Overview (this is your home base for the trip) and pin it to the top of the folder by long-tapping on it and tapping the pin.

Now, no matter how many notes the trip grows to, the overview always sits at the top, one tap away.
Third, link your sub-notes to the overview so you can jump between them without backing out to the folder every time.
Apple Notes has a built-in way to link one note to another:
- Type >> and a search box pops up
- Start typing the name of the note you want to link to
- Select it, and a tappable link drops right into your text
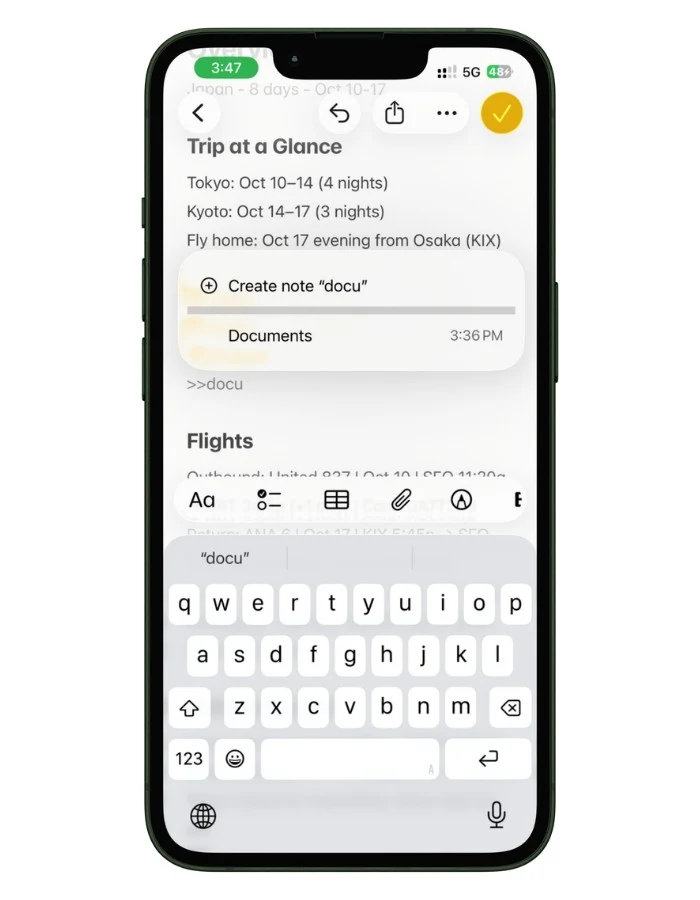
So your Overview note links out to a “Tokyo” note, a “Kyoto” note, a “Packing” note, and a “Documents” note, a clean menu for the whole trip.
The folder keeps everything together, the pinned overview is always on top, and the links let you move through it fast.
When you are standing in a train station, you open the overview, tap “Kyoto,” and you are there, then tap back, no scrolling through a folder list while you are trying to catch a train.
A quick rule of thumb on when to bother:
- One to four days, one city: a single note in your Travel folder is all you need. No trip folder, no sub-notes.
- Multiple cities or longer than about five days: give the trip its own folder, with a pinned Overview note inside that links to the others.
If you want to go deeper on organizing many trips over time (tagging them, pulling them into automatic folders), I cover that whole system in my guide on how I use Smart Folders to keep my Apple Notes ridiculously organized.
4. What Goes in the Note: The Sections That Matter
A travel note is only as useful as what you put in it.
Over many trips, I have settled on a set of core sections that cover almost everything, and a couple of optional ones for bigger or international trips.
Each one is a collapsible heading, so the note stays scannable. You expand what you need and collapse the rest.
Here is what each section is for and what actually belongs in it.
4.1 Flights and Transport
This is the section you will open in a hurry, usually at a gate, so keep it brutally scannable.
For each flight or train, I log:
- Airline or rail line and the number (Delta 1423, or the Narita Express)
- Departure and arrival times
- Confirmation code
- Seat, if I have one
- Baggage allowance, especially abroad, where it changes
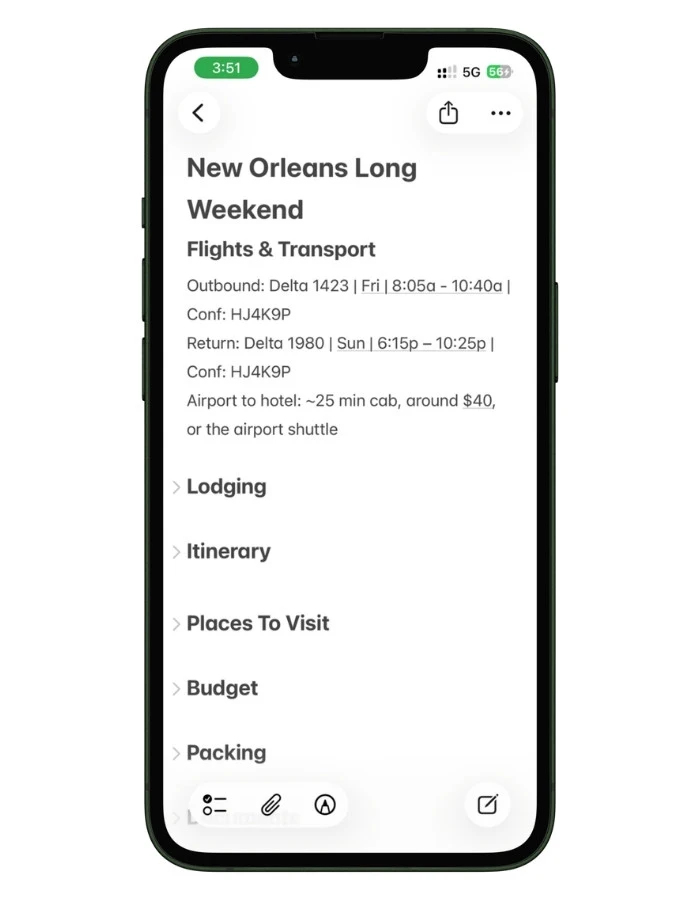
The confirmation code is the one thing you will need at the counter when the WiFi is down, so it goes near the top where you can find it without scrolling.
For the Japan trip, this section also held my train logic, how to get from Narita into Tokyo, which IC card to load, because that is exactly the kind of thing you forget the moment you step off a 13-hour flight.
4.2 Lodging
Everything about where you are sleeping, in one place:
- Hotel or rental name and full address
- Check-in and check-out times
- Confirmation or reservation number
- A pasted map link so you can navigate there in one tap
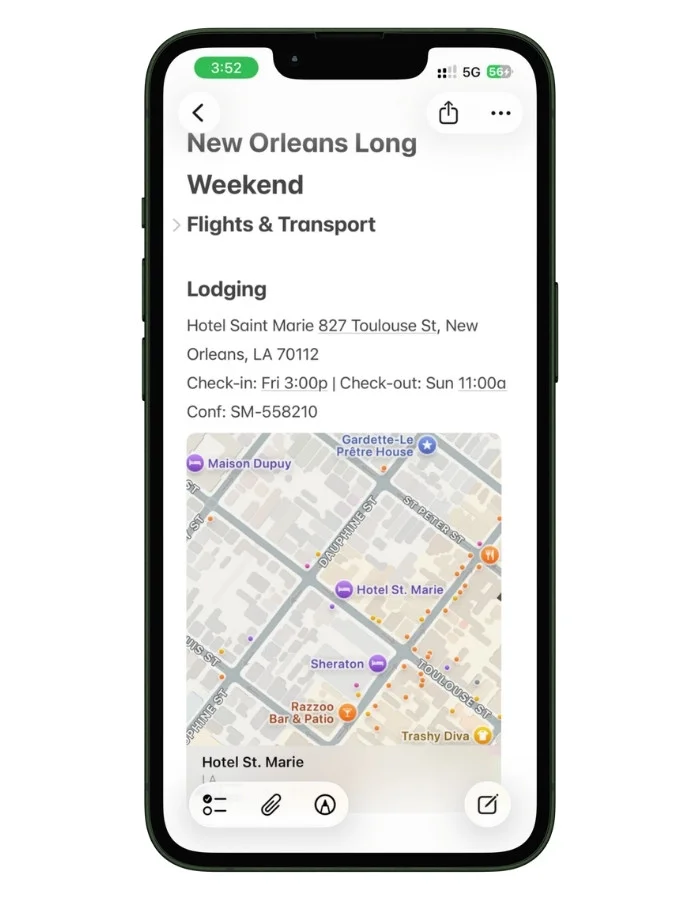
That last point matters more than it sounds.
Paste an Apple Maps or Google Maps link to the property, and Notes turns it into a tappable preview.
When you land, jet-lagged, you tap it, and you are getting directions, no retyping an address into a maps app while a taxi meter runs.
4.3 Day-by-Day Itinerary
This is the table from Section 3, the spine of the trip.
One row per day, with the plan and a notes column for the small stuff that actually trips you up: “book ahead,” “leave by 8,” “cash only.”
I keep this realistic, not aspirational.
A day crammed with twelve activities is a fantasy you will resent by noon. Three or four anchored plans per day, with room to wander, is what actually survives contact with a real trip.
4.4 Places to Visit
Separate from the itinerary, this is your running wishlist, the restaurants, sights, and shops you want to hit but have not slotted into a specific day. The trick:
- Paste the map link for each place, so it becomes a tappable location
- Add a word or two on why it is on the list (“best beignets,” “open late,” “reservation needed”)
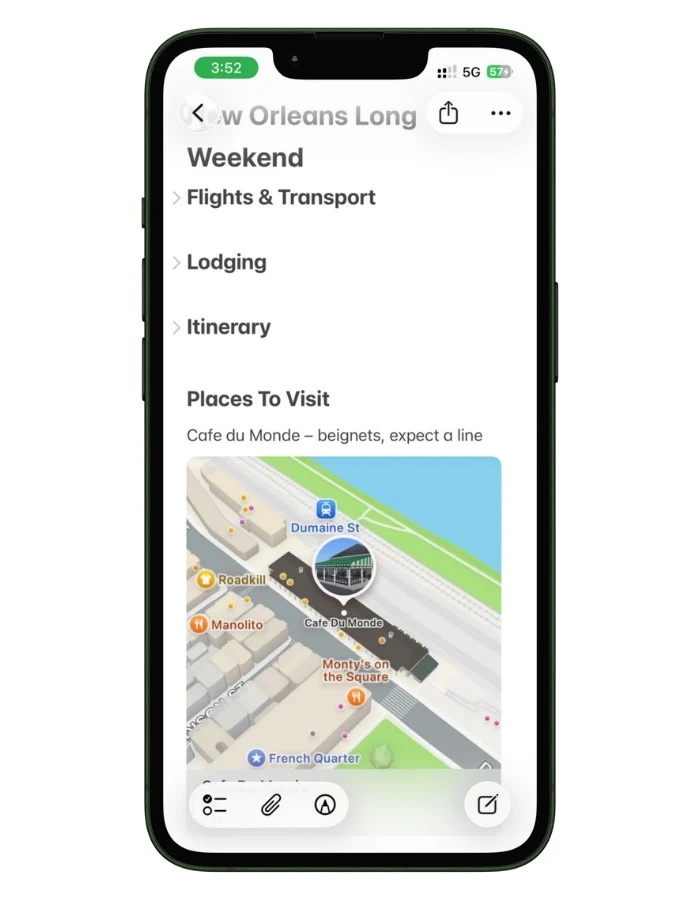
When you have a free afternoon, you open this section, see what is nearby, and go.
In New Orleans, this is where I kept a dozen food spots; in Kyoto it was temples and a specific knife shop.
It is the difference between wandering aimlessly and wandering with options.
4.5 Packing List
A checklist of what to bring and what to do before you walk out the door.
This is one of the most useful parts of a travel note, and it works best split into a few separate lists (things to do before leaving, the actual luggage, and the last-minute morning-of items), so it earns its own section.
I cover the full packing system, including the reusable setup you duplicate for every trip, in Section 5.
For the master note, just know packing is one of the core sections. Keep it here if it is a short trip, or split it into its own linked note for a bigger one.
4.6 Budget
A simple running spend tracker.
I will go deep on the money side in Section 6, including how to handle a foreign currency like yen, so here I will just say: this section holds your rough budget and your actual spend as it adds up.
Keep it lightweight. A travel note is not the place for a full spreadsheet, and trying to make it one is how people burn out on the system.
4.7 Documents
Scanned copies of the things you would panic about losing:
- Passport and any visas
- Travel insurance details
- Vaccination records, if a destination needs them
- A backup of your ID
This section comes with real nuance, where to store these safely, how locking works, and a searchability catch that surprises most people, so I gave it its own home in Section 7.
For international trips it is one of the most genuinely useful things Notes does. For a domestic weekend, you can skip it.
4.8 Emergency Info
A small section that earns its place the one time you need it:
- Local emergency number (it is not 911 everywhere, Japan is 110 for police, 119 for fire and ambulance)
- Your country’s embassy contact for the destination
- A copy of your insurance policy number and emergency line
- An emergency contact back home
I keep this in the master note rather than buried in a sub-note, so in a genuinely stressful moment it is one tap away, not four.
You will almost never open it. The one time you do, you will be very glad it is there.
4.9 A Note on Order
Put the sections you will reach for in a hurry at the top: flights, lodging, the day’s plan.
Push the reference material (documents, emergency info) lower.
When you are moving through an airport or a foreign train station, you want the thing you need under your thumb, not after six swipes.
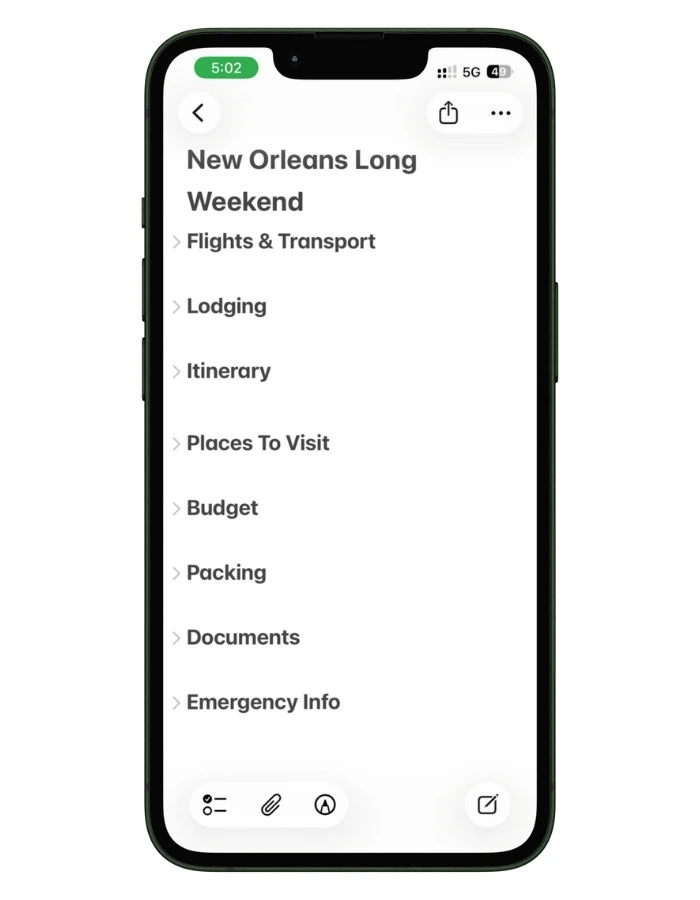
A clean master note, top to bottom, usually looks like this:
- Flights and transport
- Lodging
- Day-by-day itinerary
- Places to visit
- Budget
- Documents
- Emergency info
Collapse them all and the whole trip fits on one screen as a tidy list of headings. Expand one and you are exactly where you need to be.
5. Packing Lists That Actually Work
Everyone makes a packing list.
Most of them fail the same way: they are one long list of stuff, you tick off the suitcase items the night before, and then you walk out the door without your phone charger because it was still plugged into the wall.
The fix is to stop treating packing as one list. It is actually three, and separating them is what keeps you from that sinking feeling at the gate.
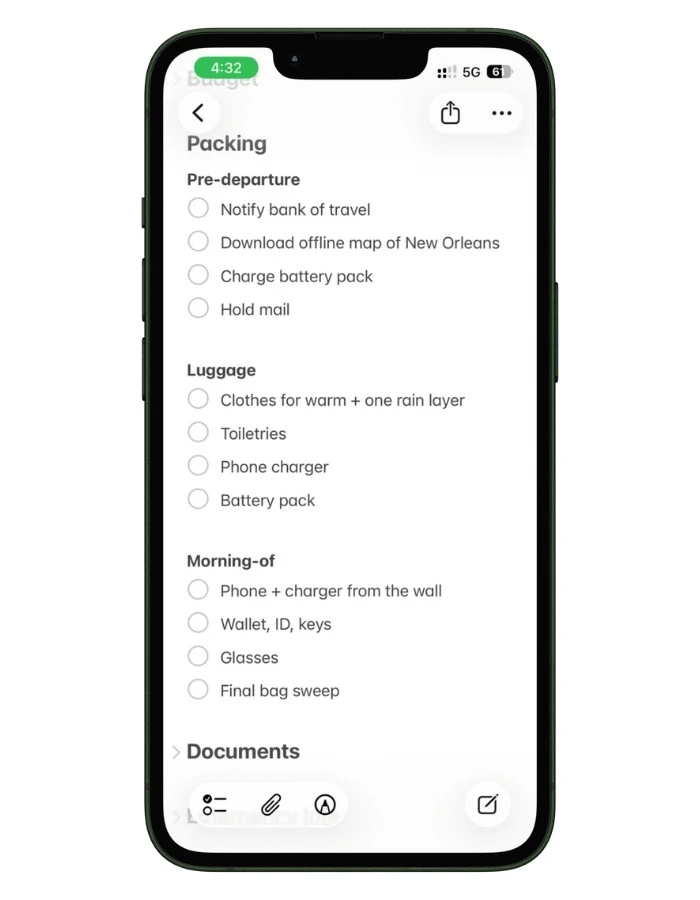
5.1 The Three-List Split
Inside your travel note, I build packing as three distinct checklists:
- Pre-departure tasks — things to do before you leave, not things to pack. Stop the mail, set an out-of-office, notify your bank of foreign travel, download offline maps, charge the battery pack.
- Luggage — the actual stuff going in the bag. Clothes, toiletries, electronics, documents.
- Morning-of — the handful of things you physically cannot pack the night before because you are still using them. Phone, charger, glasses, retainer, the toiletries you use that morning, and the one thing everyone forgets: the chargers plugged into the wall.
That last list is the one that saves you.
The night-before items are easy. It is the morning-of stuff, still on the nightstand, still in the bathroom, that gets left behind.
Giving it its own short checklist means you do a final sweep instead of trusting your half-awake memory.
5.2 Building the Checklists
Each list is a Notes checklist, not plain text.
Tap the checklist button in the formatting bar (the circle with a checkmark) and start typing, one item per line.
Now you can tick things off as you pack, and the satisfying part: completed items can sort to the bottom automatically if you turn that on (Settings → Notes → Sort Checked Items → Automatically), so your list shrinks as you work through it.
Group the luggage list with simple headings so it does not become an intimidating wall:
- Clothes
- Toiletries
- Electronics
- Documents
For the Japan trip, my electronics group had a line that a domestic trip never would: a plug adapter, because Japan’s outlets and voltage are not the same as home.
That is the kind of thing you want sitting in a checklist, not in your memory, because you will not think of it until you are standing in a Tokyo hotel room holding a charger that does not fit.
5.3 Reuse It for Every Trip
Here is the part that makes this pay off long-term. Once you have built a solid packing list, you never build it from scratch again.
- Keep a master packing note in your Travel folder
- For each new trip, duplicate it (long-press the note, tap Duplicate), rename it for the trip, and adjust
- Uncheck everything, trim what you do not need, add the trip-specific items
A beach weekend and a winter city break share maybe 70 percent of the same list. Duplicating means you start from that 70 percent every time instead of staring at a blank note trying to remember whether you packed socks.
Over a year of travel, this saves you real time and, more importantly, it means you stop forgetting the same things you always forget, because they are permanently on the list now.
6. Tracking Your Trip Budget
Money on a trip falls apart in two predictable ways.
You either lose track of what you are spending until the trip is over and the credit card statement ruins your week, or you are abroad doing currency math in your head and have no real idea what anything costs back home.
Apple Notes handles both, and better than you would expect, thanks to a feature called Math Notes that turns any note into a live calculator.
I will keep this focused on the travel angle here, since the full mechanics deserve their own treatment, but if you want the complete breakdown of everything Math Notes can do, I put it all in my Apple Math Notes guide.
6.1 A Simple Running Spend Tracker
The lightest version is just a list you add to as you go.
In your budget section, type what you spend on its own line, then total it with a single equals sign:
Hotel = 480
Food = 165
Tours = 90
Transport = 60
Hotel + Food + Tours + Transport =
The moment you type that last equals sign and hit space, Notes calculates the total and shows it.
Update any number and the total recalculates on its own. No calculator app, no spreadsheet, just a running tally that lives right inside your trip note.
This is the closest Notes gets to a spreadsheet, and for a trip budget it is honestly enough.
You are not doing accounting. You are answering one question: “how much have I spent so far,” and this answers it instantly.
6.2 Converting Currency Abroad
This is where it earns its place on an international trip.
Math Notes converts currencies using live exchange rates, so you can log spending in the local currency and see it in your home currency at the same time.
In Japan, everything is in yen, and the mental math is rough. So I logged costs in yen and let Notes do the conversion:
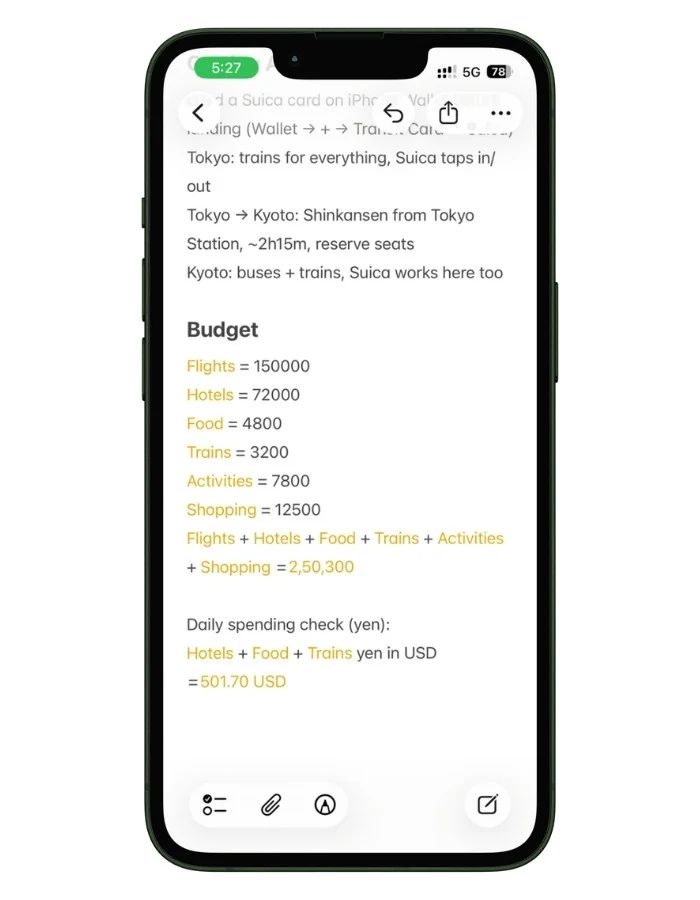
That last line gives you the total converted to dollars, using current rates when you are online.
Suddenly “72,000 yen” stops being an abstract number and becomes a real amount you can actually feel.
Two honest things to know:
- The conversion needs an internet connection to pull fresh rates, though it caches the last rates it fetched, so it still works roughly offline
- It converts one expression at a time. You cannot keep a single tracker mixing yen and dollars and euros and get one combined total. For a single-currency trip it is great. For a multi-country trip where the currency keeps changing, you hit a wall.
6.3 When You Need More
Math Notes is a capable calculator, but it is not a budgeting system. It will not categorize your spending, chart it, or sum a column inside a table.
If your trip budget is detailed enough that you want real formulas and proper categories, that belongs in a spreadsheet, Apple Numbers or Google Sheets.
7. Storing Travel Documents Safely
Losing your passport abroad is the nightmare. Losing the photocopy of your passport because it was buried in your email is the avoidable version of that nightmare.
Apple Notes is a genuinely good place to keep digital backups of your important travel documents, as long as you understand a few things most people never get told.
7.1 Scanning Your Documents
Notes has a built-in scanner that is better than just snapping a photo. It detects the edges of a document, straightens it, and cleans up the image.
- Tap the paperclip icon in a note
- Choose Scan Documents
- Hold your phone over the passport, visa, or insurance page
- It captures automatically, and you can add more pages to the same scan
What to keep a scanned backup of:
- Passport photo page, and any visas
- Travel insurance policy and its emergency phone number
- Vaccination records, if your destination requires them
- Driver’s license or a second photo ID
- Booking confirmations you would hate to lose
For the Japan trip, having my passport and insurance scanned into a note meant that even if my bag walked off, I had everything I needed to deal with an embassy or a hospital, sitting on my phone and synced to my iPad.
7.2 The Searchability Catch Nobody Mentions
Here is something that surprises almost everyone.
When you scan a document into Notes, the app reads the text inside it. You can search your notes for a word that only appears inside a scanned image, and Notes will find it.
That is genuinely useful, you can search “policy number” and land on your insurance scan.
But the moment you export that scan as a PDF, that searchable text layer disappears. The exported PDF behaves like a flat image. Open it in another app, try to search or select the text, and you get nothing.
What this means in practice:
- Inside Notes: scanned documents are searchable. Great.
- Exported as a PDF to share or store elsewhere: the text is gone, it is just a picture.
If you only need the scan as a visual backup, which is the case for most travel documents, this does not matter at all.
You are going to look at your passport scan, not search it. But if you were counting on exporting searchable PDFs of your documents, know that Notes will not do that cleanly.
There are workarounds involving exporting through other apps, but for travel, treat your Notes scans as visual backups and you will be fine.
7.3 Lock the Sensitive Stuff
A scanned passport is exactly the kind of thing you do not want visible if someone picks up your unlocked phone.
Notes lets you lock individual notes behind Face ID or a passcode.
- Put your sensitive scans in their own note
- Long-press the note and choose Lock
- It now requires Face ID or your passcode to open
A couple of real limitations to know before you rely on this:
- You cannot lock a note that has collaborators. If you share your trip with family, the shared note cannot also be locked. So keep sensitive documents in a separate, private, locked note, not in the shared trip note.
- Locked notes do not show their attachments when viewed on iCloud.com, you can only open them on your actual Apple devices.
I keep my document scans in a dedicated locked note, separate from the main trip note, every single trip. It takes one extra step and it means a lost or grabbed phone does not hand someone my passport. If you want the full walkthrough, I went deep on it in my guide on how I secure sensitive information using iPhone Notes.
8. Using Apple Notes Abroad
A domestic trip and an international trip are different animals.
Abroad, two things go wrong that never come up at home: you cannot read anything, and you cannot count on having a signal.
This is where being deep in Apple’s built-in apps quietly pays off, because the tools that solve both problems are already on your phone.
8.1 Translation Right Inside Your Trip Note
Abroad, the most useful thing you can do before you go is build a small phrases section in your trip note, the handful of things you know you will need: your hotel address in the local language, dietary restrictions, “where is the train station,” “I need a pharmacy.”
Type them in while you have time and WiFi, and they are there when you need them, signal or not.
What makes this work inside Notes is that you can translate text without ever leaving the app.
Select any text in a note, tap Translate in the pop-up menu, and Notes detects the language and shows the translation right there.
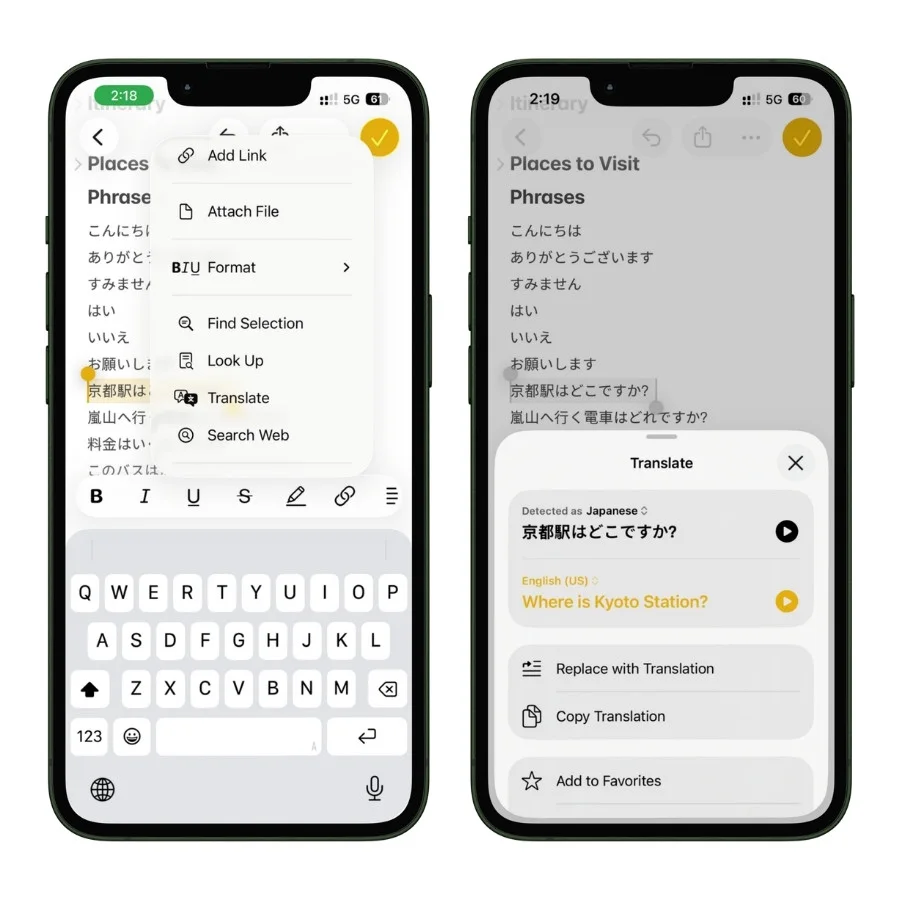
You can even tap Replace with Translation to swap the text in place, or Copy Translation to grab it.
So the workflow is simple:
- Before the trip, type the English phrases you expect to need into a phrases note
- On the ground, select a phrase, translate it, and show your screen to the person you are talking to
- Or write down something you need to remember in the local language and translate it back to understand it later
In Kyoto, I kept a short phrases note like this, and selecting a line to translate it on the spot was faster than fumbling with anything else. It is not going to make you fluent, and it occasionally fumbles slang or nuance, but for getting understood, it does the job, and it lives right alongside the rest of your trip plan.
8.2 Offline Access When You Have No Signal
This is the single most underrated reason to plan in Apple Notes for international travel.
Your note is stored on your phone. It opens instantly with no signal, no WiFi, no data, nothing.
Think about when that matters abroad:
- You land, you have no local SIM yet, and you need your hotel address to tell a taxi driver
- You are on a subway underground with zero signal and need to check the next stop
- You are rationing data on an expensive roaming plan and do not want to burn it loading an app
Everything you typed into your note (your itinerary, addresses, confirmation numbers, the phrases section, your scanned documents) is right there, offline, the moment you open the app.
A cloud-based travel app makes you wait for a connection. Notes just opens.
One thing to do before you leave, while you still have WiFi: open your trip note and make sure it has fully synced and loaded on your phone, including any scanned documents. Open the scans once so they cache locally. That way, everything is genuinely on the device, not waiting in the cloud for a signal you will not have.
8.3 Apple Maps and Saved Places
Throughout this guide, I have mentioned pasting map links into your note. Abroad, this connects to one more useful habit: saving places and downloading maps for offline use.
- Paste map links for your hotel, key sights, and restaurants into your note, so each is a tappable location even when you are reading the note offline
- Download the area map in your maps app before you go, so navigation itself works without a signal
- For a wishlist of spots, the Places to Visit section from Section 4 becomes your offline guide. Tap a saved location, and you are navigating
The combination is what makes it work: the note holds what you want to do and where, and the offline map handles getting there. Neither needs a connection once you have set them up at the hotel’s WiFi that morning.
9. Planning Group and Family Trips Together
A solo trip note only has to make sense to you. The moment someone else is on the trip, the whole game changes, and this is where a shared Apple Note quietly beats group chats and forwarded screenshots.
Instead of texting the hotel address four times and answering “what time is the flight again” on repeat, everyone looks at the same note.
I have run this both ways: a group trip where four of us needed the same itinerary, and a family trip where my mom just needed to see the plan without me relaying it piece by piece.
Here is how to set it up, and where it strains.
9.1 Sharing a Trip Note
This is the one setup detail people get wrong, so get it right from the start.
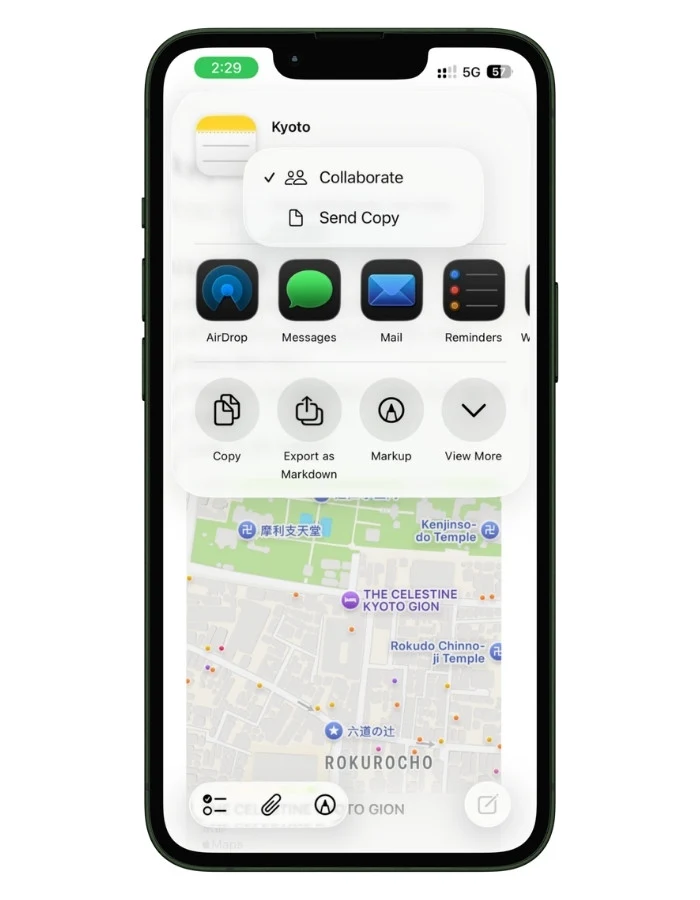
- Open your trip note and tap the share icon
- Choose Collaborate, not Send Copy
- Pick how to send the invite (Messages is the most reliable)
The difference matters more than it looks:
- Collaborate creates one shared, live note that everyone edits together. A change one person makes shows up for everyone.
- Send Copy sends a frozen snapshot. Everyone gets their own separate version, edits go nowhere, and you are right back to the chaos you were trying to avoid.
If you only remember one thing about sharing, it is Collaborate, not Send Copy.
9.2 Permissions and Live Editing
When you share, you control what others can do:
- Can make changes, lets everyone add and edit, the right choice for a trip everyone is building together
- View only lets people see but not touch, which is what you want for, say, sharing the finished plan with a parent who just needs to read it
For my family trip, my mom got view-only, she wanted to see the itinerary, not rearrange it. For the group trip, everyone had edit access so we could all throw in restaurant ideas and flight details.
Once shared, edits sync for everyone, and you will see a small indicator on the note when someone else has made a change you have not looked at yet.
9.3 The House-Sitter Note (A Trick I Picked Up From Reddit)
This is not about the trip itself, but it turned out to be one of the most useful ideas I came across.
I did not think of it. I saw a few people on Reddit mention doing it, tried it myself, and now I set one up every time I travel.
If someone is watching your home, your pet, or your plants while you are away, a shared note is perfect for it. Create a separate note (not your trip note) and share it with whoever is house-sitting:
- Alarm codes and where the spare key is
- Pet feeding instructions and the vet’s number
- Plant watering schedule
- WiFi password
- Who to call if something breaks, and where the water shutoff is
Both of you can see it, they can check things off as they go, and you can update it in real time if something changes while you are away.
It beats a long text they will lose in a thread, and it keeps all the “how does the house actually work” detail out of your trip plans.
It is a small thing, but it is a good example of why I read through so many threads when I put this together.
The best uses of Apple Notes are not always the obvious ones, and a lot of them come from regular people quietly sharing what works for them.
One condition, though: this only works if your house-sitter is on an iPhone. So if the person watching your place is on Android, this trick isn’t really for you. Worth checking what phone they carry before you build the note.
9.4 Where Collaboration Breaks
I would be doing you a disservice if I pretended shared notes are flawless.
They are good, but three things genuinely go wrong, and knowing them upfront saves the frustration.
- Sync lag. Shared notes usually update quickly, but not always instantly. On a weak connection, or occasionally for no clear reason, an edit can take a while to show up for everyone. Do not treat a shared note as a live, to-the-second source of truth the way you would a group chat. Build in a little buffer.
- Simultaneous edits can collide. If two people edit the exact same spot at the exact same moment, Notes resolves it with last-write-wins, meaning one person’s change can quietly overwrite the other’s. In practice, this is rare; you are seldom both typing in the same cell at the same second, but if you see something vanish, this is usually why.
- You cannot lock a shared note. A note with collaborators cannot be Face ID locked. So anything sensitive (passport scans, anything private) stays in your own separate, locked note, never in the shared trip note.
And one human failure mode that has nothing to do with the software: shared planning only works if people actually use it.
The most common way these break down is one person diligently keeping the note updated while everyone else ignores it and keeps asking questions in the group chat.
Agree as a group, before the trip, that the note is the single source of truth. Otherwise, you have built a beautiful note that only you read.
9.5 When a Dedicated App Is the Better Call
For most trips, a couple or a small group of friends, a shared note is the lower-friction, no-app-required option, and it wins. But be honest about scale.
A dedicated tool like Wanderlog is the better choice when:
- The group is large (more than four or five people), and everyone is adding a lot
- You need expenses split in complicated, uneven shares across many people
- The trip is heavily map-based, with dozens of pinned spots everyone is contributing to
- Anyone on the trip is on Android, since shared Notes is Apple-only and falls apart the moment a non-Apple traveler is involved
That last point is the real dealbreaker for a lot of groups.
Apple Notes lives entirely inside the Apple world. One friend on a Pixel and the shared-note plan is dead on arrival; that is when you move to something cross-platform.
10. Where Apple Notes Falls Short for Travel
I have spent this whole guide showing you what Apple Notes does well, and it does a lot well.
But the fastest way to lose trust in a tool is to discover its limits at the worst possible moment, like at a gate when your flight just changed.
So here is every real limitation I hit, gathered in one place, each with the workaround that actually helps.
10.1 It Cannot Track Your Flights
This is the big one.
Apple Notes has no idea your flight exists. It will not tell you about a delay, a gate change, or a cancellation. It is a piece of paper that syncs, not a live tracker.
The workaround: keep a flight-tracking app running alongside Notes purely for alerts. TripIt’s pro tier does this, and the airline’s own app does it too. Notes holds your plan; the tracker watches your flights. Use both.
10.2 It Will Not Build Your Itinerary for You
There is no email import.
You cannot forward a booking confirmation and have Notes turn it into an itinerary. Every flight number, hotel address, and confirmation code goes in by hand.
The workaround: there is no magic here, but copy-paste is faster than retyping. When a confirmation email arrives, copy the key details straight into your note as you book, rather than letting them pile up unentered. Doing it at booking time, a little at a time, beats facing a wall of data entry the night before you leave.
10.3 You Cannot Sum a Column in a Table
Notes tables look like spreadsheets, but they are not. There are no formulas. You cannot total a column of expenses inside a table.
The workaround: use Math Notes for the totals, with your numbers as a list rather than relying on the table to add them. If you need true spreadsheet math, that is what Apple Numbers or Google Sheets are for.
10.4 Tables Are Rigid
You cannot resize columns, merge cells, or color anything.
Notes auto-sizes columns to the longest entry, so one long cell can squeeze everything else on the screen, which is especially painful on a phone.
The workaround: keep cell text short and put longer detail below the table. Treat the table as a glance-able grid, not a document.
10.5 There Is No Version History
If you accidentally delete or overwrite something in a note, there is no clean “go back to yesterday’s version” button the way there is in Google Docs.
An accidental undo or a collaborator overwriting your text can lose work.
The workaround: for anything truly important, the Recently Deleted folder holds whole deleted notes for 30 days, so a deleted note is recoverable. But for edits within a note, your safety net is thin, so for irreplaceable info (confirmation numbers, document scans), keep a second copy somewhere outside the note.
10.6 Exported Document Scans Lose Their Searchability
Scanned documents are searchable inside Notes, but export them as a PDF, and that searchable text layer disappears. The PDF becomes a flat image.
The workaround: for travel, treat your scans as visual backups, which is all most people need them to be. If you genuinely need a searchable PDF of a document, run it through a dedicated scanning app instead of exporting from Notes.
10.7 It Is an Apple-Only World
This is the limitation that catches groups off guard.
Everything here—syncing, sharing, collaboration—lives entirely inside the Apple ecosystem. There is no Android app and no real Windows app.
The web version at iCloud.com is limited, and locked notes will not even show their attachments there.
The workaround: if everyone on the trip is on Apple devices, this never comes up. The moment a traveler is on Android, move shared planning to something cross-platform like a shared Google Doc or Wanderlog. Keep Apple Notes for your own private planning.
10.8 Sync Is Usually Reliable, Until It Is Not
Notes syncs through iCloud, and most of the time it is seamless.
But sync can lag on weak connections, and there have been bugs, including one where accepting new iCloud terms temporarily made notes appear to vanish (they were not actually gone; a sync toggle had flipped off).
The workaround: before any trip, confirm your travel folder is created under iCloud account and fully synced across your devices. Open the note on a second device (your iPad, say) to verify everything is really there. If notes ever do seem to disappear, check Settings, your name, iCloud, Notes, and make sure sync is on, before panicking.
None of these are reasons to avoid Apple Notes for travel. They are reasons to use it for what it is good at and to know where its edges are.
Notes is your planning hub and your offline source of truth. It is not a flight tracker, not a spreadsheet, and not a cross-platform collaboration suite.
Pair it with one specialized tool when you hit one of these walls, and you get the best of both: the speed, privacy, and simplicity of Notes, with a backstop for the few things it genuinely cannot do.
11. Travel Note Templates You Can Copy
Everything in this guide comes together into a few templates you can lift straight into Apple Notes.
Here are the two I use most, ready to copy and paste. Replace the bracketed placeholders with your trip, and you are set.
11.1 The Master Itinerary Template
Your home base note. Build it once per trip, make each section a Heading so it collapses, and for a bigger trip, link out to city notes from here.
11.2 The Packing List Template
The three-list split from Section 5. Make each line a checklist item so you can tick things off as you go.
The Honest Bottom Line
After all of it (the trips, the testing, the wins, and the moments it let me down), here is where I land.
Apple Notes is the best free travel planner most people already have and do not realize it. It is fast. It is private. It works with no signal. And it holds an entire trip in one place you can open in a second.
- For a road trip or a domestic long weekend, it is genuinely all you need
- For an international trip, the offline access, currency math, translation, and document backups are what set it apart
It is not perfect, and I have been straight with you about that:
- It will not track your flights
- It will not build your itinerary from an email
- It is not a spreadsheet
- It falls apart the moment someone on the trip is not on an Apple device
But knowing the limits is exactly what makes it powerful.
You use Notes as your planning hub and your offline source of truth. When you hit a wall, you add one specialized tool to cover that one gap.
A flight tracker for alerts. A spreadsheet for a heavy budget. A cross-platform app for a mixed-device group. Nothing more.
That is the whole philosophy: use the simplest thing that works, and add more only when a real need shows up, never because an app told you to.
So who is this for?
If you are on an iPhone, you value simplicity and privacy, and you would rather build your trip your own way than fill in someone else’s template, this is your system.
Copy the templates, build your first trip note, and take it for a run.
You will probably find, like I did, that the boring little app that came free on your phone handles more than almost anything you would have paid for.
Wherever you are headed next, I hope it is a good one. Safe travels.
FAQs
Can Apple Notes track my flight or warn me about delays?
No. Apple Notes has no flight-tracking ability at all. It will not notify you about delays, gate changes, or cancellations; it only holds the flight details you type in yourself. If you want live flight alerts, run a flight tracker alongside it. TripIt’s free tier does this well, and your airline’s own app does too. Use Notes for the plan and the tracker for the alerts.
Is text inside a scanned passport or document searchable?
Inside the Notes app, yes. When you scan a document, Notes reads the text, and you can search your notes for words that appear inside the scan. The catch: if you export that scan as a PDF, the searchable text layer disappears, and it becomes a flat image. For travel, this rarely matters; you keep scans as visual backups, which is all most people need.
Can an Android friend see my shared travel note?
Not really. Apple Notes sharing and collaboration live entirely inside the Apple ecosystem. There is no Android app, and the iCloud.com web version is limited. If anyone on your trip is on Android, move shared planning to something cross-platform like a shared Google Doc or Wanderlog, and keep Apple Notes for your own private planning.
Does Apple Notes work offline while traveling?
Yes, and this is one of its biggest advantages abroad. Your notes are stored on your phone, so they open instantly with no signal, no WiFi, and no data. Your itinerary, addresses, confirmation numbers, and scanned documents are all there offline. One tip: before you leave, open the note (and any scans) on WiFi so everything is fully cached on the device, not waiting in the cloud.
Can I use Apple Notes for multiple trips without it getting messy?
Yes. Keep all trips in one Travel folder, give each trip its own master note, and pin the active one to the top.
Is it safe to keep passport and ID scans in Apple Notes?
Reasonably, if you take two steps. Keep sensitive scans in a separate note locked with Face ID or a passcode, and store that note in iCloud so it survives a lost phone by syncing to your other devices. Never put document scans in a shared note, because notes with collaborators cannot be locked. For anything genuinely irreplaceable, keep a second copy outside Notes too.
Can I plan a group or family trip in Apple Notes?
Yes, as long as everyone is on Apple devices. Share your trip note using Collaborate (not Send Copy), set permissions to “Can make changes” for co-planners or “View only” for people who just need to read it, and everyone sees the same live note. It works best for couples and small groups. For large groups, complex expense splitting, or anyone on Android, a dedicated app like Wanderlog is the better choice.
Can Apple Notes convert currency for a trip budget?
Yes, using the built-in Math Notes feature. Type an amount with a currency and convert it with a line like “50000 JPY in USD =”, and Notes uses live exchange rates when you are online. It converts one expression at a time, so it cannot maintain a single tracker mixing several currencies into one total. For one country at a time, it works great.
Do I need to pay for anything to use Apple Notes for travel?
No. Apple Notes is free and already on your iPhone. There is no subscription, no premium tier, and no account to create beyond the Apple ID you already have. The only thing it uses is your existing iCloud storage for syncing, which the free tier covers for text and a reasonable number of scans.