How I Use Apple Notes for Project Management
You know what’s funny? I never thought I’d use the Notes app for managing projects.
I used to think it was just for random ideas or grocery lists.
But one day, I started writing things down for a project I was working on—and somehow, it just worked.
Now I’m using it for almost everything.
Tasks, deadlines, stuff to remember, things I need to send people… all in one place.
And the more I used it, the more I realized—this little app can actually handle a lot.
So if you’re tired of jumping between apps or just want something that’s already on your phone, I’ll show you how I use Notes to manage projects from start to finish.
- 1. Getting Started: Setting Up Your Notes App for Project Management
- 2. Organizing Projects with Checklists
- 3. Advanced Features for Better Organization
- 4. Syncing and Accessing Notes Across Devices
- 5. Collaborating with Team Members in Real-Time
- 6. Adding Multimedia to Enhance Your Project Notes
- 7. Using Apple Maps for Location-Based Notes
- 8. Setting Reminders and Deadlines within Notes
- My Final Take
- FAQs
1. Getting Started: Setting Up Your Notes App for Project Management
Alright, before you start adding a bunch of stuff into Notes, it’s better to set things up a bit.
Nothing fancy—just creating a folder for your project, naming it right, and figuring out how you wanna lay things out.
Trust me, doing this from the start saves you from scrolling through a mess later.
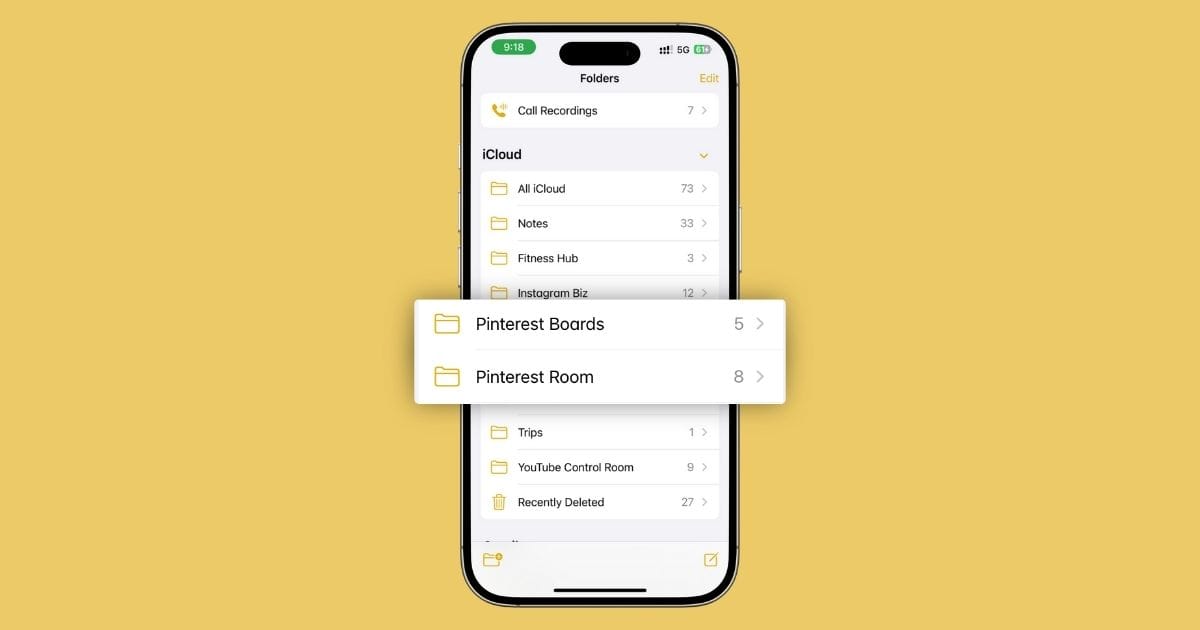
1.1 Creating a New Project Folder
Alright, first things first—let’s get your project organized.
The Notes app lets you create folders to keep everything in one place.
Here’s how to set up a new project folder:
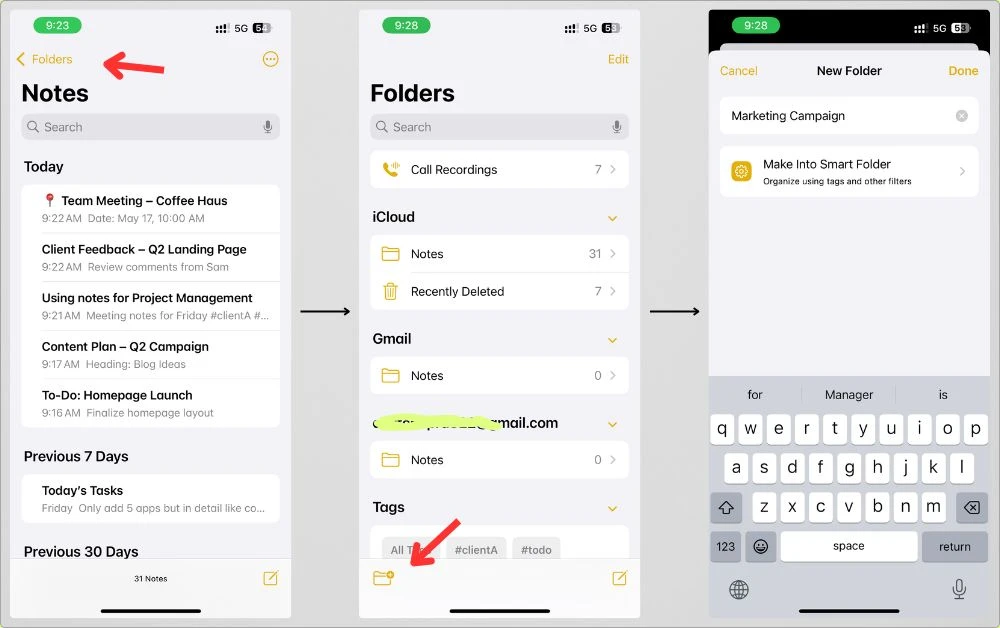
- Open the Notes App: Fire up the Notes app on your iPhone.
- Go to the Folders View: Tap the back arrow at the top left to get to your Folders.
- Create a New Folder: Tap New Folder Icon at the bottom left of the screen.
- Name Your Folder: Give it a name that’s related to your project, like “Marketing Campaign” or “Home Renovation.”
Now, all your project-related notes will be neatly tucked away in that folder, making it easier to find everything when you need it.
You can even create subfolders if you’ve got multiple projects within the same category.
1.2 Naming Your Project
When it comes to naming your project, you wanna keep it clear and straightforward.
Here are a few tips:
- Keep it Descriptive: Name the project something that immediately tells you what it’s about. No need for fancy names—just something like “Website Redesign” or “Event Planning.”
- Use Dates: If it’s a time-sensitive project, add the month or year to the name (e.g., “Q3 Marketing Plan”).
- Keep it Short: Long names can get messy and hard to read. Keep it snappy but descriptive.
This way, you’ll always know exactly what project you’re looking at when browsing your folders.
Plus, if you’ve got a ton of folders, short names help keep things from getting cluttered.
1.3 Customizing Notes for Projects
Once you’ve got your folder and project names sorted, it’s time to set up the notes themselves.
Here’s how to customize your notes for easy project management:
1.3.1 Use Bullet Points for Tasks
When you’re writing your project plan or to-do list, use bullet points to keep things neat.
It’ll make it easier to read and check off tasks as you go.
1.3.2 Use Headings
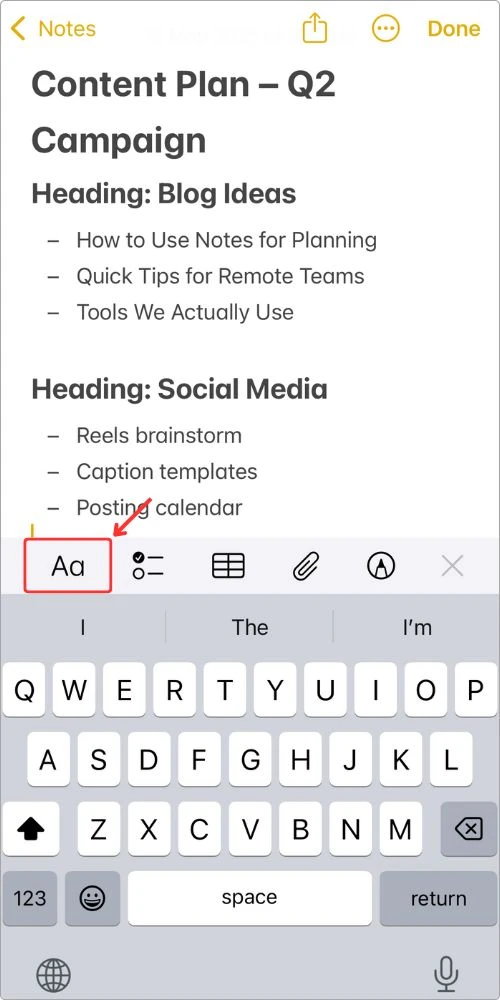
Add headings like “To-Do List,” “Deadlines,” or “Team Members” to break up your notes into sections.
Tap the “Aa” button at the top to choose Heading 1, 2, or 3 for different sections.
This keeps your notes organized and makes it super easy to scan through later.
2. Organizing Projects with Checklists
Alright, let’s talk checklists.
If you’re like me, you know there’s nothing more satisfying than crossing something off a list.
And with the Notes app, you can make your own to-do lists with checkboxes, making it super easy to stay on track.
Here’s how you do it:
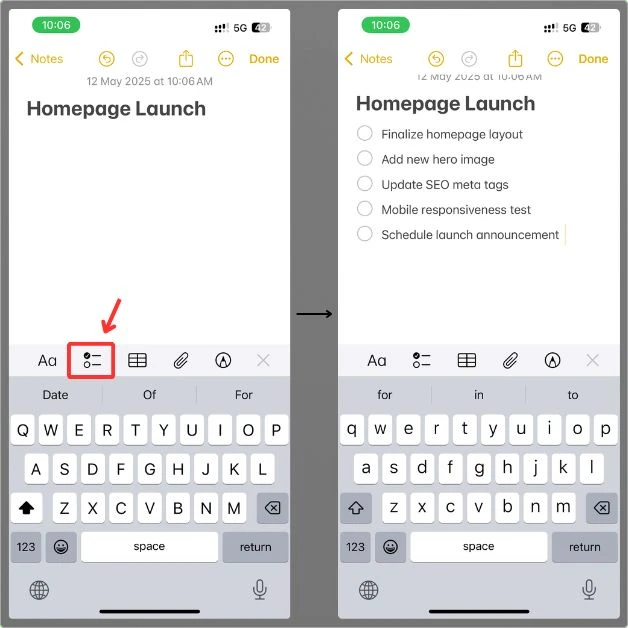
- Open up a note in your project folder.
- Tap the little circle with the checkmark icon at the top.
- Start typing your task, and each time you hit return, it’ll add another checkbox for the next item on your list.
- Just tick off the boxes as you go—simple as that.
Now you’ve got a neat list of things to do, and every time you check something off, you’re getting closer to wrapping up your project.
2.1 Breaking Down Big Tasks into Subtasks
Big projects can feel overwhelming.
But if you break them down into smaller, bite-sized tasks, they become way more manageable.
Here’s how you do it:
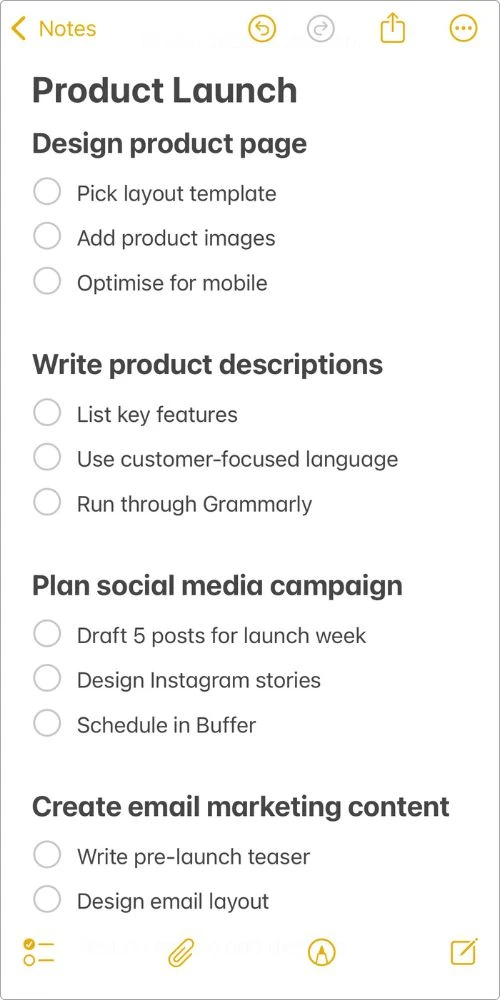
Let’s say you’re planning a launch for a new product.
Instead of writing “Launch Product” as one giant task, break it down:
- “Design product page”
- “Write product descriptions”
- “Plan social media campaign”
- “Create email marketing content”
Each of these smaller tasks will get its own checklist.
And now you’re not looking at one huge, overwhelming project—you’re looking at manageable steps.
You’ll get through it in no time.
Also read: How I Use Apple Notes as a Daily Planner on My iPhone
2.2 Checking Off Completed Tasks
I gotta say—there’s something magical about checking off a task.
You know what I mean?
Every time you tick something off, it’s like a mini celebration.
And it keeps you motivated to power through the next task.
So, as you’re working through your project, just keep ticking off the items in your checklist.
You’ll start to feel like you’re making real progress, and that little dopamine hit when you check something off? Priceless.
Plus, when you look back at your list and see all those checked boxes, you’ll feel pretty damn good about the progress you’ve made.
Trust me, it works.
3. Advanced Features for Better Organization
If you’ve only been using Notes to type random stuff, you’re missing out on a few features that can actually keep things way more organized.
Let’s break them down one by one.
3.1 Collapsible Sections
Okay, so if you’ve got a long project with a lot of details, you know it can get messy real quick.
But the good news is, Notes has got your back with collapsible sections.
It’s like a magic trick that keeps your notes from looking like a chaotic mess.
Here’s how it works:
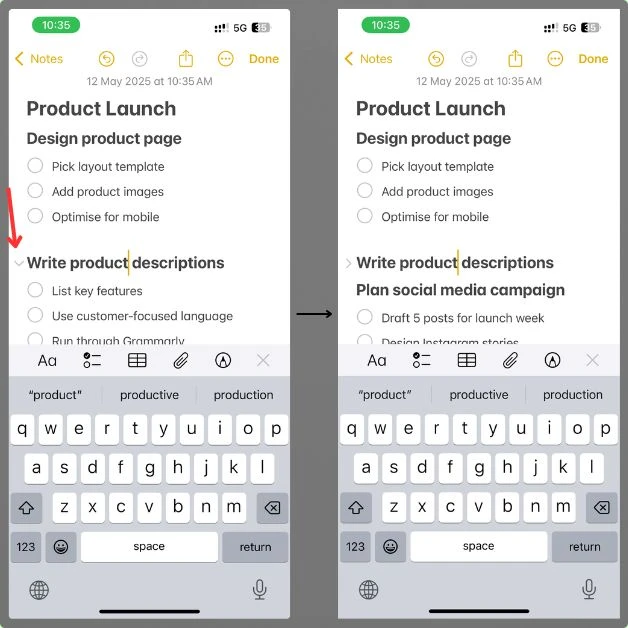
- Open up your project note.
- Select a heading (eg, Write product descriptions).
- After you add a heading, you’ll see a little arrow on the left. Tap it, and it’ll hide or show everything under that section—makes long notes way easier to scroll through.
This makes long notes way more manageable.
Instead of scrolling forever to find a specific section, you just collapse it, keeping your note neat and organized.
3.2 Smart Folders
Smart Folders are like the MVP of organization.
Instead of manually sorting your notes into different folders, Notes does it for you.
Once you’ve set up Smart Folders, it will automatically organize your project notes based on tags, keywords, or content type.
For example:
- You could have a Smart Folder that automatically collects everything related to a project, like “Marketing Campaign,” no matter which folder you put it in.
- Or, set it up so that any notes with the tag “Urgent” get grouped together.
You set the rules once, and from there, Notes keeps things organized without you having to think about it.
3.3 Tagging for Quick Searching
Tags are a game-changer.
If you’re working on a bunch of different projects and need to quickly find something specific, tagging is the way to go.
Here’s how to do it:
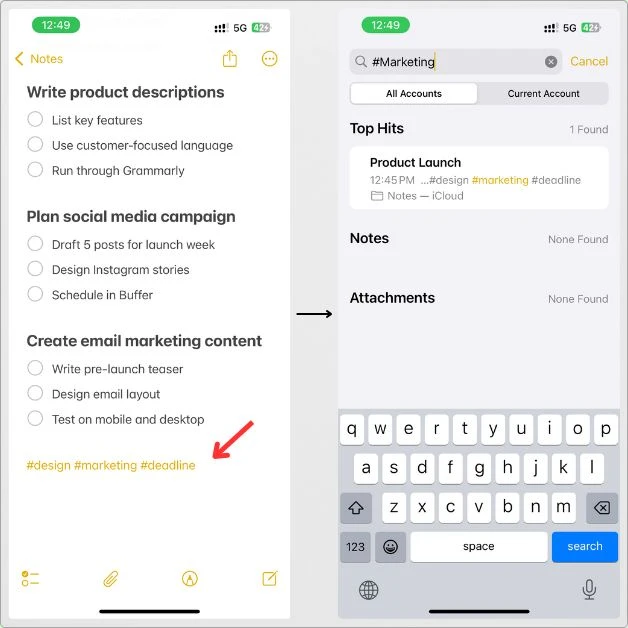
- When you create a note, just add a tag at the bottom like “#design,” “#marketing,” or “#deadline.”
- Later, when you need to find all your notes related to “marketing,” just search for the “#marketing” tag, and you’ve got all your related notes right there.
This way, you can organize your notes without worrying about folders.
Just tag ’em, search for them, and you’re good to go.
It’s a super quick and easy way to stay on top of everything.
4. Syncing and Accessing Notes Across Devices
Here’s the thing—when you’re working on a project, you’re not always sitting in one place with one device.
You might jot down ideas on your iPhone in the morning, review them on your Mac at work, and make edits on your iPad later at night.
That’s where syncing kicks in.
As long as iCloud is turned on for Notes, everything you write or change gets updated across your Apple devices.
It’s just there, ready when you need it.
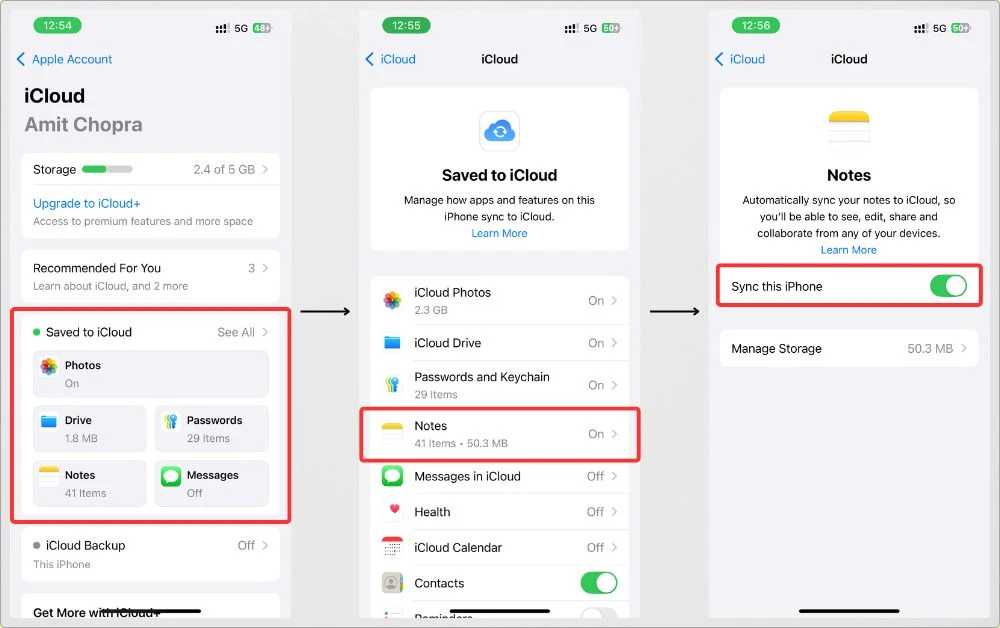
To make sure syncing is on:
Go to Settings → Tap your Apple ID (top) → iCloud
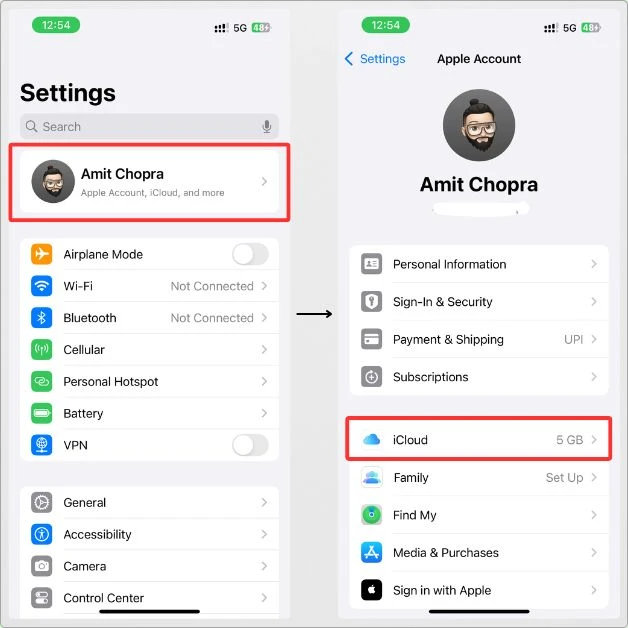
Scroll down and check that Notes is turned on.
You’ll see it listed under Saved to iCloud.
If that switch is green, you’re good to go.
And if you ever switch between devices often, this syncing thing saves you a ton of back-and-forth.
Your project stays with you, no matter where you are.
Also read: How to secure sensitive information in iPhone Notes
5. Collaborating with Team Members in Real-Time
When you’re working with others on a project, it helps to keep everything in one place instead of sending updates back and forth.
Notes makes it really easy to share what you’re working on, so everyone can stay in the loop and make changes without any back-and-forth.
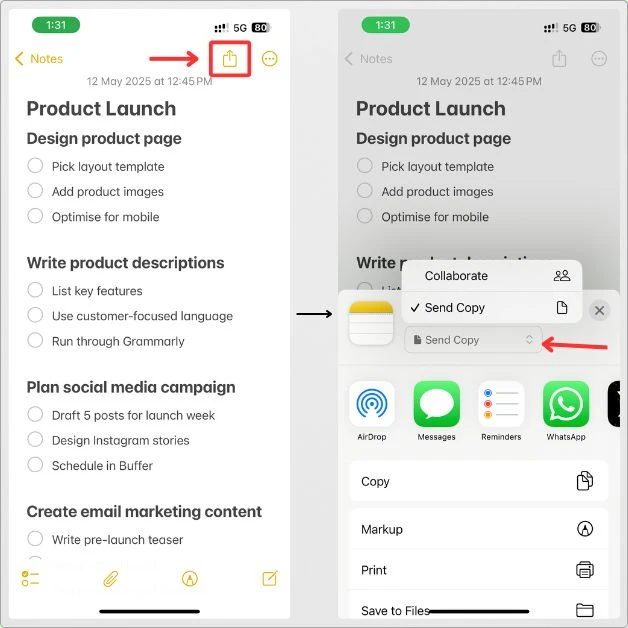
Here’s how to share your notes:
- Open the note you want to share.
- Tap the Share button at the top (the box with the arrow pointing up).
- From here, select the Collaborate option to invite people to edit the note, or send a simple copy of the note if you just want them to view it.
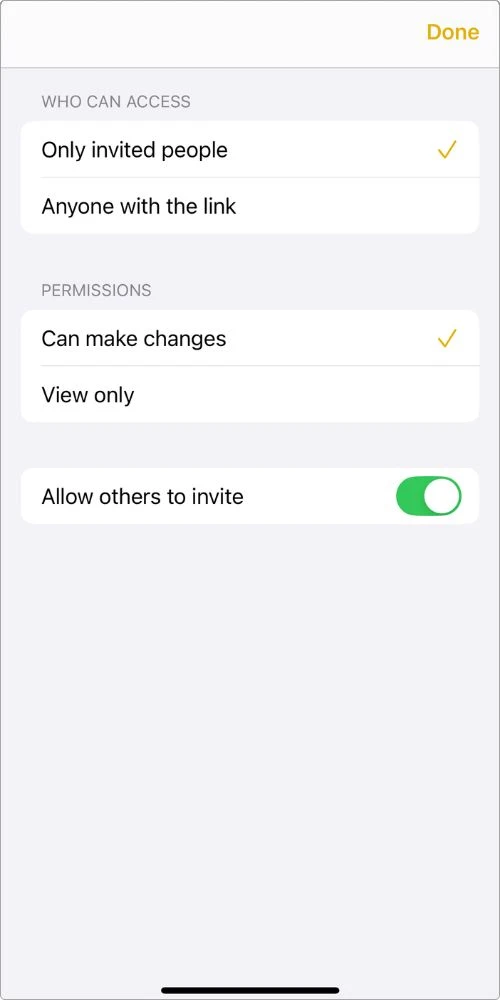
Now, to make sure only the right people have access to make changes or view the note, you can set permissions:
- After selecting Collaborate, you’ll see options for Who Can Access. You can choose between:
- Only invited people: This is perfect for keeping your project secure.
- Anyone with the link: A quick way to share it widely if you need a broader group to view or contribute.
- Under Permissions, you can choose whether people can:
- Make changes: This lets your team members add to or edit the note.
- View only: If you just want them to see the note without making any changes, select this option.
This setup gives you full control over who can see and edit your notes, making it super simple to collaborate while keeping things organized.
5.1 Real-Time Editing
Now, here’s where the magic happens.
Once you’ve shared your note and set the permissions, everyone involved can edit the note at the same time.
This real-time collaboration is huge for keeping things moving without waiting for people to send back updates.
Benefits of real-time editing:
- Instant updates: When someone adds or changes something, you see it happen live.
- No version confusion: Everyone sees the same note, so you don’t have to worry about different versions or who has the most recent copy.
- Faster progress: As everyone works together, you can move through tasks quicker and stay ahead on deadlines.
Real-time editing helps keep your project flowing smoothly, ensuring everyone can pitch in when needed and make updates instantly.
6. Adding Multimedia to Enhance Your Project Notes
Sometimes, text alone isn’t enough to capture everything you need in a project.
The great thing is, the Notes app lets you enhance your notes with multimedia—whether it’s photos, documents, audio, or even sketches.
This makes your project notes more interactive and detailed.
6.1 Adding Photos & Videos
You can easily add visuals to your notes, which is perfect for things like product shots, screenshots, or visual progress.
Here’s how to do it:
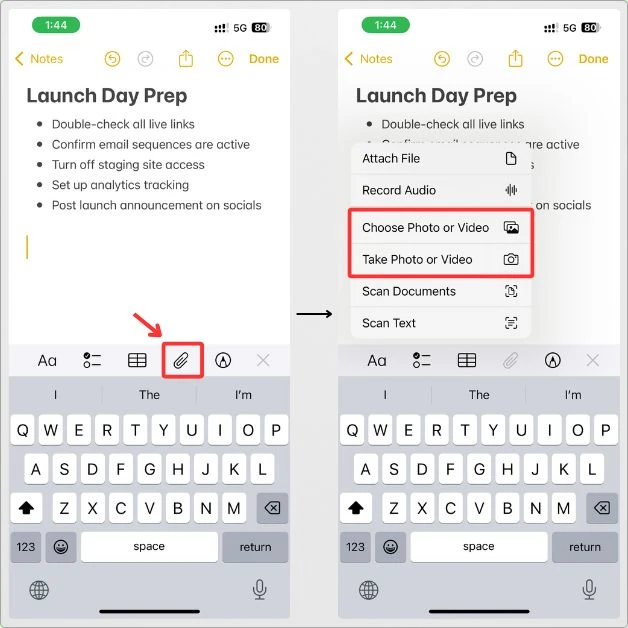
- Open the note you’re working on.
- Tap the paperclip icon in the toolbar above the keyboard.
- Choose whether you want to Take Photo or Video right away or Choose Photo or Video from your gallery.
This is great for adding images that help explain your project or just keeping things visually engaging.
You can even move and resize the images once they’re in your note.
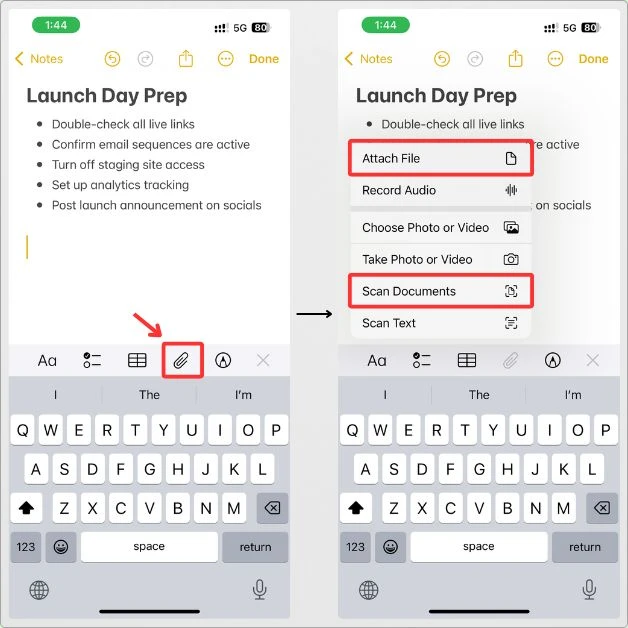
6.2 Attaching Files & Scanning Documents
If you need to attach documents—whether it’s a contract, a design, or something else—you can do that, too.
Here’s what you need to do:
- Tap the paperclip icon in the toolbar.
- From there, you can Attach File or choose to Scan Documents directly into the note.
- The Scan Documents feature is awesome for quickly snapping a picture of a document.
Now, instead of having a pile of separate files or papers, everything you need is neatly inside your project note.
6.3 Recording Audio
For quick ideas, voice memos, or discussions, you can record audio directly in your note:
- Tap the paperclip icon in the toolbar.
- Hit Record Audio, and the Notes app will start recording. You can then stop and save it right within the note.
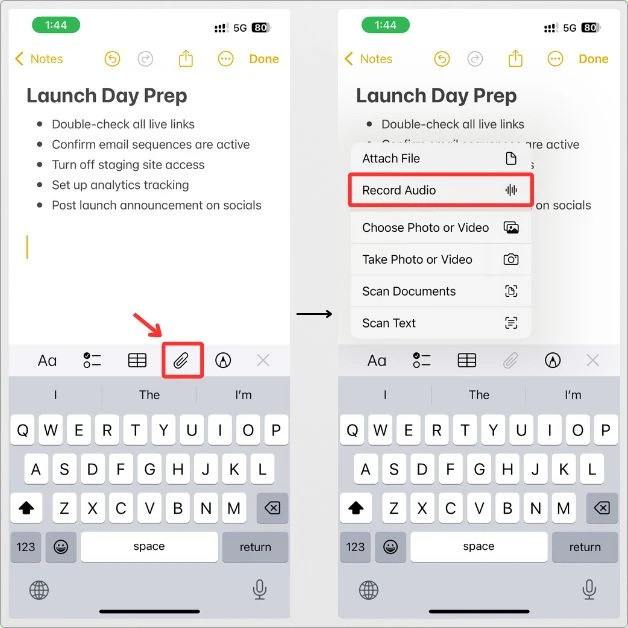
This feature is perfect for capturing ideas on the go or leaving voice memos for teammates who need quick feedback.
6.4 Using Sketches & Drawings
When you want to quickly sketch out an idea, flowchart, or design, you can draw directly in your note:
- Tap the pen icon in the toolbar to bring up the drawing tools.
- Start sketching your idea using your finger or an Apple Pencil if you’ve got one.
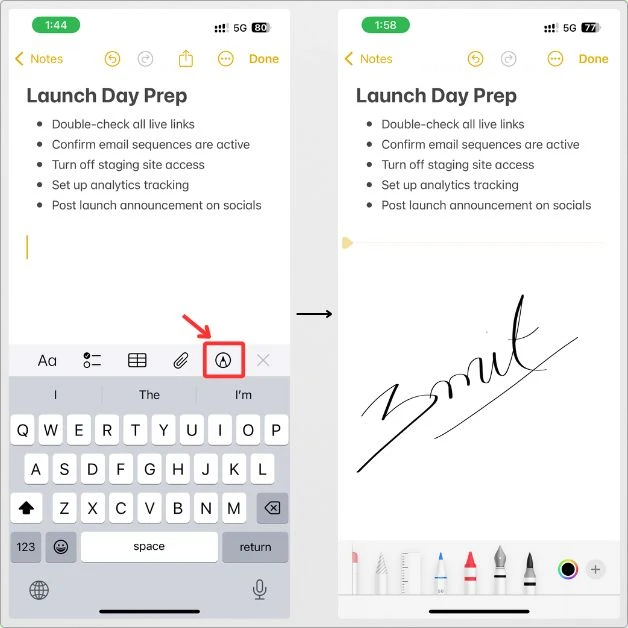
You can add as many sketches as you need, resize, and move them around to fit your note.
It’s a great way to visualize concepts quickly and keep everything in one place.
6.5 Why Multimedia Makes Your Notes Stronger
Sometimes you just need more than words.
Like, maybe you’re trying to explain something and a quick photo would do it better.
Or you’ve got a doc you don’t wanna forget, so you just scan it into the note.
It all helps.
Keeping everything in one spot—your pics, voice notes, checklists—saves you from bouncing between apps later.
So yeah, adding that extra stuff makes your notes way easier to use when you’re actually in the middle of the project.
7. Using Apple Maps for Location-Based Notes
Some projects aren’t just about tasks—they’re about places too.
Like maybe you’re planning an event, checking out locations, or handling stuff that involves being on-site.
And keeping track of all those little details for each place?
That can get messy fast.
But with Apple Maps and Notes working together, you can pin those notes right to the spot.
So you don’t forget what’s what when you’re back out there.
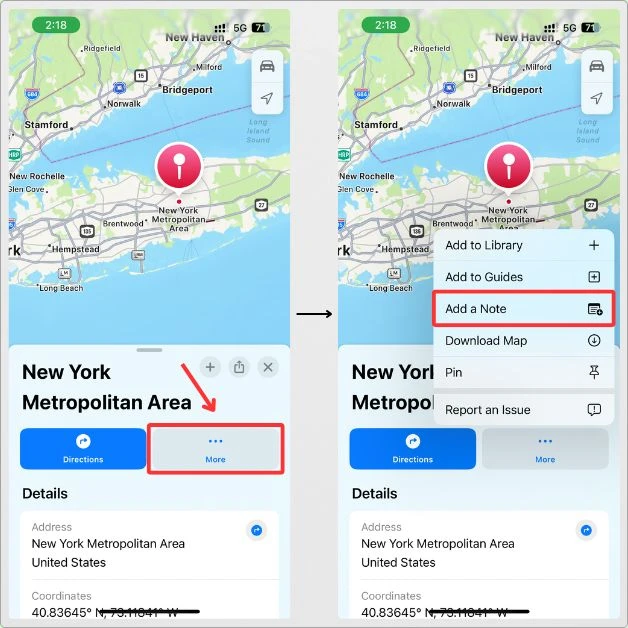
7.1 Adding Notes to Locations
Apple Maps allows you to add notes to specific locations, so you can reference them later when you’re on-site or planning.
Here’s how it works:
- Open Apple Maps: Start by opening the Apple Maps app on your iPhone.
- Find the Location: Search for the address or place you want to add a note to.
- Tap the Location: Once you’ve found the location, tap it to open the place’s details.
- Add a Note: Tap the three dots (more options) on the location, then tap Add a Note. Here, you can type any important information about the location that’s relevant to your project, like meeting times, directions, or special instructions.
7.2 Why It’s Useful for Projects
Using location-based notes helps you stay on track with projects that involve multiple places or moving parts.
Here are a few examples:
- Event Planning: If you’re managing an event with different venues, you can add location-specific details—like parking instructions, contact info for the venue, or setup times—right within the map.
- Construction or Site Visits: Attach notes to each site you visit, so you can keep track of measurements, progress, or things that need attention at each specific location.
- Delivery & Logistics: When managing deliveries or service routes, you can add notes for each stop, like special delivery instructions or time-sensitive details.
When you’re out there working on something and trying to remember what you noted down for a place, you don’t wanna guess.
Now it’s just there—tied to the spot, right where it should be.
8. Setting Reminders and Deadlines within Notes
Deadlines sneak up on you—especially when you’ve got ten other things going on.
And sure, Notes doesn’t have a reminder feature built in, but that doesn’t mean you can’t still make it work.
There are a couple ways to stay on top of what’s due, without overcomplicating anything.
8.1 Using Notes with the Reminders App
Even though Notes doesn’t have built-in reminders, you can still set them up easily with the Reminders app.
And there are two ways to do it, depending on what you need.
If you want to set a reminder for the entire note:
- Tap the share icon at the top of the note.
- From the options, choose Reminders.
- Add your title, set the date and time, and hit Add.
- Done. Now you’ll get a reminder, and it’ll link back to that specific note.
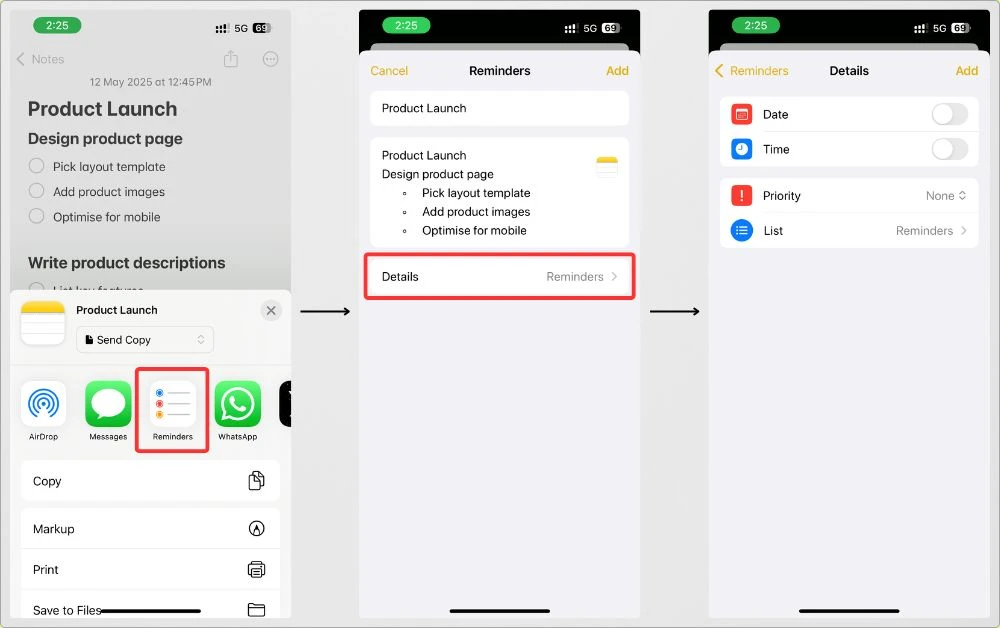
This works great if the whole note is something you want to follow up on—like a full checklist or meeting prep.
If you only want to be reminded about a specific part of the note:
- Highlight the sentence, line, or words you want to turn into a reminder.
- Tap Share from the little popup menu.
- Choose Reminders, fill in the details, and hit Add.
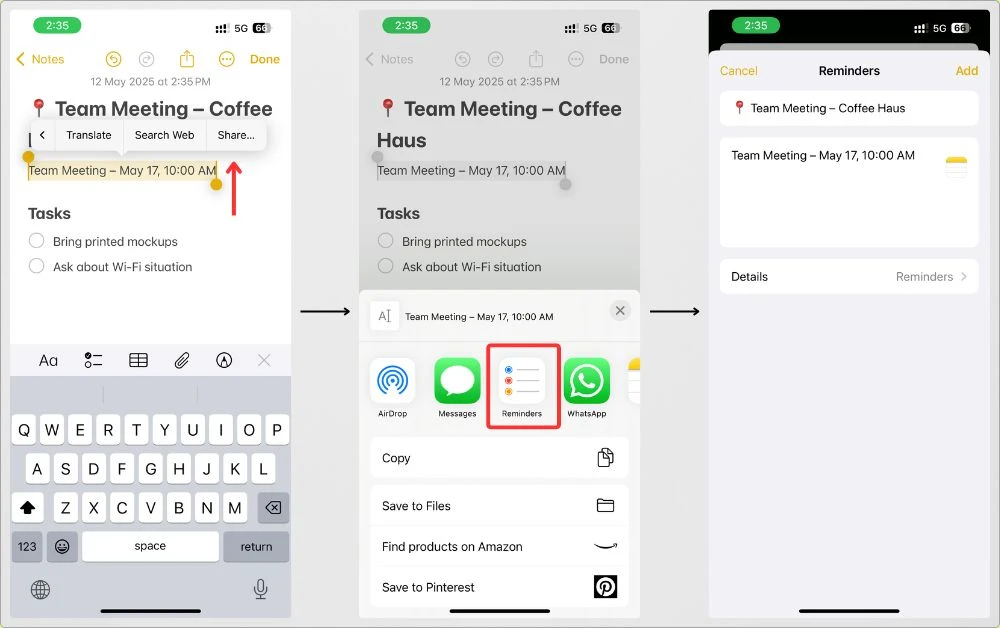
This is super helpful when just one task or detail in a long note needs follow-up.
No need to create a whole separate note for it.
8.2 Manually Typing Dates and Deadlines
If you want to keep things simple, you can always type out your deadlines directly in your notes.
For example, you can write: “Finish the report by Friday, May 15th.”
While this doesn’t trigger any notifications, it keeps your deadlines right there in your notes, so you’re always aware of the timeline.
8.3 Using Siri to Set Reminders
Want to make it even easier? You can use Siri to set reminders for your deadlines.
Just say something like, “Hey Siri, remind me to finish the report by Friday at 3 PM,” and Siri will add that reminder to your Reminders app automatically.
You can then link this reminder to your note to keep everything connected.
8.4 Why It’s Useful
By integrating reminders with your Notes app, you’re able to:
- Stay Organized: Keep all your deadlines in one place—within your project notes.
- Never Miss a Deadline: Whether you’re using Reminders or typing dates directly, you’ll have everything visible and accessible.
- Work Smarter: Siri and the Reminders app let you set up reminders hands-free, which saves you time when you’re managing a busy project.
Even though Notes doesn’t have a built-in reminder system, you can still stay on top of your deadlines with just a few extra steps.
My Final Take
Alright, that’s everything I had to share.
This is exactly how I’ve been using the Notes app to manage my projects—simple, clean, and straight from the iPhone.
Nothing fancy. Just stuff that actually works.
But, if you’ve got your own way of using Notes, or maybe some trick I didn’t mention—drop it in the comments or message me.
I’d honestly love to hear it.
Even a small tip might help someone else reading this.
And if this helped you in any way, that makes my day.
Thanks for sticking around till the end. Catch you in the next one.
FAQs
Can I use Notes for long-term project management?
Absolutely. You can organize your projects with folders, checklists, and reminders, and everything syncs across devices. It’s not just for quick notes; it can handle long-term planning, too.
How do I share Notes with my team?
Just tap the share button, choose who you want to collaborate with, and pick whether they can edit or just view. It’s that simple. Your whole team can stay on the same page, live, without having to send emails or multiple versions.
Can I add photos or documents to my project notes?
Yep, you can add photos, videos, PDFs, and even scan documents right into your notes. It’s perfect for keeping everything in one place—no more digging through files.
How do I set reminders for tasks in Notes?
While Notes doesn’t have a built-in reminder feature, you can easily copy your tasks over to the Reminders app or manually type out deadlines in your notes. Or, use Siri to set reminders on the go—super easy.
Can I use Notes for both work and personal projects?
Definitely. You can create separate folders for work, personal stuff, or whatever you need. Notes is flexible enough to handle everything you throw at it.
Can I search for specific notes within a project?
Yep, if you’ve tagged or titled your notes well, the search function makes it super easy to find exactly what you need. Just type in a keyword, and you’ve got it.