How I Secure Sensitive Information Using iPhone Notes
We all drop stuff into the Notes app that’s kinda personal.
It could be passwords, ideas you’re not ready to share, or even stuff you wouldn’t want anyone else reading.
And most people? They don’t even lock it.
It’s just… there. Sitting wide open.
This guide is for when you’ve got stuff in Notes that’s nobody’s business but yours.
I’m gonna walk you through how to lock it, back it up safely, and make sure no one’s peeking at your private info.
Not your nosy friend, not some random if you lose your phone, not even Apple.
So yeah, nothing complicated here.
Just simple steps to keep your notes locked down tight.
- 1. Protect Your Notes with a Password
- 2. Use Face ID for Fast Access
- 3. Locking Individual Notes
- 4. How Notes App Encryption Keeps Your Information Safe
- 5. Keep Your iPhone Secure with a Strong Passcode
- 6. Leverage iCloud Syncing for Secure Backups
- 7. Share Notes Securely
- 8. Keep Your Notes App Updated
- 9. Advanced Tip: Encrypt Notes Using Third-Party Encryption
- What Not to Do (Yeah, Don’t Do These)
- My Final Take
- FAQs
1. Protect Your Notes with a Password
Okay, let’s start with the basics.
The easiest way to protect your sensitive info in Notes is by setting up a password.
It’s simple, but it’s gonna keep your stuff safe from anyone who shouldn’t be looking at it.
Here’s how you do it:
- Open Settings on your iPhone → Apps → Notes.
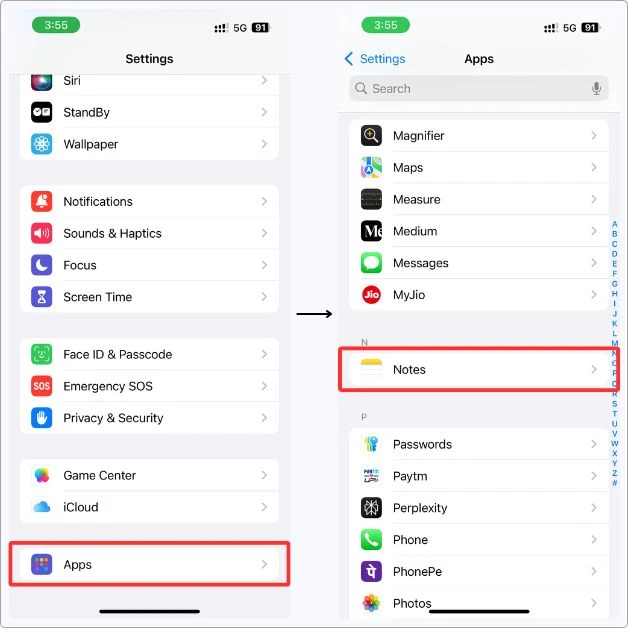
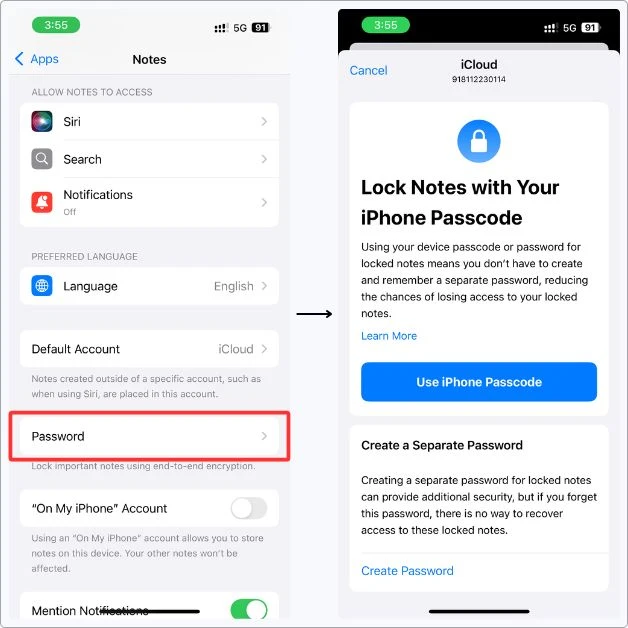
- Tap Password.
- Now, you’ve got two options:
- Use your iPhone passcode: This is the easiest. If you already have a passcode to unlock your phone, you can use the same one to lock your notes.
- Create a separate password: If you want an extra layer of security, you can create a totally different password just for Notes. But beware: If you forget this one, there’s no way to get back in, so choose something you’ll remember.
- Once your password’s set, you can also turn on Face ID for quick access. This way, you don’t even need to type the password every time—just unlock with your face.
Why It’s Important
Your iPhone probably has stuff you don’t want anyone else to see.
Notes with passwords, private thoughts, maybe work stuff too.
And if your phone ends up in someone else’s hands? They can just open Notes and read it all like it’s nothing.
But once you lock your notes with a password or Face ID, that’s it.
No one’s getting in but you.
It’s one of the easiest ways to keep your personal stuff private.
Takes like a minute to set up, and you’re good.
So yeah, if there’s even one note you don’t want others seeing, lock it.
Simple as that.
2. Use Face ID for Fast Access
Typing your password every time? Nah, nobody’s got time for that.
If you’ve got Face ID set up, use it.
It makes unlocking your notes way faster, and yeah, it’s still just as secure.
Here’s how to turn it on:
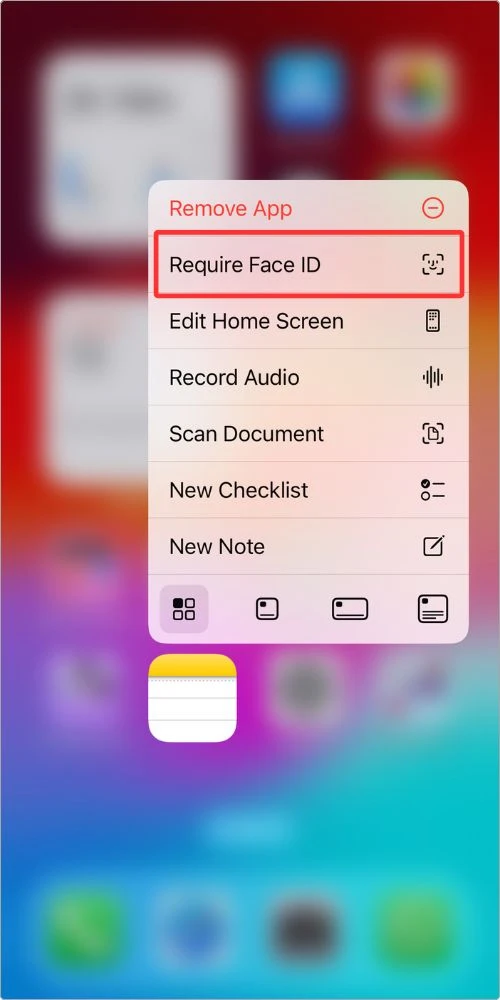
- Long press the Notes app icon on your home screen.
- Tap Require Face ID.
- That’s it. You’re done.
Now, every time you open Apple Notes, you don’t need to type a thing.
Just look at your phone, and you’re in.
Why It Matters
Face ID is fast and solid.
It saves time, and it’s way harder for someone to fake your face than to guess a password.
So, you get the best of both—speed and security, no extra effort.
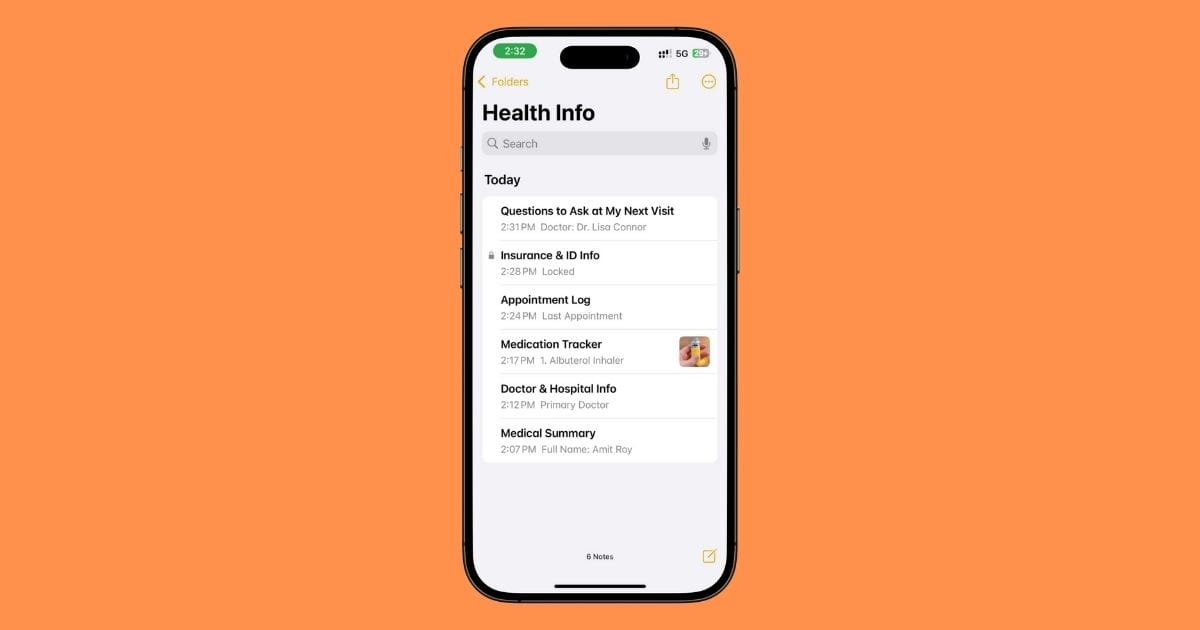
3. Locking Individual Notes
Alright, so maybe you don’t need to lock everything in your Notes app.
But there are definitely some things you want to keep private.
No worries—you can lock individual notes, and it’s super simple.
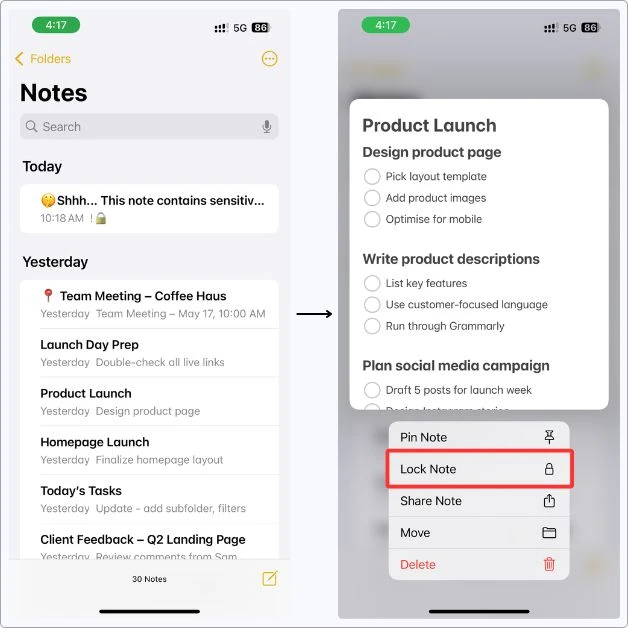
Here’s how you do it:
- Open the Notes app and find the note you wanna lock.
- Once you’re in the note, long tap on it.
- A menu will pop up—just tap on Lock Note.
- If you haven’t set a password already, you’ll be asked to set one. Once it’s set, you’re good to go.
- From now on, your note’s locked and will only open when you enter your password or use Face ID (if you have it enabled).
Why It’s Important
The cool thing about locking notes is—you don’t have to lock the whole app.
You just lock the stuff that actually matters.
Maybe it’s something personal, or maybe it’s a project you’re managing inside Notes.
Either way, you can lock just those notes and leave the rest open.
It’s all about control.
You decide what stays private and what doesn’t.
That’s the beauty of it.
So, if you’ve got certain notes that need extra security, just lock ‘em up, and you’re all set.
4. How Notes App Encryption Keeps Your Information Safe
Let’s talk about something important: encryption.
When you lock a note in the Notes app, it’s not just a simple password.
Apple uses end-to-end encryption to make sure your note is completely secure.
So, what does that mean? Here’s the breakdown:
4.1 What is End-to-End Encryption?
It’s a fancy term, but what it means is that only you can read your locked notes.
When you lock a note, it’s scrambled into unreadable data (encrypted).
That way, even if someone else tries to access it, they won’t be able to make sense of it.
Apple doesn’t even have the key to decrypt it.
4.2 How Does It Work in Practice?
- On Your Device: The moment you lock a note, it’s encrypted directly on your iPhone. Your passcode (or Face ID) is the key to unlock it. So, even if someone grabs your phone, they can’t access the note without that key.
- On iCloud: When your locked notes sync across devices using iCloud, the encryption travels with it. This means that even though your notes are stored on Apple’s servers, they’re still encrypted, so no one—not even Apple—can read them.
4.3 What Does This Mean for You?
This kind of encryption gives you peace of mind, for real.
Once you lock a note, it’s just for you—nobody else can get in.
Not your friend, not a stranger, not even Apple.
Whether the note’s on your phone or syncing through iCloud, it stays locked until you unlock it.
And if you forget your password? Yeah… not even Apple can help you.
That’s how locked down it is.
So if something’s personal, just lock it and know it’s staying private.
5. Keep Your iPhone Secure with a Strong Passcode
Now, let’s make sure your whole iPhone is locked down tight.
If your iPhone isn’t secure, then all the stuff you’re trying to protect, like those locked notes, can still be at risk.
So, it’s super important to set up a strong passcode for your device.
Most of us already use Face ID, which makes unlocking your iPhone super easy.
But here’s the thing: even with Face ID, it’s still important to have a strong passcode in place.
Here’s why: Your passcode is your backup security if Face ID ever fails (like if your face isn’t recognized for some reason). Plus, it adds an extra layer of protection, keeping your phone locked down even if someone else tries to access it.
Here’s how to make sure your passcode is set up:
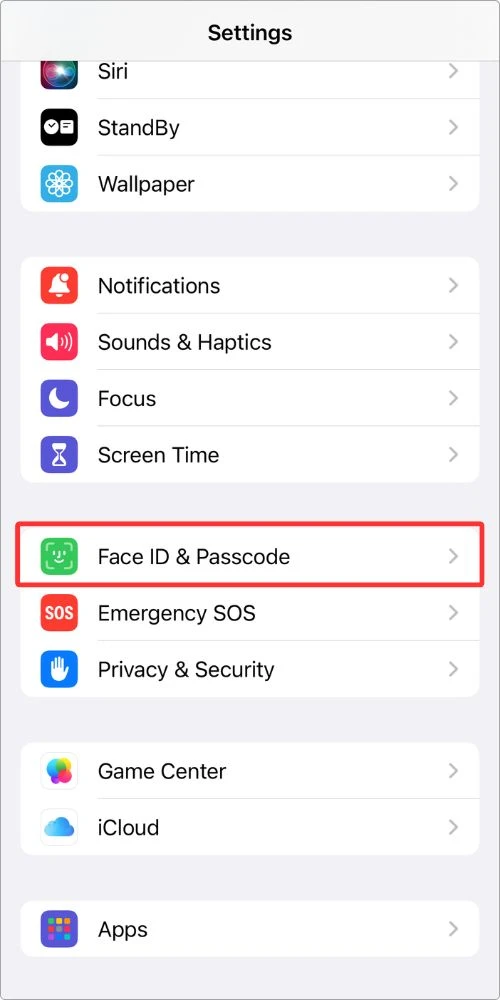
- Go to Settings on your iPhone.
- Tap on Face ID & Passcode.
- If you haven’t set a passcode yet, tap Turn Passcode On.
- Pick a strong passcode. Avoid simple ones like “1234”—you want something more secure.
- That’s it. Now, your phone will ask for your passcode if Face ID doesn’t work or if you ever need to unlock it manually.
Why It’s Important
Face ID is great, no doubt—but passcode is your backup.
If Face ID doesn’t work, your passcode is the thing that keeps everything safe.
So yeah, just take a minute and make sure it’s strong.
You’ll be glad you did if anything ever goes sideways.
6. Leverage iCloud Syncing for Secure Backups
Alright, now that we’ve got your iPhone secured, let’s talk about making sure your notes are backed up safely.
iCloud syncing is one of the easiest ways to back up your notes while keeping them encrypted and secure.
Here’s how to ensure your Notes are syncing with iCloud:
- Go to Settings on your iPhone.
- Tap on your Apple ID (your name at the top of the settings).
- Tap iCloud.
- Scroll down and make sure Notes is turned on. This will back up all your notes to iCloud.
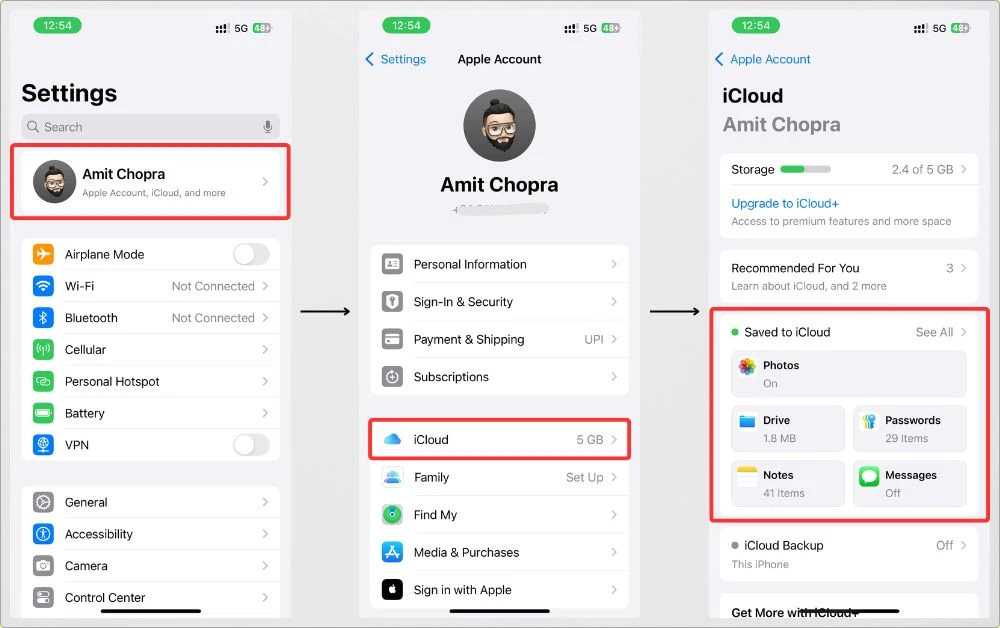
Now, your notes are securely backed up and accessible across all your Apple devices.
Plus, if you ever lose your phone or need to restore it, your notes are safe in the cloud.
Why It’s Important
iCloud’s got your back.
When it’s turned on, your notes get backed up.
And yeah, they’re encrypted too, so they stay private even while syncing.
If your iPhone ever gets lost or something breaks, no stress.
You can get all your notes back on a new phone like nothing happened.
It’s basically your safety net.
So take a sec, check that iCloud sync is on, and know your stuff’s covered no matter what.
7. Share Notes Securely
Sometimes you gotta share a note—could be something work-related, a checklist, or just stuff you want someone else to see.
But here’s the thing: if it’s even a little bit private, you don’t wanna just hit “send” and hope for the best.
Here’s how to do it right:
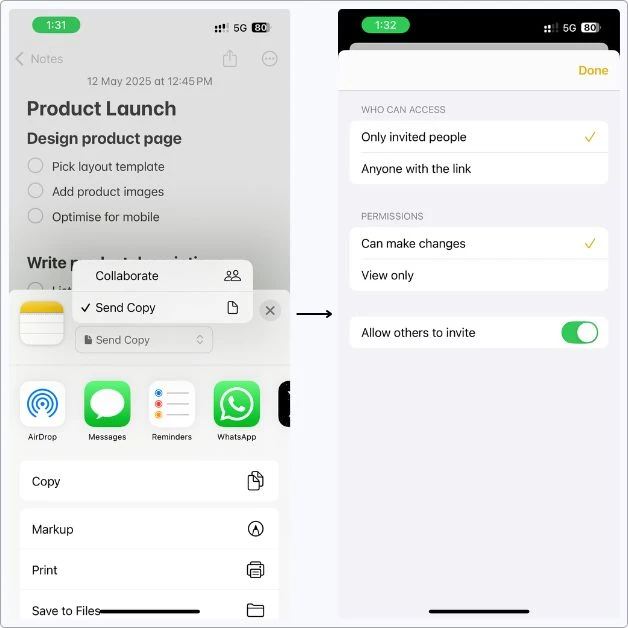
- Open the note you want to share.
- Tap the Share button at the top (the box with the arrow pointing up).
- Pick how you wanna send it—Messages, WhatsApp, Mail, AirDrop… whatever works.

Now here’s the key part:
- If you want someone to just read it, tap Send Copy.
- If you want them to edit it with you, tap Collaborate instead.
- Before you send it, double-check the permissions. Make sure it’s set to either view only or can edit, depending on what you want them to do.
Why It Matters
Look, once you share a note, you’re giving someone access to your stuff.
So it better be the right person, with the right permissions.
You don’t want them editing something they weren’t supposed to, or worse, sharing it with someone else.
It only takes a second to set the rules, and that one second can save you a lot of regret later.
8. Keep Your Notes App Updated
This one’s pretty simple, but trust me, it’s crucial.
Keeping your Notes app updated ensures that you’re always getting the latest security features and bug fixes.
Apple is constantly rolling out updates that protect you from the newest threats, so don’t ignore them.
Here’s how to make sure you’re always up to date:
- Go to Settings on your iPhone.
- Tap General, then tap Software Update.
- If there’s an update available, just tap Update Now. Make sure your phone is plugged into power and connected to Wi-Fi.
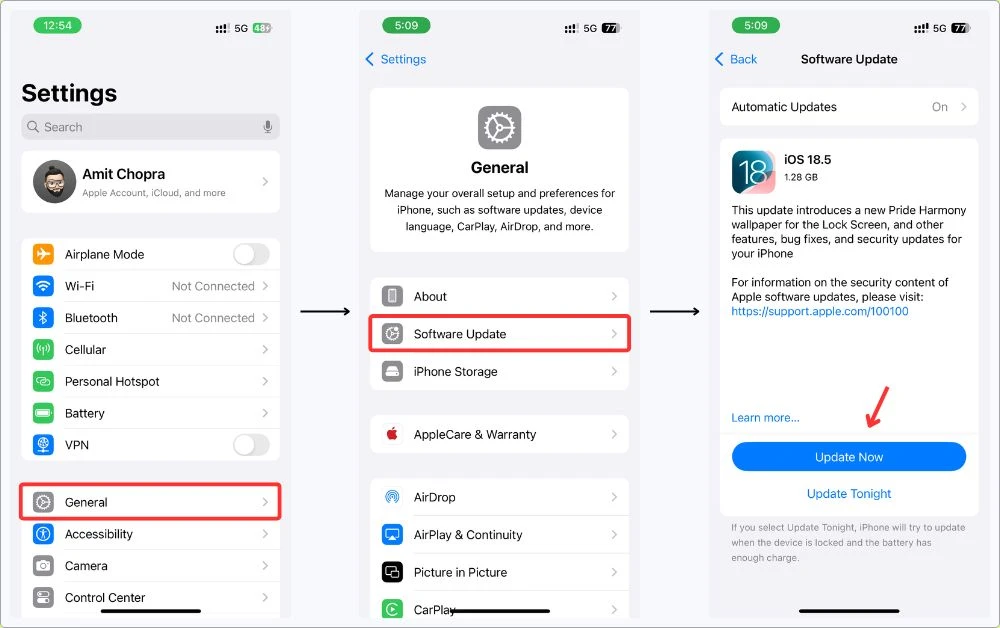
Note: Apple automatically updates the Notes app with iOS updates, so as long as your phone’s updated, your Notes app will be too.
Why It’s Important
Updates aren’t just for new features—they’re also about security.
Every time Apple rolls out a new update, they’re patching up any holes that might be vulnerable to hackers.
So, when you skip an update, you’re leaving your phone and your sensitive info exposed.
Plus, keeping the Notes app updated means you’ll have the latest security features to protect your notes from unauthorized access.
So, don’t skip those updates.
Stay on top of them, and your iPhone and Notes app will stay as secure as possible.
9. Advanced Tip: Encrypt Notes Using Third-Party Encryption
Alright, let’s talk about going the extra mile.
The built-in security features in Notes are solid, but if you’re dealing with super-sensitive information, you might want to take it up a notch.
That’s where third-party encryption apps come in.
Here’s the deal: While iCloud keeps your locked notes safe, third-party encryption apps like Cryptomator or Boxcryptor can encrypt your notes before they even hit iCloud or any cloud service.
It’s an added layer of protection, making sure that even if someone were able to get into your iCloud, your notes would still be locked down.
Here’s how you can encrypt your notes using third-party apps:
- Download an encryption app like Cryptomator or Boxcryptor from the App Store.
- Set up your encryption account and choose the files or notes you want to encrypt.
- These apps will add encryption to your files, making them unreadable to anyone without the decryption key.
Why It’s Important
If you’re storing truly sensitive stuff—like confidential work files or personal secrets—and you want maximum security, these apps provide an additional layer of protection.
While iCloud encryption is strong, these tools take it a step further, ensuring that your data is encrypted from the start, not just in transit.
It’s a little extra work, but if your privacy is really important to you, this could be the way to go.
What Not to Do (Yeah, Don’t Do These)
Alright, you’ve got the steps to lock things down, but here are a few things you definitely don’t wanna mess up:
- Don’t leave sensitive notes unlocked – If it’s personal or private, lock it. No excuses.
- Don’t store passwords or bank info in plain text – At least lock the note, or better yet, use a password manager.
- Don’t reuse your phone passcode as your Notes password – If someone figures one out, they’ve got both.
- Don’t forget what you shared – If you shared a note a while ago, go back and check if it still needs to be shared. Clean it up if not.
- Don’t skip iCloud backup – One lost phone and poof… your notes are gone. Sync it and save yourself the stress.
Just keep these in mind and you’re golden.
My Final Take
Alright, we’ve covered all the key steps to keep your notes safe—from setting up strong passwords to using Face ID for quick access, and even taking extra security measures with third-party apps.
But here’s the thing: all this only works if you take action and actually implement it.
Now’s the time to go through your notes and lock up anything sensitive.
It doesn’t take long, but it makes a huge difference in ensuring your personal info stays safe and secure.
Your iPhone is like a personal vault, and you’ve got the tools to make sure that vault stays locked.
So don’t wait—secure your notes now, and stay on top of it.
Quick Security Checklist:
To make sure your iPhone Notes are fully secured, follow these quick steps:
- Set a strong password for Notes (don’t use anything obvious).
- Enable Face ID for quick but secure access to your locked notes.
- Lock sensitive individual notes to keep private info protected.
- Turn on iCloud syncing to back up your notes securely and access them across devices.
- Regularly update your iPhone and Notes app to get the latest security patches and features.
- Use third-party apps for ultra-sensitive info that needs extra protection.
- Review your notes regularly to make sure they’re organized and locked when needed.
Alright, that’s it from me for now.
Hope this helped you lock down your notes and keep your stuff safe.
Keep these tips in your back pocket, and don’t hesitate to come back when you need more.
Stay secure, and take care.
FAQs
Can I lock the entire Notes app, or just individual notes?
No, you can’t lock the entire Notes app. But you can lock individual notes to protect sensitive information. Just long tap on a note and hit “Lock Note” to keep it secure.
How do I unlock a locked note if I forget the password?
Unfortunately, if you forget the password for a locked note, there’s no way to recover it. That’s why it’s important to choose a password you’ll remember and consider using Face ID for easier access.
Can others edit my locked notes if I share them?
If you share a locked note, you can choose whether the person can edit it or just view it. You’ll control permissions before you send it out, so they won’t be able to make changes unless you give them permission.
Is iCloud backup safe for my locked notes?
Yes. iCloud backups are encrypted, so your locked notes stay secure even when backed up. Just make sure iCloud syncing is enabled for Notes to ensure everything is backed up properly.
Can I store passwords in the Notes app securely?
While Notes offers encryption and password protection, it’s better to store passwords in a dedicated password manager like 1Password or Apple’s Keychain. These apps are designed specifically for secure password storage.
Do I need third-party apps to encrypt my notes?
No, Notes already offers encryption for locked notes. However, if you’re dealing with extremely sensitive data and want the highest level of security, third-party encryption apps like Cryptomator or Boxcryptor can add another layer of protection.