How to Use Apple Notes for Recipes
You’ve got recipes everywhere.
Screenshots sitting in your camera roll from three months ago. Safari tabs you swore you’d come back to. A note that just says “Pasta thing from TikTok” with literally nothing else inside.
And probably a few texts from your mom that go something like “just add some of this, you’ll know when it’s enough.”
I had the same mess.
I’d save a recipe, forget where I put it, spend 5 minutes scrolling, give up, and order food.
At some point, I had maybe 40-50 recipes floating around in Apple Notes with zero organization. No folders, no tags, no system. Just a pile.
So I spent 2 weeks actually building a proper recipe system inside Apple Notes. 25+ recipes. Tested every way to clip recipes from websites and social media.
- Installed the Shortcuts
- Scanned some family recipe cards
- Set up folders, tags, Smart Folders, a cookbook index with note links
I even installed Mela, Paprika, and Crouton to compare them honestly against Apple Notes, because I wanted to know if a paid app is actually worth it.
Turns out Apple Notes can do way more for recipes than most people realize.
Tags, Smart Folders, Gallery View, document scanning, collapsible sections for cooking, note linking for building an actual digital cookbook.
It’s all there. You just need to set it up right.
That’s what this guide walks you through. Step by step. And I’ll tell you where Notes falls short too, because it does.
One thing before we start.
If you cook from strict measurements, save web recipes every other day, and want auto-scaling and cook mode out of the box, you might be better off with a dedicated app. I cover that comparison honestly in Section 9. No hard feelings if you skip there first.
But if you want a free system that handles 90% of what those apps do? Keep reading.
Here’s what we’ll cover:
- Set up your recipe folder system from scratch
- Build a tag taxonomy and Smart Folders that actually sort your recipes for you
- Save recipes from websites (2 methods, ranked)
- Save recipes from TikTok, Instagram, and YouTube using free Shortcuts
- Digitize family recipe cards and handwritten recipes with your iPhone camera
- Build a digital cookbook with note linking
- Use Apple Notes while actually cooking (without losing your mind)
- Grab recipe templates you can copy right now
- Apple Notes vs. dedicated recipe apps (honest comparison)
- What Apple Notes can’t do, and the workarounds for each
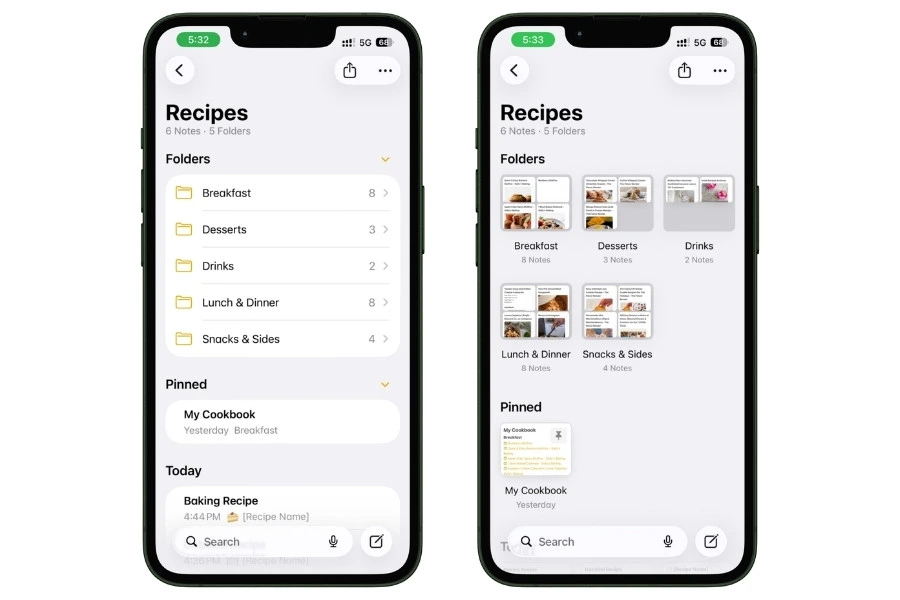
Table of Contents
- 1. Set Up Your Recipe Folder System (The Foundation)
- 2. Tag Every Recipe (And Let Smart Folders Do the Sorting)
- 3. Save Recipes From Websites (2 Methods, Ranked)
- 4. Save Recipes From Social Media (TikTok, Instagram, YouTube)
- 5. Digitize Family Recipe Cards and Cookbook Pages
- 6. Build a Digital Cookbook With Note Linking
- 7. Use Apple Notes While Actually Cooking
- 8. Recipe Templates You Can Copy Right Now
- 9. Apple Notes vs. Dedicated Recipe Apps (Honest Comparison)
- 10. What Apple Notes Can’t Do (And the Workarounds)
- What You’ve Built
- FAQs
1. Set Up Your Recipe Folder System (The Foundation)
Before you save a single recipe, you need somewhere to put it. Not just a random note floating between your grocery list and that password you swore you’d remember. An actual system.
And it starts with one folder.
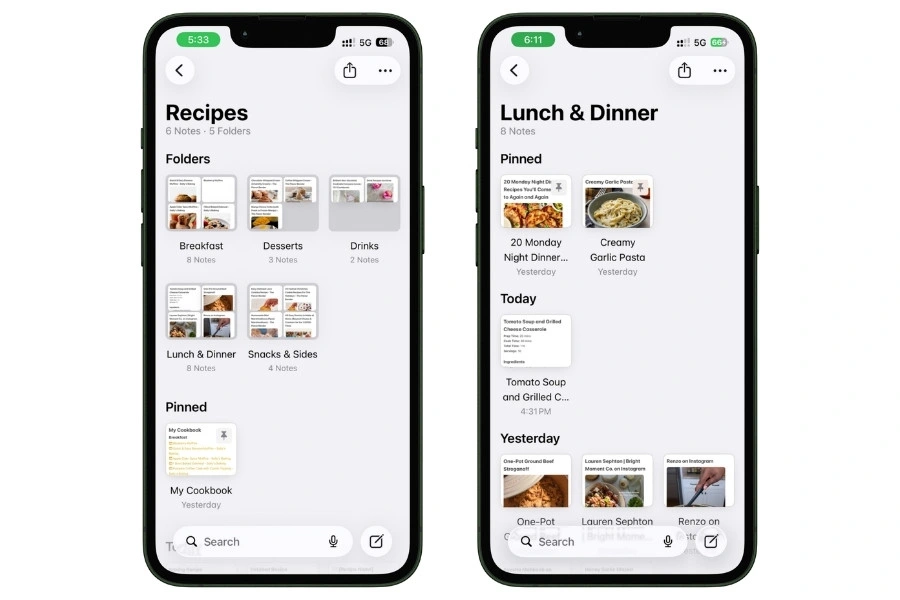
Open Apple Notes, go to your Folders view, and create a new folder called Recipes. That’s it. That’s your home base.
Every recipe you save from now on goes in here. Not scattered across random notes. Not lost in your default Notes folder. One place.
Now, you could stop here and just dump everything into this one folder. And honestly? If you’ve got 10 or 15 recipes, that works fine. Search handles the rest.
But the second your collection starts growing, you’ll want some structure inside it.
1.1 Subfolders (But Don’t Overdo It)
Here’s a rule that saved me from overcomplicating this: only create a subfolder when you’ve got at least 3 recipes that belong there.
Don’t build out 15 empty categories on day one. Start flat. Let the structure grow with your collection.
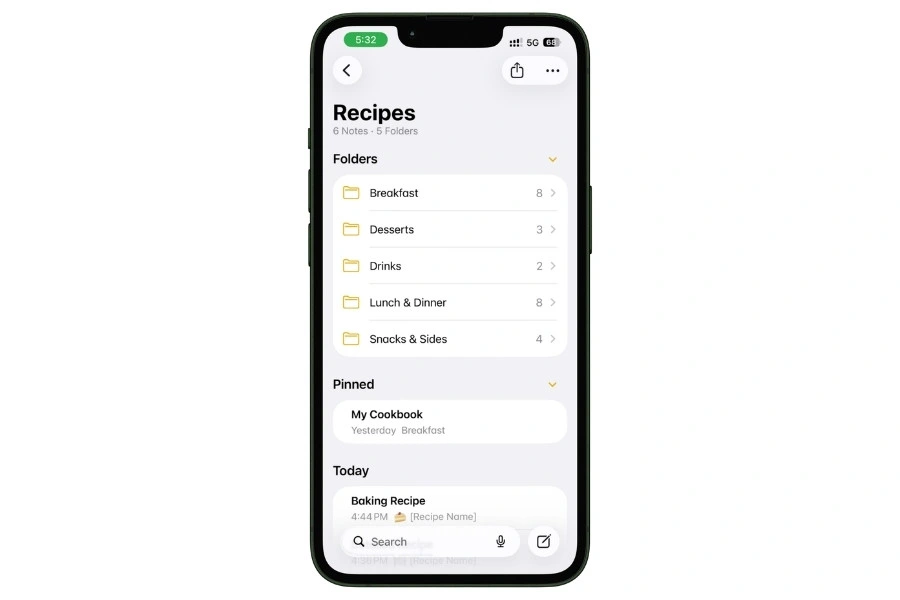
After adding 25 recipes to my system over 2 weeks, here’s the subfolder structure I ended up with:
By meal type (this is where most people should start):
- Breakfast
- Lunch & Dinner
- Snacks & Sides
- Desserts
- Drinks
That’s it. Five folders. Clean and easy to scan.
If your collection skews heavily toward a specific cooking method or cuisine, you can add those too:
By method (optional, add when it makes sense):
- Slow Cooker
- Air Fryer
- One-Pot
- No-Cook
By cuisine (optional):
- Italian
- Indian
- Mexican
- Thai
But don’t create these upfront “just in case.” Wait until you actually have 3+ recipes that need a home. Otherwise, you’re just staring at empty folders, feeling organized but not actually being organized.
To create subfolders:
- Open the Recipes folder
- Tap the three dots in the top-right corner
- Tap Add Folder
- Enter the subfolder name
- Tap Save
1.2 The Inbox Trick
This one’s small, but it changed how I save recipes.
Create a note inside Recipes called Inbox. This is your dumping ground.
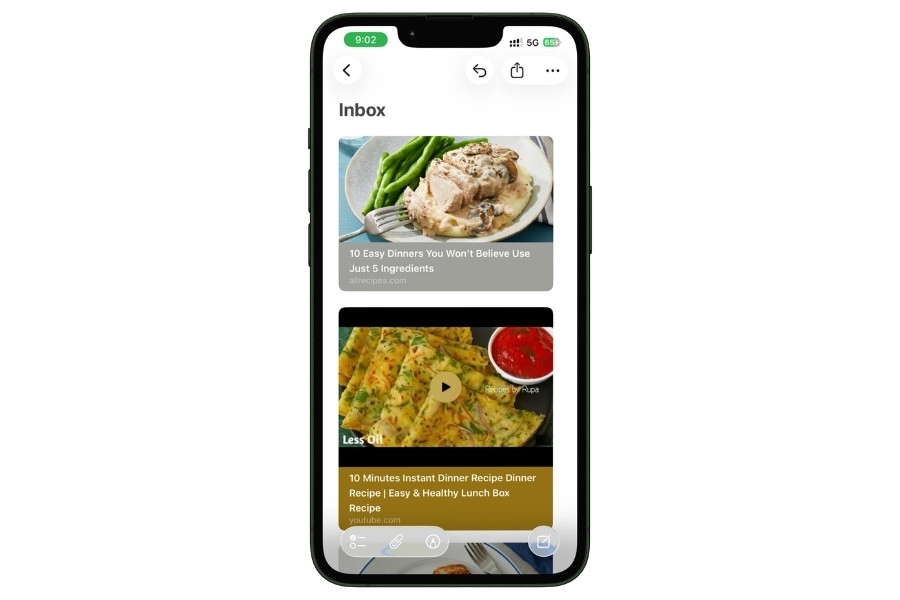
Every time you find a recipe quickly and don’t have time to tag it, format it, or figure out where it goes… throw it in the Inbox.
Then once a week, maybe on a Sunday when you’re planning meals, open the Inbox, go through what’s in there, tag each recipe properly, and move it to the right subfolder.
Takes 5 minutes. Keeps your system clean without slowing you down when you’re saving things in the moment.
Without the Inbox, what happens is you save a recipe, don’t file it, and two weeks later, you can’t find it because it’s sitting between your work notes and a shopping list. The Inbox prevents that.
1.3 Turn On Gallery View (This Changes Everything)
Okay, this is the single best thing you can do to make your recipe folder feel like an actual cookbook instead of a wall of text.
Open your Recipes folder. Tap the three-dot menu (•••) at the top right. Select View as Gallery.
That’s it. Now, instead of a plain list of note titles, you see thumbnail cards with images. If your recipe notes have a food photo as the first image, you’ll see that photo right in the grid.
It looks incredible. You can visually browse your recipes the same way you’d flip through a cookbook.
This is the exact setup from that Pinterest pin that inspired this whole guide.
The person had 155 recipe notes in Gallery View, and it looked like a proper digital cookbook. You can have the same thing in about 30 seconds.
1.4 Pin Your Go-To Recipes
Every subfolder has those 2-3 recipes you make all the time. The weeknight pasta in Lunch & Dinner. The banana pancakes in Breakfast. Whatever your rotation is.
Long-press on any of those notes inside the subfolder and tap Pin Note. Pinned notes stay at the very top of that subfolder, no matter how you sort.
So when you open Lunch & Dinner, your most-cooked dinners are right there. No scrolling past the new stuff you saved yesterday. Open Desserts, and your go-to chocolate cake is at the top.
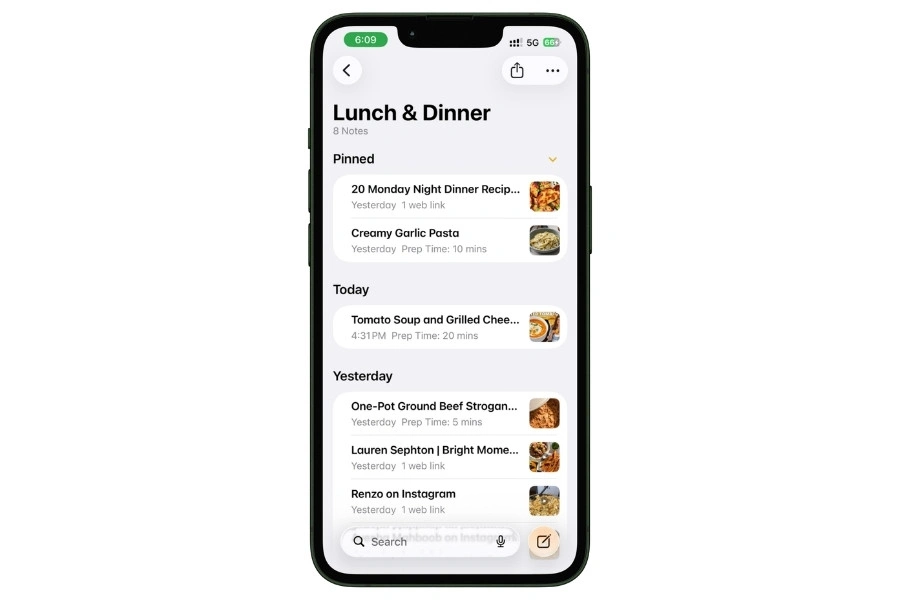
1.5 What Your Folder System Should Look Like
After setting all this up, here’s the structure:
Gallery View turned on. Pinned recipes at the top. That’s the foundation.
It took me about 15 minutes to set this up from scratch. And every recipe I’ve saved since then has a place to go instead of floating around in Notes limbo.
Also read: How to Use Apple Notes for Expense Tracking (Free Shortcut)
2. Tag Every Recipe (And Let Smart Folders Do the Sorting)
Folders are great for the basics. But they have one big limitation when it comes to recipes.
A chicken tikka masala is a dinner. It’s Indian. It’s spicy. It’s something you meal prep on Sundays. It’s a tested favorite.
But in your folder system? It can only live in one place. You put it in “Lunch & Dinner” and now it’s invisible when you’re browsing by cuisine or looking for meal prep ideas.
Tags fix this completely.
One recipe can carry as many tags as you want. And Smart Folders use those tags to automatically build collections for you, without you moving a single note.
This is the layer that turns your recipe folder from “organized” into “the recipes find themselves.”
2.1 How Tags Work in Apple Notes (Quick Refresher)
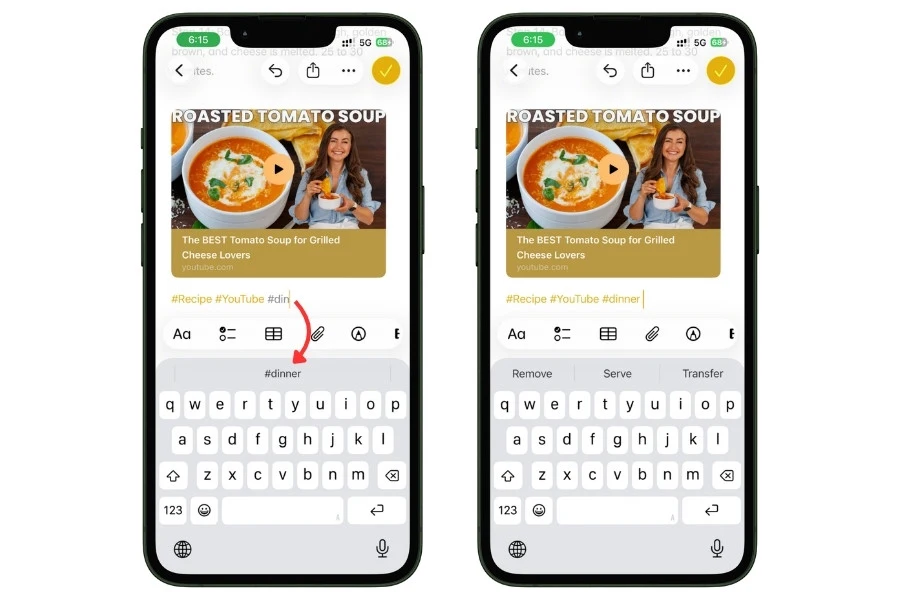
Tags are just words that start with a # symbol.
Type them anywhere in a note, and Apple Notes recognizes them automatically. They show up in the tag browser at the bottom of your Folders view, and you can tap any tag to instantly see every note that has it.
The best spot to put tags in a recipe note is at the very bottom. Out of the way when you’re cooking, but still doing their job behind the scenes.
You can also add tags using the tag picker. When you type #, Notes shows suggestions based on tags you’ve already used. So you don’t have to remember every tag or worry about typos.
Type #din and it’ll suggest #dinner.
2.2 The Tag Taxonomy (My Exact System)
Don’t just make up tags randomly. If every recipe gets different tags with no consistency, you end up with 50 tags that each have one note in them. Useless.
Here’s the system I use. Every tag falls into one of 8 categories:
Base tag (goes on every single recipe note):
- #recipe
This is your anchor. Every Smart Folder you build later will start with this tag. It separates your recipes from everything else in Apple Notes.
Meal type:
- #breakfast
- #lunch
- #dinner
- #snack
- #dessert
- #drink
Cuisine:
- #italian
- #mexican
- #indian
- #thai
- #japanese
- #american
Only add cuisine tags you actually cook. If you’ve never made Thai food, don’t create the tag. You can always add it later when you save your first Thai recipe.
Cooking method:
- #slowcooker
- #airfryer
- #grilling
- #onepot
- #instantpot
- #baking
- #nocook
Diet:
- #vegetarian
- #vegan
- #glutenfree
- #keto
- #dairyfree
Effort level:
- #quick (under 30 minutes, start to plate)
- #weeknight (reasonable on a work night)
- #weekend (longer, more involved)
- #mealprep (makes multiple servings, stores well)
Source:
- #family
- #copycat (restaurant recreations)
- #youtube
- #tiktok
- #cookbook
Status:
- #tested (you’ve actually made this)
- #wanttotry (saved but haven’t cooked yet)
- #favorite (the hall of fame)
You don’t need to use every single tag on every recipe. A simple pasta might only get: #recipe #dinner #italian #quick #tested.
A complex holiday dish might get 8 tags. Use what applies.
2.3 Tagging in Practice (Real Example)
Here’s how I tagged one of my recipe notes to show you how this works in real life:
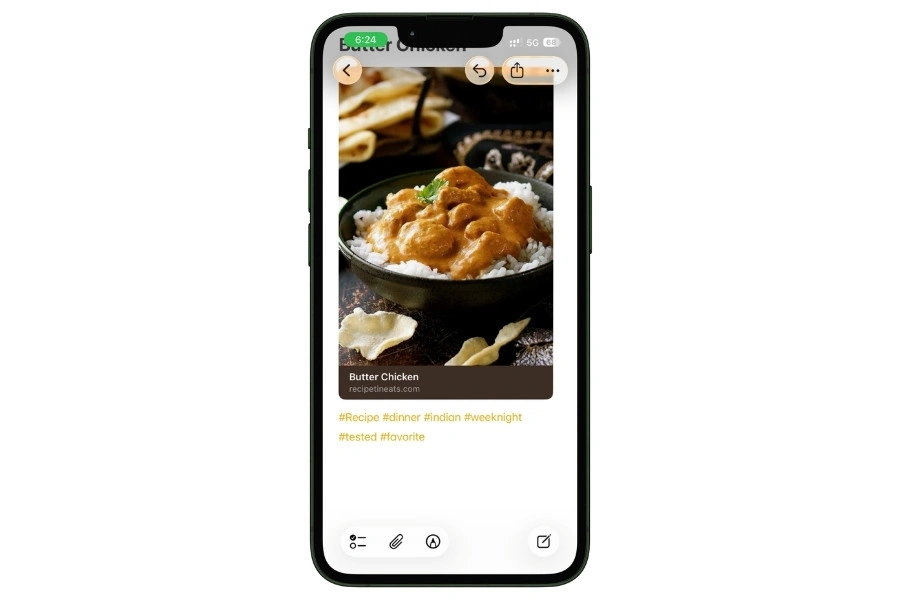
The note has the full recipe inside it. At the very bottom, I added:
#recipe #dinner #indian #weeknight #tested #favorite
That’s 6 tags. Took about 10 seconds to type. And now this recipe shows up automatically in every Smart Folder that matches any of those tags.
I didn’t have to copy it, move it, or think about where it “lives.” It just appears where it’s relevant.
Compare that to the folder-only approach. If Butter Chicken is in the “Lunch & Dinner” folder, you’d never find it by browsing “Indian” or “Weeknight” or “Favorites.”
You’d have to search for it by name, which means you have to already know what you want. Tags let you browse and discover.
2.4 Smart Folders That Actually Work
Smart Folders are basically saved searches.
You set the tag filters once, and the folder automatically collects every note that matches. No manual sorting. No dragging notes around.
You tag a recipe, and it appears in every Smart Folder where it belongs.
Here are the 5 Smart Folders I set up for my recipe system:
“Quick Weeknight Dinners” Filters: #recipe + #dinner + #quick This is the folder I open most. It’s Tuesday, I’m tired, I need something fast. Tap, scroll, pick, cook.
“Tested Favorites” Filters: #recipe + #favorite + #tested The greatest hits. Recipes I’ve made multiple times and I know they work. This is the folder I open when someone asks “what should I make?”
“Want to Try” Filters: #recipe + #wanttotry Everything I’ve saved but haven’t cooked yet. I check this on weekends when I have time to experiment. Once I cook something, I swap #wanttotry for #tested (and #favorite if it was good).
“Meal Prep Sunday” Filters: #recipe + #mealprep Sunday afternoon batch cooking. Every recipe here makes enough for multiple meals and stores well.
“Vegetarian Options” Filters: #recipe + #vegetarian For when I’m cooking for someone who doesn’t eat meat, or just want a lighter meal.
You can create as many Smart Folders as you want. Some people add “Air Fryer Recipes,” “Holiday Cooking,” “Indian Food,” whatever fits their cooking habits. Start with these 5 and add more as you need them.
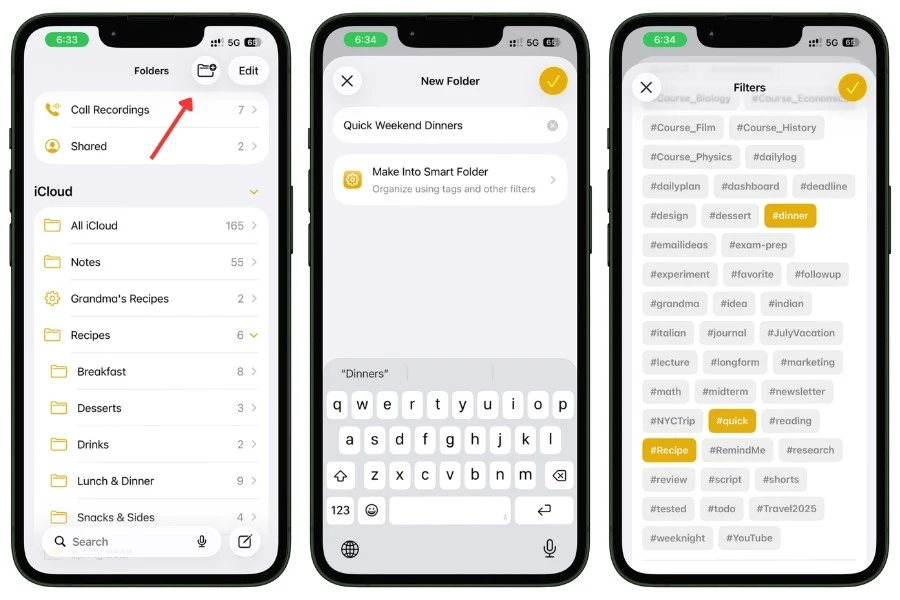
2.5 How to Create a Smart Folder (Step by Step)
Here’s how to set one up on your iPhone:
- Go to your Folders view in Apple Notes
- Tap the New Folder icon at the top right (the folder with a + sign)
- Type your folder name, like “Quick Weeknight Dinners”
- Tap Make Into Smart Folder (the option right below the name field)
- You’ll see a Filters screen. Tap Tags
- Select the tags you want: #recipe, #dinner, #quick
- At the top, make sure it says “Include notes matching all filters” (not “any”) so it only shows recipes matching ALL your tags
- Tap the checkmark at the top right to save
That’s it. The folder populates instantly with every matching recipe. And any new recipe you tag correctly in the future shows up automatically.
2.6 The Exclusion Trick (Find Your Untagged Recipes)
This one’s hidden, and nobody talks about it.
When you’re browsing tags in the tag browser, tap a tag once to filter by it. But tap the same tag a second time, and it gets a strikethrough line through it.
That means “exclude” — show me everything that does NOT have this tag.
Why does this matter for recipes? Tap #recipe once to see all your recipes. Then tap #tested twice (strikethrough). Now you’re looking at every recipe you haven’t cooked yet, even if you forgot to add the #wanttotry tag.
It’s a fast way to find notes that slipped through without proper tags. Super useful when you’re cleaning up your Inbox folder on Sundays.
2.7 Tags + Folders Work Together
One thing I want to be clear about: tags don’t replace your folder system. They sit on top of it.
Your Butter Chicken note still lives in the “Lunch & Dinner” folder. That’s its physical home. But the tags let it appear in 4 different Smart Folders at the same time without being copied or moved.
Folders handle the basic structure. Tags handle the cross-referencing. Smart Folders handle the automatic sorting.
Together, they turn 25 recipes into a system that feels like it has 100, because you can find what you want from any angle: by meal, by cuisine, by effort, by status.
After tagging all 25+ recipes in my system, finding a specific recipe went from about 30-40 seconds of scrolling to under 5 seconds through a Smart Folder.
That’s not a small improvement. That’s the difference between actually cooking something new and giving up and ordering food.
For a full deep dive on tags and Smart Folders beyond recipes, check out: How I Use Tags and Smart Folders to Keep My iPhone Notes Ridiculously Organized
3. Save Recipes From Websites (2 Methods, Ranked)
You found a recipe online. Maybe on AllRecipes, Bon Appetit, a random food blog, or that one NYT Cooking link someone sent in the group chat. Now you want it in Apple Notes.
There are 2 ways to do this. Each one gives you something different. I tested both on the same recipe to see exactly what you get with each method, what you lose, and how long it takes.
Here’s the breakdown.
3.1 Method 1: Safari Share Sheet (Fastest, But Just a Bookmark)
This is what most people do. And it’s fine for a quick save. But it’s not giving you what you think it’s giving you.
Here’s how it works:
- Open the recipe page in Safari
- Tap the Share button
- Scroll down and tap Notes
- Choose which folder to save it in (pick your Recipes folder or Inbox)
- Tap Save
What you get: a rich link preview card inside a new note. It shows the page title, a thumbnail image, and the URL. Looks nice.
What you don’t get: the actual recipe. No ingredients. No instructions. No cook time. Just a link back to the website. If you’re offline, on a plane, in a kitchen with bad signal, or the website goes down, you’ve got nothing.
When to use this: You’re browsing, you see something interesting, and you just want to bookmark it for later. That’s it. Think of it as a “save for later” button, not a “save the recipe” button.
Time to save: About 5 seconds.
3.2 Method 2: Use ChatGPT to Grab a Clean Recipe (My Go-To Method)
This is what I actually use for most of my recipe saves.
It’s faster than copy-pasting, the output is cleaner, and you don’t have to scroll past anyone’s life story to find the ingredients.
Here’s how it works:
- Open the recipe page in Safari
- Copy the URL from the address bar
- Open ChatGPT and paste this prompt:
“Go to this URL and extract only the recipe. Give me: Recipe Title, Prep Time, Cook Time, Servings, full Ingredients list, and Step-by-step Instructions. No blog content, no life stories, no ads. Format it clean and simple.”
- Paste the URL right after the prompt and hit send
- ChatGPT strips out all the junk and gives you just the recipe, cleanly formatted
- Copy the output
- Open Apple Notes, create a new note in your Recipes folder, and paste
- Go back to Safari, copy the recipe page URL again, and paste it at the bottom of the note as a source link
That’s it. You go from a messy recipe page full of ads and popups to a clean, formatted recipe note in about 30 seconds.
And you’ve got the original URL sitting at the bottom in case you ever want to go back to the source.
I saved most of my recipes this way. It works on any recipe site, any food blog, any page with a recipe on it.
ChatGPT handles the messy HTML and gives you just the stuff you need. The free ChatGPT tier works fine for this.
Don’t want to use ChatGPT? That’s fine. You can do it manually, too. Open the recipe page in Safari, scroll down to the recipe card section, select the ingredients and instructions text, copy it, and paste it into a new note. You’ll probably need to clean up some formatting, random line breaks, and text that got selected, weird spacing. It takes a bit longer, and the result isn’t as clean, but it works without any extra apps.
There’s also a Shortcut called Recipe Clipper on RoutineHub that’s supposed to automate this whole process. You run it from Safari’s Share Sheet on a recipe page, and it reads the structured recipe data from the site and creates a formatted Apple Note with the title, ingredients, instructions, cook time, everything. Sounds great in theory. But I tested it on my iPhone 13 running iOS 26, and it didn’t work. The Shortcut ran, but never created the note. It was last updated in Sep 24, 2019, so your experience may vary depending on your device and iOS version. If you want to try it yourself, it’s at routinehub.co/shortcut/3555.
3.3 Quick Notes From Safari (The “Try Later” Bookmark)
This one’s different from the other two methods. It’s not about saving a recipe into your system. It’s about flagging something while you’re browsing so you can come back to it.
On iPad: Swipe from the bottom-right corner of the screen to open a Quick Note. It automatically links to the Safari page you’re on. Write a quick thought like “try this for dinner party” and dismiss it.
On Mac: Move your cursor to the bottom-right corner (or press Globe + Q). Same thing — a Quick Note appears, linked to the current page.
The cool part: next time you visit that same webpage, the Quick Note pops up automatically. So if you’re browsing AllRecipes three days later and land on that page again, your note is right there reminding you.
When to use this: You’re deep in a recipe browsing session, opening tons of tabs, and don’t want to stop and properly save each one. Quick Note everything, then go back later and save the ones you actually want using Method 2.
3.4 Which Method Should You Use?
Here’s the simple version:
- Just want to bookmark it for later? → Safari Share Sheet (Method 1) or Quick Note
- Want the actual recipe saved in your notes? → ChatGPT method (Method 2). If you don’t want to use ChatGPT, copy-paste manually from the page.
My actual workflow: I copy the URL, paste it into ChatGPT with the prompt, copy the clean output into a new note, and add the source link at the bottom. Takes about 30 seconds per recipe. I use the Share Sheet link-only method maybe once in a while when I’m browsing fast and just want to flag something for later, but for actually saving a recipe I want to cook from, ChatGPT every time.
Here’s how the two methods compare:
| Share Sheet | ChatGPT Method | |
|---|---|---|
| Time | ~5 seconds | ~30 seconds |
| Gets recipe text | No (link only) | Yes (clean and formatted) |
| Thumbnail | Yes (link preview) | Yes (link preview) |
| Formatting | Clean (but empty) | Clean and structured |
| Works offline | No | Yes |
| Works on all sites | Yes | Yes |

4. Save Recipes From Social Media (TikTok, Instagram, YouTube)
This is the modern recipe problem that nobody talks about.
You’re scrolling TikTok or Instagram. Someone makes this incredible-looking dish in a 60-second video. You think “I need to make that.”
So you save the video. Maybe you send it to yourself. And then… nothing.
It sits in your saved folder forever. You never cook it because the recipe isn’t written down anywhere. It’s trapped inside a video you’d have to rewatch and pause frame by frame to get the ingredients and steps.
Websites at least have text you can copy. Social media recipes are locked inside video content. That’s a completely different challenge.
Here’s how to solve it.
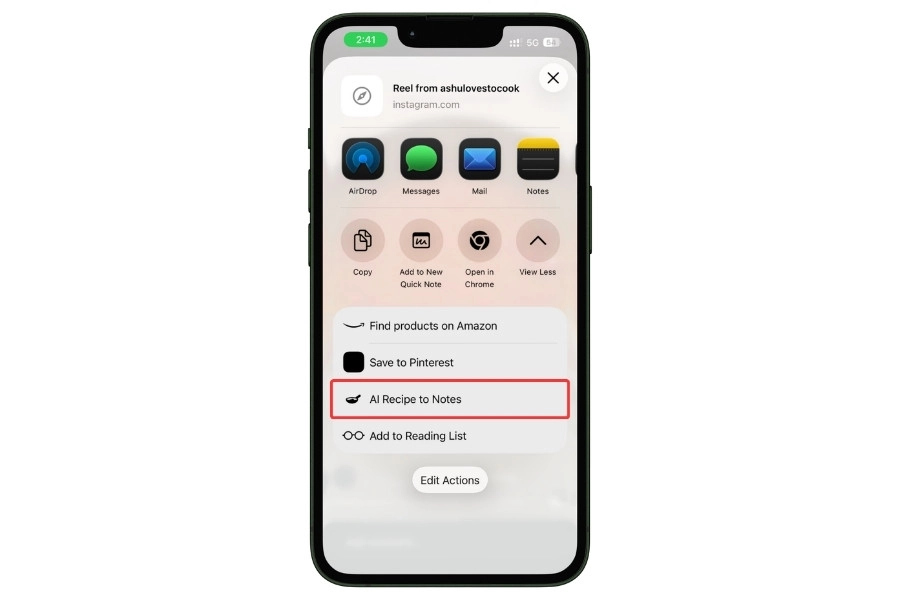
4.1 AI Recipe to Notes Shortcut (The One That Went Viral)
Stephen Robles, an Apple tech creator, built a Siri Shortcut called AI Recipe to Notes that basically solves this problem in one tap.
It went viral on TikTok for a reason. It works.
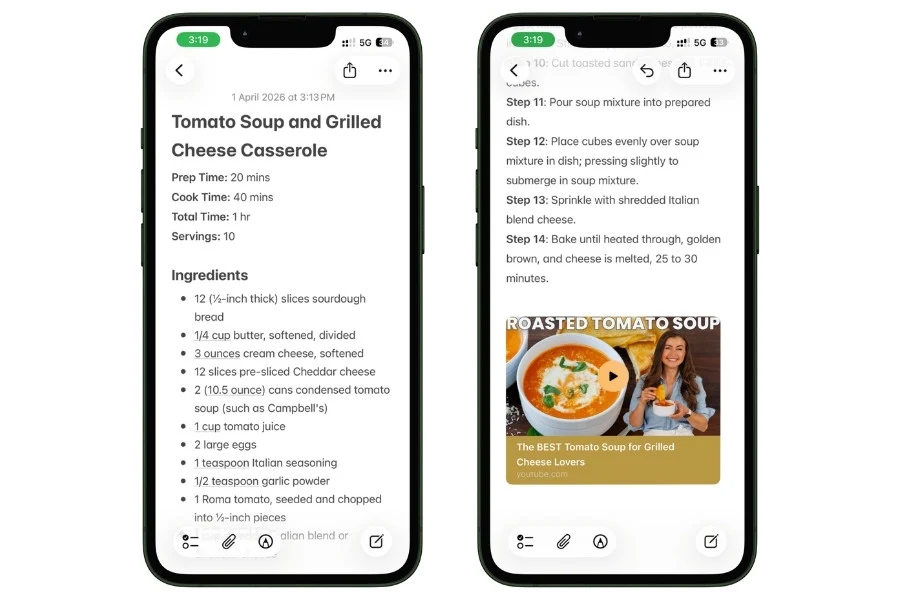
What it does: You share a video from Instagram Reels, TikTok, YouTube Shorts, or Facebook Reels to this Shortcut. It grabs the caption and video description, sends it to Apple Intelligence on your device, and the AI parses it into a clean formatted note with:
- Recipe title
- Ingredients list
- Step-by-step instructions
- A link back to the original video
The whole thing takes about 15 seconds. You go from “cool video” to “recipe saved in Apple Notes” without typing a single word.
How to set it up:
- Go to beard.fm/recipe on your iPhone
- Tap to download the Shortcut
- Add it to your Shortcuts library
- That’s it. It now appears in your Share Sheet
How to use it:
- Open TikTok, Instagram, YouTube, or Facebook
- Find a recipe video you want to save
- Tap the Share button on the video
- Select AI Recipe to Notes from the share options
- Wait a few seconds while Apple Intelligence processes the caption
- A new note appears in Apple Notes with the formatted recipe
The requirement: This Shortcut needs Apple Intelligence, which means you need an iPhone 15 Pro, iPhone 15 Pro Max, or any iPhone 16 model or newer. If you’ve got an older iPhone, keep reading. There’s another version for you.
How accurate is it? I tested it on 5 different social media recipe videos. The AI got the title and ingredients right every time.
Instructions were mostly accurate but sometimes combined two steps into one or left out a small detail that was only shown visually in the video (like “toast the spices until fragrant”).
My suggestion: always keep the link to the original video in the note so you can rewatch that one step if something’s unclear.
4.2 ChatGPT-Powered Version (For Older iPhones)
If your iPhone doesn’t support Apple Intelligence, Robles built an alternate version that uses ChatGPT instead.
It works the same way. Share a video → Shortcut grabs the caption → ChatGPT parses it into a recipe → saves to Apple Notes.
What you need:
- A ChatGPT account (the free tier works)
- The ChatGPT app installed on your iPhone
- The alternate Shortcut from beard.fm/recipegpt
The output is almost identical.
ChatGPT is slightly more verbose in the instructions sometimes, but the ingredients and steps are there. It’s a solid alternative if you’re not on the latest hardware.
Also Read: Apple Notes Without Apple Intelligence: How I Get Everything Done on iPhone 13
4.3 The Extended Version: Save Recipe + Auto-Generate Grocery List
There’s a third version of this Shortcut that does something extra. After saving the recipe to Apple Notes, it also takes the ingredients and adds them to your Reminders grocery list automatically.
So in one tap, you get a formatted recipe note AND a shopping list with everything you need to buy.
This one’s called Save Recipe Add Ingredients. Same download source. If you do weekly meal planning and grocery shopping, this version saves a genuinely ridiculous amount of time.
4.4 Manual Method (Works on Any iPhone)
No Shortcut? No Apple Intelligence? No ChatGPT? You can still save social media recipes. It just takes more effort.
Here’s what I’d do:
- Play the recipe video
- Pause at the ingredients part (if they show it on screen) and take a screenshot
- Replay and write down the steps as you watch. Don’t try to memorize. Just type them into a new note while the video plays
- Paste the video link into the note so you can rewatch later
- Add the dish photo as the first image (screenshot the best frame)
- Tag it with #recipe and #tiktok or #youtube so you know the source
Is it tedious? Yeah. But it works on literally any iPhone, no setup needed. And once the recipe is in your Notes, it’s there forever.
The TikTok video might get deleted, the creator might remove it, the algorithm might never show it to you again. Your note stays.
4.5 YouTube Full-Length Cooking Videos
YouTube Shorts work with the AI Recipe to Notes Shortcut. But what about regular 10-15 minute cooking videos?
Those are different. The caption is usually too short to contain the full recipe, so the Shortcut won’t pull enough detail.
You’ve got two approaches here. The quick one and the quicker one.
First, always check the description box. A lot of YouTube cooks put the full recipe right there in the video description.
If it’s there, just copy that, paste it into a new note, and you’re done. No need to watch anything.
If the description doesn’t have the recipe, grab the transcript instead. This is way faster than watching the video and typing along manually.
- Go to a free YouTube transcript tool
- Paste the YouTube video URL
- Copy the full transcript
- Open ChatGPT (or any AI tool you use) and paste the transcript with a prompt like:
“Extract the recipe from this video transcript. Give me the dish name, full ingredient list with measurements, and step-by-step cooking instructions. Keep it clean and simple.”
- ChatGPT spits out a clean, formatted recipe in seconds
- Copy that into a new Apple Note
No watching. No pausing. No typing while someone talks at you for 12 minutes. You get a clean recipe from a video without ever pressing play.
Then finish the note:
- Copy the YouTube video URL
- Paste it at the bottom of your note. Apple Notes automatically creates a rich preview card with the video thumbnail. Looks great in Gallery View.
- Tag it, and you’re done
The video link stays in the note so you can always rewatch if something’s unclear.
But honestly, the transcript-to-ChatGPT method pulls out the recipe so cleanly that you rarely need to go back.
4.6 Source Tags Matter Here
One last thing about social media recipes. Always tag where the recipe came from:
- #tiktok
- #youtube
Here’s why. When you write down a recipe from a 60-second video, you’ll inevitably miss something.
- A visual cue
- The exact texture they showed
- How long they actually cooked something for
If you know the source, you can go back to the original video. And the video link in your note makes that easy. Tap the link, rewatch the 10 seconds you need, close it, keep cooking.
But if you saved the recipe six months ago and didn’t tag the source, you might not remember where it came from.
Was it TikTok? Instagram? That one YouTube channel? Good luck finding it. The tag solves that.
5. Digitize Family Recipe Cards and Cookbook Pages
This might be the most important section in this entire guide.
Not because it’s the most technically impressive. But because recipe cards get lost.
- They get stained
- The ink fades
- The paper tears
And once they’re gone, they’re gone. Nobody’s recreating your grandmother’s handwriting from memory.
Your iPhone can turn those fragile recipe cards into something that lasts forever, stays searchable, and syncs across every device you own. And it takes about 30 seconds per recipe.
Here are 4 ways to do it, depending on what you’re working with.
5.1 Scan the Card as a Document (Preserves the Original)
This is the simplest method, and it’s built right into Apple Notes.
- Open a new note in your Recipes folder
- Tap the Paperclip icon in the toolbar
- Select Scan Documents
- Point your camera at the recipe card
- Apple Notes automatically detects the edges, corrects the angle if you’re not perfectly straight, and adjusts the contrast
- Tap the shutter button (or let it auto-capture)
- Tap Save
You now have a high-quality scan of the original card sitting inside your note. The handwriting, the stains, the little doodles in the margin. All preserved exactly as it is.
But here’s the part most people don’t know.
Apple Notes doesn’t just save it as a dumb image. Live Text OCR runs on every scan automatically.
That means the text in the image, even handwritten text, becomes searchable. Type “chicken” in Apple Notes search, and it’ll find that word inside your scanned recipe card. You don’t have to do anything extra. It just works.
When to use this: When you want to preserve the original look of the recipe. Family recipe cards, old cookbook pages with someone’s handwritten notes in the margins, anything where the visual matters as much as the content.
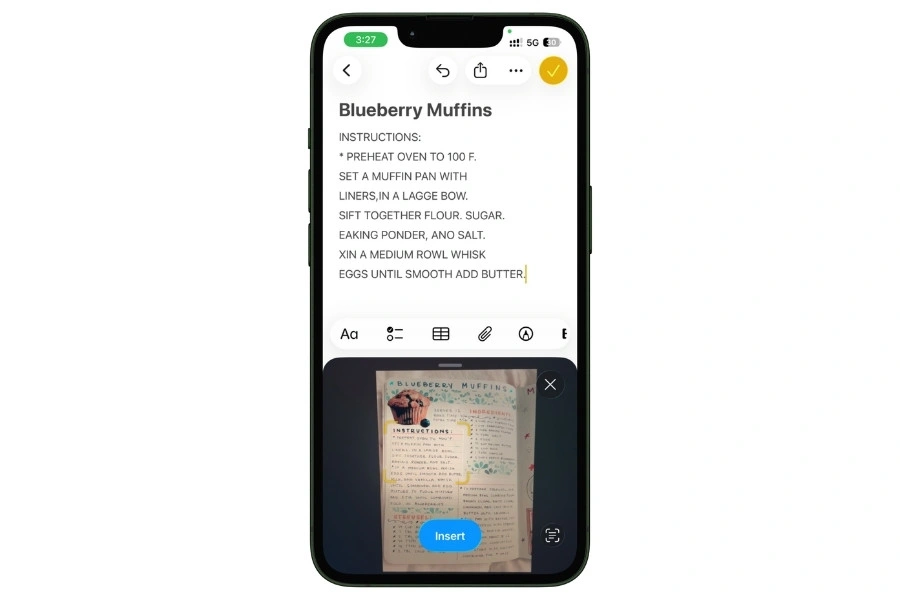
5.2 Scan Text (Converts to Editable, Typed Text)
This does something different. Instead of saving an image, it reads the text on the card and converts it to editable typed text right inside your note.
- Open a new note (or an existing recipe note)
- Tap the Paperclip icon in the toolbar
- Select Scan Text
- Point your camera at the recipe card or cookbook page
- You’ll see the text highlighted on screen in real-time
- Tap Insert to drop the extracted text into your note
Now you’ve got the recipe as actual text.
You can edit it, reformat it, add checkboxes to the ingredients, bold the section headings. It’s a fully editable recipe note.
How accurate is it? I tested this on 5 different recipe cards. Here’s what I found:
- Typed/printed recipe cards: Near perfect. Got everything right, including measurements and abbreviations.
- Clean handwritten print: About 90-95% accurate. Occasionally misread a letter, but easy to fix.
- Cursive handwriting: Hit or miss. Maybe 60-70% accurate. Older cursive with faded ink was worse.
- Stained or faded cards: Struggled with text that overlapped stains. Placing the card on a dark background and using good lighting helped a lot.
- Abbreviations: Sometimes read “tsp” as “tap” or “Tbsp” as “Tbap.” Quick fix, but worth knowing.
Bottom line: if the handwriting is reasonably clean, Scan Text saves you a ton of typing. If it’s old cursive or badly faded, you’ll need to correct a few things. Still faster than typing the whole recipe from scratch.
5.3 The Dual-Format Method (This Is What I Recommend)
Do both. In the same note.
- First, scan the original card as a document (Section 5.1). This preserves the handwriting visually at the top of the note.
- Then below it, use Scan Text (Section 5.2) to add the editable typed version.
Now you’ve got one note with the original recipe card image at the top and a clean, editable, searchable text version below it.
Why do both? Because the scan preserves what the card looks like.
That matters when it’s your grandmother’s handwriting or your mom’s notes scribbled in the margins. You want that.
But you also want text you can actually search, edit, format, and cook from without squinting at a photo.
This is the method I used for every family recipe in my collection. It takes maybe 60 seconds per card, and the result is something that’ll outlast the paper it was written on.
5.4 Record the Recipe
Every family has one person who cooks incredible food but has never written down a single recipe.
They don’t use measuring cups. They cook by feel, by color, by smell, by “you’ll know when it’s done.”
Apple Notes can capture those recipes, too.
Starting with iOS 18, Apple Notes has built-in audio recording with live transcription. Here’s how to use it:
- Open a new note
- Tap the Paperclip icon in the toolbar
- Hit Record Audio
- Ask your family member to walk you through the recipe out loud. “What goes in first? How much? How long does it cook? What should it look like?”
- Stop recording when they’re done
You now have two things in that note: the full audio recording and a written transcript right below it.
The transcript is searchable. You can cook from it directly, or clean it up later into a proper recipe format.
If you’re on an iPhone that supports Apple Intelligence, you can also tap Summarize on the transcript to get a condensed version of the recipe.
It won’t be perfect, but it gives you a solid starting point to work from.
Pro tip: Do this at a family gathering. Set the phone on the counter while they cook. Record the whole thing. You’ll capture things they didn’t even know they do, like that moment where they add a little extra of something or adjust the heat based on how it sounds. Those details are what make family recipes special, and they’re the first things that get lost.
5.5 Live Text on Cookbook Pages (No Scanning Needed)
Got a physical cookbook open to a recipe you want to save? You don’t even need to scan it.
- Open your iPhone camera
- Point it at the cookbook page
- You’ll see a small Live Text button appear in the bottom-right corner of the viewfinder (looks like lines of text in a box)
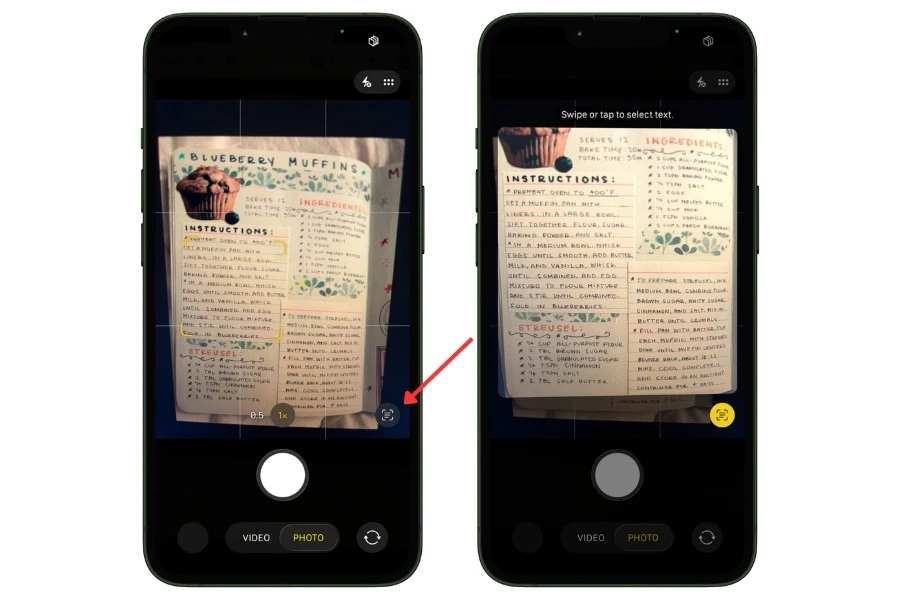
- Tap it
- Now you can select text directly from the camera view, just like selecting text on a screen
- Select the recipe text, tap Copy
- Open Apple Notes, paste it into a new note
That’s it. No scanning, no photo, no OCR step. Just point, select, copy, paste. The text lands in your note as fully editable content. Format it however you want.
This works really well on printed cookbook pages with clean fonts. It struggles with small text, weird layouts (like recipes printed in two narrow columns), and decorative fonts.
But for most standard cookbooks, it’s shockingly fast.
5.6 Organize Your Family Recipes
Once you’ve digitized a few family recipes, give them a proper home.
Create a subfolder inside your Recipes folder called Family Recipes. Or if you don’t have enough for a dedicated subfolder yet, just use the #family tag and let Smart Folders handle it.
For recipes from specific people, add their name as a tag:
- #family #grandma
- #family #mom
- #family #auntmaria
- #family #dad
That way you can create a Smart Folder called “Grandma’s Recipes” that filters for #recipe + #family + #grandma. Every recipe from her, all in one place, found automatically.
One more thing. If you’re digitizing a lot of family recipes in one sitting, batch them.
Scan all the cards first into the Inbox, then go back and add the typed text, tags, and formatting. Same batch workflow from the web recipe section. It’s much faster than doing the full process card by card.
This is the kind of project where you do it once, and it’s done forever.
The cards can go back in the box. But the recipes are now searchable, editable, synced to every device, and safe from coffee stains, kitchen fires, and moving boxes that get lost.
6. Build a Digital Cookbook With Note Linking
At this point, you’ve got recipes saved from websites, social media, and family cards.
They’re in folders, tagged, and showing up in Smart Folders. That’s already better than 95% of people’s recipe collections.
But there’s one more layer that turns this from “organized notes” into something that genuinely feels like a cookbook. And that’s note linking.
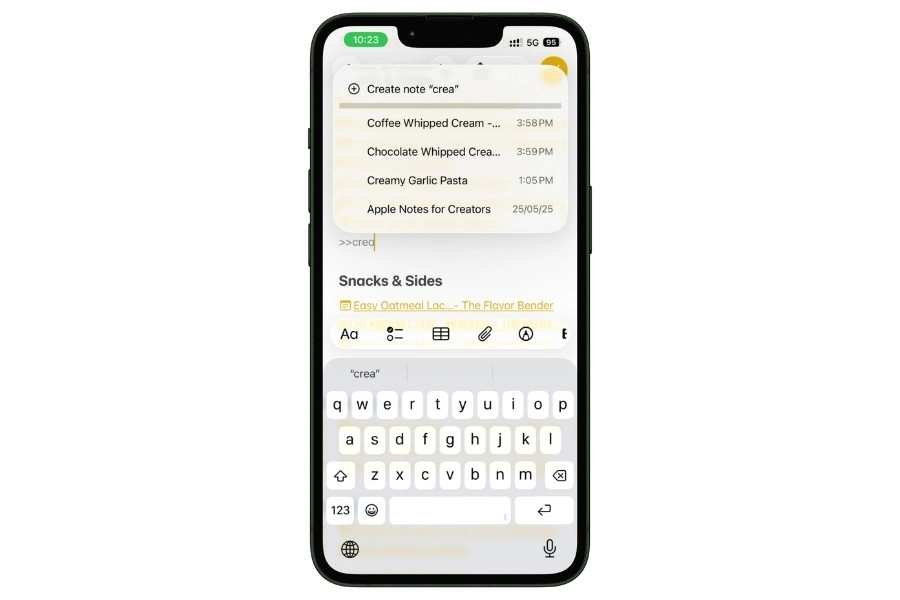
Apple Notes lets you create clickable links between notes.
Type >> inside any note, start typing a name, and it suggests matching notes you can link to. Tap one, and it becomes a hyperlink.
You tap it, you jump straight to that note. Tap the back arrow, you’re right back where you were.
This means you can build an index note that links to every recipe in your collection. A table of contents for your personal cookbook. One note to browse everything.
6.1 Create Your Cookbook Index
Here’s how to build it:
- Create a new note in your Recipes folder
- Title it something like “My Cookbook” or “Recipe Index”
- Long-tap on the note and tap Pin Note so it stays at the very top of your folder. This is your homepage now.
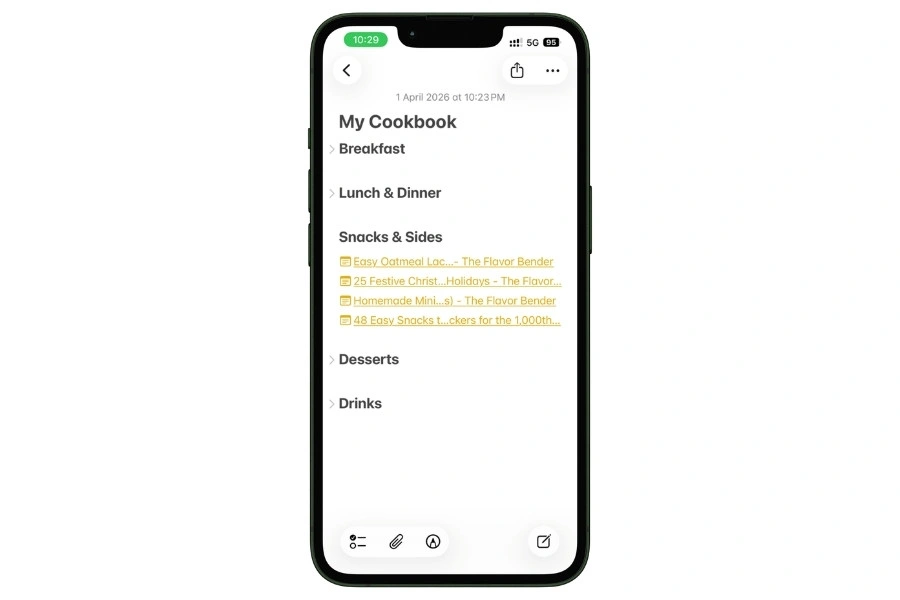
Now add category headings. Format each one as a Heading or Subheading (select the text, tap the Aa formatting menu, and choose Heading).
This is important because in iOS 18 and later, headings get a collapse arrow next to them. You can tap it to hide or show everything underneath. More on why that matters in a second.
Here’s what my index note looks like:
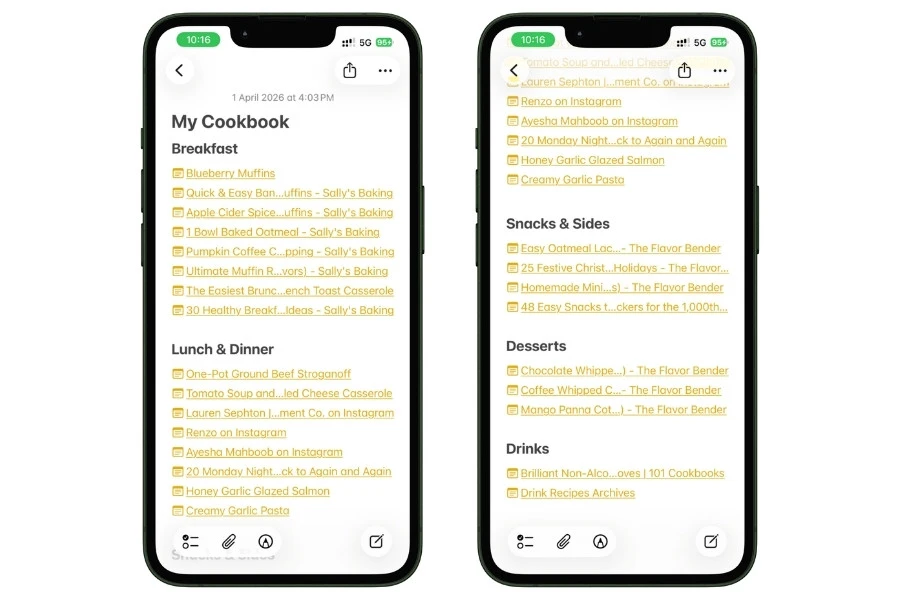
Each recipe name here is a clickable link I created using >>.
So whenever I want something, I just tap the recipe name and land right on that note instead of bouncing around my Recipes folder trying to find it.
6.2 How to Add Note Links (Step by Step)
If you’ve never used note linking before, here’s exactly how it works:
- Place your cursor where you want the link
- Type >> (two greater-than symbols)
- A dropdown appears showing your recent notes and a search bar
- Start typing the recipe name
- Apple Notes autocompletes with matching notes
- Tap the one you want
- It appears as a clickable link with a small note icon next to it
That’s it. The link is live. Tap it from anywhere, and you jump to that recipe.
If you’ve named your recipe notes clearly (like “Butter Chicken” instead of “New Recipe 3”), the autocomplete makes this ridiculously fast.
You can link 20 recipes in your index in under 5 minutes.
6.3 Add Backlinks (So You Can Navigate Both Ways)
This is the step most people skip, but it makes the whole system feel connected.
Inside each recipe note, add a link back to your index. Just scroll to the bottom (or the top, wherever you prefer) and type your index name after >>.
Now you can go from the index to any recipe with one tap. And from any recipe back to the index with one tap.
- You’re never stuck
- You’re never scrolling
You’re just tapping between notes like pages in an actual cookbook.
The whole loop, index to recipe to back to index, takes under 3 seconds.
6.4 Collapsible Sections Make the Index Browsable
Remember those headings I told you to use for the categories? Here’s why they matter.
When your index has 25, 50, or 100 linked recipes, scrolling through the whole list gets long.
But because each category is a formatted heading, you get that collapse arrow. Tap it, and everything under “Lunch & Dinner” hides. Tap it again, and it expands.
So when you open your index, you can collapse everything except the category you’re interested in.
Looking for dessert? Collapse Breakfast, Lunch & Dinner, and Snacks. Now you’re only seeing your dessert recipes. Clean, focused, fast.
This is one of those features Apple added in iOS 18 that nobody seems to connect to recipes. It’s perfect for this.
6.5 Build Special-Purpose Index Notes
Your main cookbook index covers everything. But you can create additional index notes for specific situations.
These are separate notes, each with their own set of links.
- Weekly Meal Plan: Links to the 5-7 recipes you’re cooking this week. Update it every Sunday. Pin it temporarily so it’s at the top of your folder during the week. Unpin it and update it next Sunday.
- Holiday Cookbook: Links to every recipe you make during the holidays. Thanksgiving turkey, Christmas cookies, Diwali sweets, whatever your family does. You open this once a year and everything’s right there. No trying to remember what you made last time.
- Guest Dinner Playbook: Your 8-10 most impressive recipes. The ones you pull out when someone’s coming over, and you want to look like you know what you’re doing. Having this ready means you never panic-scroll through 50 recipes trying to decide what to cook for guests.
- Meal Prep Rotation: Links to your go-to meal prep recipes that you cycle through. If you meal prep every Sunday, this note is your menu. Rotate recipes in and out as you get tired of them or discover new ones.
Each of these takes about 2 minutes to create. And they save you real decision-making time when it matters.
6.6 How This All Connects
Let me zoom out for a second so you can see the full picture of what you’ve built.
- Your folders hold the recipes physically, organized by meal type.
- Your tags let the same recipe appear in multiple Smart Folders — by cuisine, effort, diet, status.
- Your cookbook index gives you a single browsable table of contents with one-tap links to everything.
- Your special-purpose notes (weekly plan, holiday cookbook, guest dinner) give you quick access to recipes for specific situations.
And all of it is connected. You can find any recipe from any angle.
- Browse by folder
- Filter by Smart Folder
- Navigate by index
- Search by name or ingredient.
Every path leads to the same recipe note. That’s not just organization. That’s a system.
And it took maybe 30 minutes total to set up on top of the work you’ve already done in the earlier sections.
7. Use Apple Notes While Actually Cooking
Everything up to this point has been about saving and organizing recipes. But none of that matters if the experience of actually cooking from Apple Notes is terrible.
And honestly, out of the box, it kind of is.
Your screen locks after 30 seconds. You tap it with wet hands and accidentally delete a line. You can’t find where you left off in a long recipe. There’s no “cook mode” button that makes the text bigger and keeps the screen on.
But there are workarounds for every single one of these problems.
Once you set them up, cooking from Apple Notes is genuinely smooth. Not Paprika-level smooth. But way better than cooking from a recipe website with ads, popups, and a screen that dims every time you look away.
7.1 Fix the Screen Timeout Problem
This is the #1 complaint about cooking from Apple Notes.
You’re chopping onions, you look back at your phone, and the screen is off. You tap it, unlock it with wet hands (or try to, with Face ID struggling because your face is covered in flour), and scroll to find where you were. Every. Single. Time.
Two fixes. Pick whichever one fits you.
The simple fix: Go to Settings → Display & Brightness → Auto-Lock → Never.
Your screen stays on until you manually lock it. Dead simple.
The only downside is you have to remember to change it back after cooking, or your battery drains in your pocket all day. Set a reminder if you’re forgetful.
The better fix (Guided Access): This one takes 2 minutes to set up, but it’s worth it.
Guided Access locks your iPhone to a single app and disables auto-lock at the same time. It also disables touch on areas of the screen you define, which means flour-covered accidental taps won’t mess up your recipe.
Here’s how to set it up:
- Go to Settings → Accessibility → Guided Access
- Turn it on
- Set a passcode (or use Face ID to end sessions)
- Under Time Limits, you can optionally set a sound alert
- Under Display Auto-Lock, toggle it to the duration you want (or leave it off entirely during Guided Access)
How to use it when cooking:
- Open your recipe note in Apple Notes
- Triple-click the side button (or home button on older iPhones)
- Guided Access screen appears. You can circle areas of the screen to disable touch (useful for keeping the top toolbar safe from accidental taps)
- Tap Start in the top right
Your phone is now locked to Apple Notes. Screen stays on. Random touches are blocked in the areas you circled. You cook in peace.
To exit: triple-click the side button again and enter your passcode (or use Face ID).
I use Guided Access every time I cook. It takes 3 seconds to activate, and it completely eliminates the screen timeout problem plus the accidental-touch problem. Game changer.
7.2 Use Collapsible Sections While Cooking
If your recipe note has content formatted with Headings or Subheadings (which it should, especially if you’re using the templates from the next section), each heading gets a small collapse arrow in iOS 18+.
Here’s why that’s so useful while cooking:
- Before you start cooking: Everything is expanded. You can read through the whole recipe, review the ingredients, understand the steps.
- While prepping: Collapse the Instructions section. You only need the ingredient list right now. Less scrolling, cleaner view.
- While cooking: Collapse the Ingredients section (you’ve already prepped everything). Expand only the Instructions. Now your screen shows just the steps, nothing else.
- If the recipe has a backstory or source notes: Collapse those from the start. You don’t need to read about where the recipe came from while your oil is heating.
The point is you’re controlling what’s visible on screen at any given moment. Long recipes that normally require endless scrolling become focused, step-by-step views.
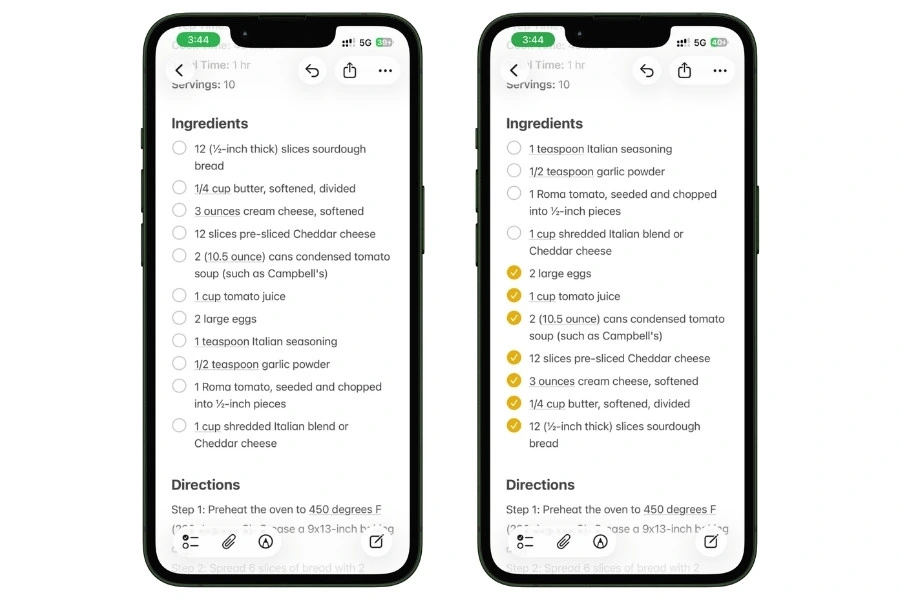
7.3 Checklists as a Prep Tracker
Format your ingredients as a checklist.
You might have already done this if you set up the recipe with the template format. If not, select your ingredient list, tap the checklist icon in the toolbar, and each ingredient gets a circle checkbox next to it.
Now, as you prep each ingredient — wash, chop, measure, set aside — check it off. The satisfying little checkmark appears, and you know that ingredient is ready.
But here’s the setting that makes this actually useful:
Go to Settings → Notes → Sort Checked Items → Automatically.
With this turned on, every ingredient you check off slides to the bottom of the list automatically.
So the unchecked ingredients, the stuff you still need to prep, stay at the top. You always see what’s left. No scanning through the whole list, wondering “did I already chop the garlic?”
7.4 Siri Commands for Hands-Free Cooking
Your hands are covered in raw chicken. Or dough. Or sauce. You’re not touching your phone. But you still need to do things.
Siri handles this without you touching anything:
- “Hey Siri, show me my Butter Chicken note” Opens the specific recipe note. You might need to name it clearly for Siri to find it. “Butter Chicken” works better than “BC dinner thing.”
- “Hey Siri, set a timer for 12 minutes” Sets a timer without leaving Apple Notes. You can set multiple named timers too: “Hey Siri, set a timer called rice for 20 minutes.”
- “Hey Siri, add chicken thighs to my grocery list” Adds items to your Reminders grocery list on the fly. If you realize mid-cooking that you’re low on something, just say it. It’s there for next time you shop.
- “Hey Siri, create a note called Butter Chicken modifications” If you’re tweaking the recipe as you go — more garlic, less salt, different spice ratio — tell Siri to create a new note with your changes. You can merge it into the original recipe note later.
None of these require you to touch your phone. None of them take you out of your cooking flow. They just work in the background.
7.5 Apple Watch as a Wrist-Mounted Recipe Card
If you have an Apple Watch running watchOS 26 or later, Apple Notes now syncs to your wrist.
This sounds gimmicky, but it’s actually useful for one specific situation: short recipes with simple ingredient lists.
Think marinades, salad dressings, spice blends, quick sauces. The kind of recipe that’s 5-6 ingredients and 3 steps.
How to set it up:
- Open the Watch app on your iPhone
- Scroll down to Notes and make sure it’s enabled
- On your watch face, add the Notes complication (tap and hold the watch face → Edit → tap a complication slot → select Notes)
Now you can tap the complication and see your notes directly on your wrist. Pinned notes appear at the top, so pin whatever recipe you’re making today.
You’re not going to read a 30-step beef wellington recipe on a tiny watch screen. But for quick-reference recipes? It’s faster than picking up your phone.
7.6 iPad as a Kitchen Display
If you’ve got an iPad, cooking from Apple Notes is a completely different experience.
The bigger screen makes everything easier to read, and you can prop it up on the counter like a cookbook.
A few tips:
Use Split View. Swipe up from the bottom to open the dock, then drag the Clock app (or any timer app) to the side. Now you’ve got your recipe on one side and a timer on the other. Or put Spotify on the side if you’re the type who cooks with music.
Increase the text size. Pinch-to-zoom doesn’t work in Apple Notes (annoying, I know). But you can go to Settings → Display & Brightness → Text Size and bump it up a couple notches while cooking. Or use Settings → Accessibility → Larger Text for even bigger options. Change it back when you’re done.
Use a stand. Sounds obvious, but it makes a huge difference. Even a small phone/tablet stand, or a cookbook holder keeps the iPad at a readable angle. Propping it against a toaster works too. No judgment.
7.7 Apple Notes vs. Cooking From a Recipe Website
I cooked the same recipe twice. Once from the original website in Safari, and once from the same recipe saved in Apple Notes.
From the website: the screen timed out 4 times. An ad covered half the recipe card once. The page scrolled to a different position when an ad loaded. I had to scroll past the life story section twice when I lost my place.
Total interruptions: about 6-7 across a 35-minute cooking session.
From Apple Notes: screen stayed on (Guided Access). No ads. No scroll hijacking. I collapsed the ingredients after prepping and only saw the steps. Checked off each step as I went.
Total interruptions: zero.
It’s not a close comparison. Once a recipe is in Apple Notes, cooking from it is dramatically less frustrating than cooking from the web.
That alone justifies the 30 seconds it takes to save recipes properly.
8. Recipe Templates You Can Copy Right Now
Apple Notes doesn’t have a template feature. People have been requesting this for years, and Apple still hasn’t added it.
But it doesn’t matter. You can build your own templates in about 5 minutes, and they work just as well.
You create a master template note, and every time you want to add a new recipe, you copy the structure into a fresh note.
I made 3 templates for different types of cooking. You can copy any of them right now, paste into Apple Notes, and start using them immediately.
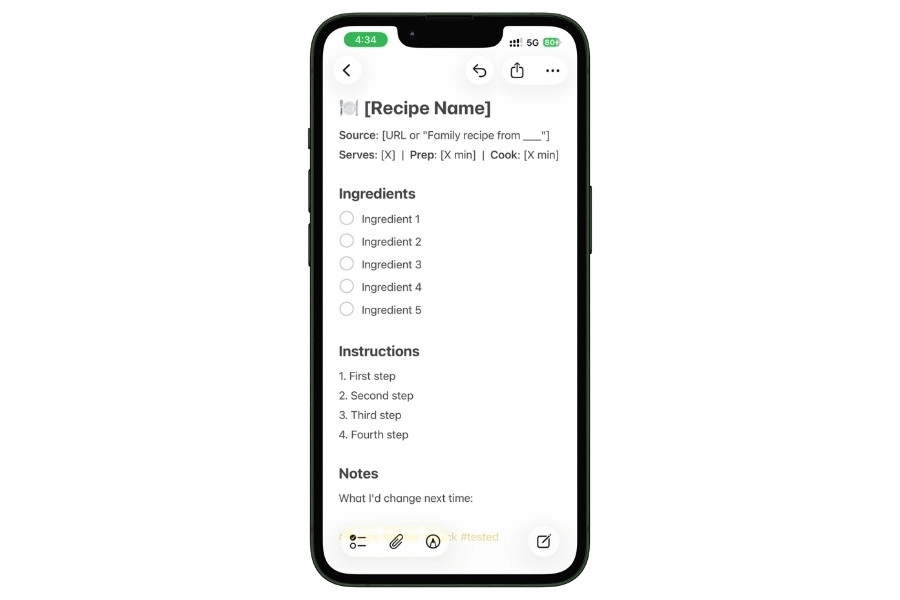
8.1 Template 1: Simple Recipe (For Everyday Cooking)
This is the one you’ll use most.
Quick, clean, no extras. Perfect for weeknight dinners, simple breakfasts, snacks, anything that doesn’t need precise measurements or elaborate steps.
This is what the template looks like:
That’s it. Simple, clean, everything has a place.
The ingredients are formatted as a checklist so you can check them off while prepping.
The instructions are numbered so you don’t lose your place.
The Notes section at the bottom is for the stuff you figure out after cooking — “needs more salt” or “double the garlic next time.” And tags at the very bottom for Smart Folders.
8.2 Template 2: Detailed Recipe (For Serious Cooks)
This one’s for recipes you care about. The ones you make for guests, perfect over time, or want to document properly.
It adds structure that the simple template doesn’t need.
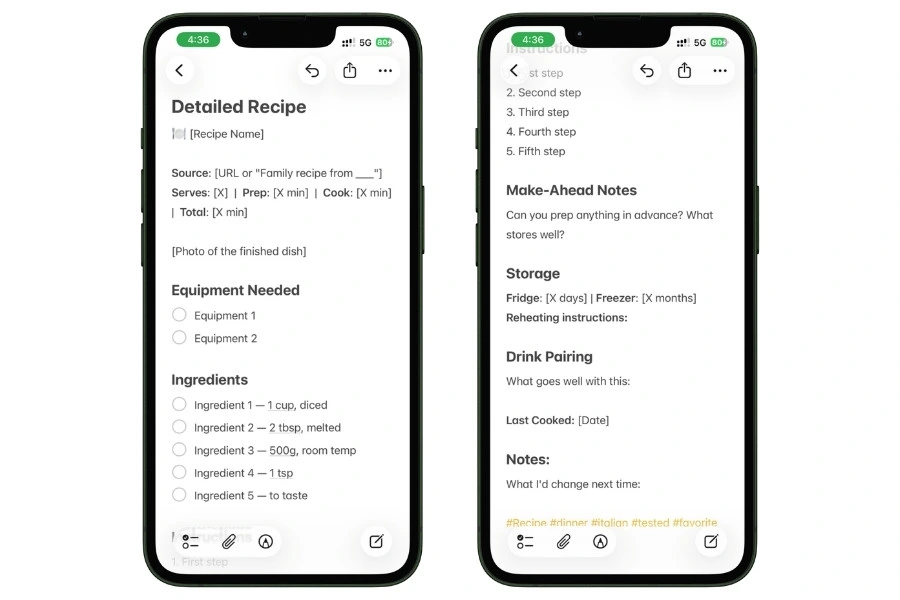
The big difference between this and the simple template is the extra sections. Equipment needed, make-ahead notes, storage instructions, drink pairing, and a “last cooked” date.
These turn a recipe note from something you read once into something you come back to and improve over time.
The date last cooked and drink pairing sections are optional. Skip them if you don’t care.
But if you’re the type who tweaks a recipe every time you make it, having that history right inside the note saves you from making the same mistake twice.
8.3 Template 3: Baking Recipe (Where Precision Matters)
Baking is a science. A tablespoon more flour or a few degrees off on the oven temp, and things go wrong. This template adds the precision fields that bakers need.
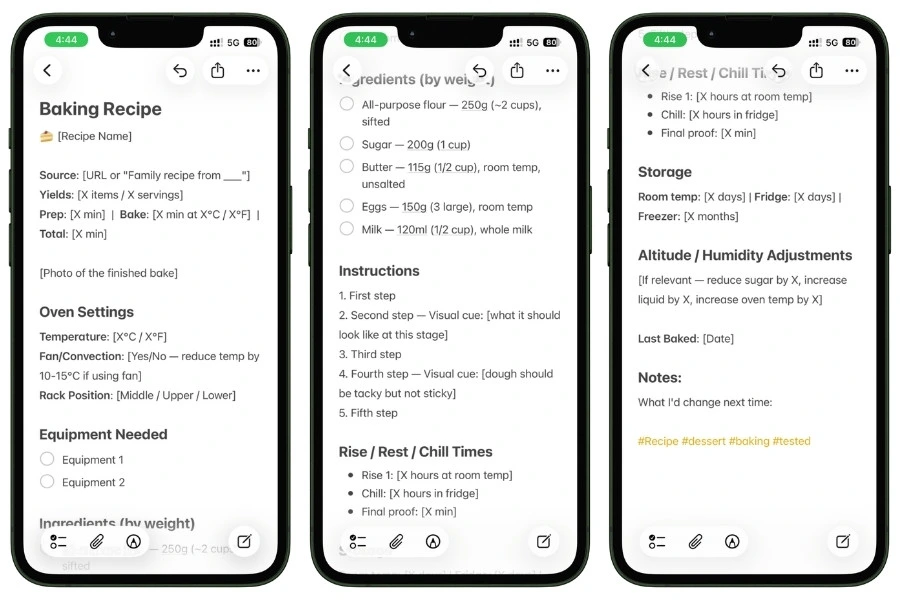
Two things that make this template different from the others.
Weights in grams alongside cups. Serious bakers weigh ingredients. Casual bakers use cups. This template gives both, so anyone can use it. The grams column is the primary measurement, cups are the backup.
Visual cues in the instructions. Baking instructions like “mix until combined” are useless if you don’t know what “combined” looks like. Adding visual cues (“dough should be shaggy, not smooth” or “mixture will look curdled, that’s normal”) helps the reader know they’re on track. No other template I’ve seen does this.
If you want all three templates in one place, I put them together on a separate page you can bookmark and come back to anytime. It also includes something I didn’t put in this guide: a copyable Tag Taxonomy Cheat Sheet with every tag category organized and ready to paste into your notes. Drop your email below, and I’ll send you the link.
8.4 How to Use These Templates
Apple Notes doesn’t have a “New from Template” button, so here’s how to make these work in practice.
On iPhone or iPad:
- Create a note with the template structure
- Long-press the template note
- Tap Duplicate Note
- Open the duplicate, rename it, and fill in the recipe details
That’s it. Your original template stays untouched.
The duplicate becomes your new recipe note. Every time you want to add a recipe, long-press the template and duplicate it again. Takes about 5 seconds.
On Mac: Same thing. Right-click the template note in the sidebar and select Duplicate Note.
With a Siri Shortcut (even faster): You can build a simple Shortcut that creates a new note with the template pre-filled. It asks you for the recipe name, drops the template structure into a new note in your Recipes folder, and opens it for editing. I’ll cover this in Section 11 (the Shortcuts cheat sheet).
9. Apple Notes vs. Dedicated Recipe Apps (Honest Comparison)
I’m not going to pretend Apple Notes is perfect for recipes. It’s not.
There are apps built specifically for recipe management that do certain things way better than Notes ever will.
But there are also things Apple Notes does that no recipe app can touch.
This section exists because if you’re reading this guide, you’re probably deciding between sticking with Apple Notes or paying for something like Mela, Paprika, or Crouton.
I installed all three and imported the same recipes to compare them side by side. Here’s what I found.
9.1 The Feature Comparison (No Sugarcoating)
| Feature | Apple Notes | Mela | Paprika | Crouton |
| Price | Free forever | $5 iPhone / $10 Mac (one-time) | $5-$30 per platform (one-time) | ~$9/year |
| One-tap web import | No (needs Shortcut or copy-paste) | Yes | Yes | Yes |
| Serving scaling | Manual (Math Notes) | Yes (tap to adjust) | Yes (slider) | Yes |
| Cook mode | No (Guided Access workaround) | Yes | Yes | Yes (hands-free wink navigation) |
| Grocery list | No (Reminders workaround) | Yes | Yes (with aisle sorting) | No |
| Meal planning | Manual (tables + links) | Yes (built-in calendar) | Yes | No |
| Collaboration | Excellent (real-time, colored cursors) | No | No | No |
| Offline access | Yes | Yes | Yes | Yes |
| Cross-platform | Apple only | Apple only | iOS, Mac, Android, Windows | Apple only |
| Freeform content | Yes (text, photos, audio, PDFs, tables, sketches) | No (structured format only) | No | No |
| Note linking | Yes | No | No | No |
| Audio recording | Yes (with transcription) | No | No | No |
| Document scanning | Yes (with OCR) | No | No | No |
| Apple Watch | Yes (watchOS 26+) | No | No | No |
| Nutritional info | No | No | No | Yes (some recipes) |
Look at that table honestly.
The dedicated apps dominate the top half: import, scaling, cook mode, grocery lists. Apple Notes dominates the bottom half: collaboration, freeform content, linking, audio, scanning.
They’re good at different things. And knowing which things matter to you is how you make the right choice.
9.2 Where Apple Notes Wins (And It’s Not Close)
It’s free, forever
No subscription. No one-time purchase. No “premium features.” No “buy separately for each platform.” Zero dollars, zero catches.
For someone with a modest recipe collection, paying $5-$30 for a dedicated app might not make sense when the phone in your pocket already does most of what you need.
Freeform content
This is the big one.
A recipe in Mela or Paprika lives in a structured format: title, ingredients, instructions, done.
- You can’t add a voice memo of your mom explaining the recipe
- You can’t attach a scanned image of the original handwritten card
- You can’t embed a PDF from a cookbook
- You can’t add a table comparing two versions of the same recipe
- You can’t sketch a plating diagram
Apple Notes lets you mix all of that in a single note. For cooks who treat recipes as living documents, not just ingredient lists, that flexibility is unmatched.
Real-time collaboration
This one surprised me. If you share a recipe folder with family members, everyone can edit notes at the same time with colored cursors showing who’s doing what.
You can @mention someone in a note. You can track who changed what.
Try doing that in Paprika. You can’t. Most recipe apps are single-user tools. Apple Notes is collaborative by default.
Note linking and cross-referencing
You built a cookbook index in Section 6 with bidirectional links between recipes. No recipe app offers anything close to this.
You can’t link a “Thanksgiving Menu” to individual recipe notes in Mela. You can’t create a “Meal Prep Rotation” index in Paprika.
This wiki-style navigation is something only Apple Notes can do.
It’s never going away
Apple Notes is a first-party Apple app that ships on every iPhone, iPad, and Mac.
It’s not a startup that might shut down, get acquired, or pivot to a subscription model. Your recipes are safe for as long as you use Apple devices.
Can you say the same about a third-party app five years from now?
9.3 Where Dedicated Apps Win (And It’s Not Close Either)
One-tap web import
This is the single biggest advantage dedicated apps have.
In Mela, you tap the share button on a recipe page, tap “Save to Mela,” and you get a perfectly formatted recipe with photo, ingredients, instructions, cook time, and servings.
In Apple Notes, you either need the Recipe Clipper Shortcut (which doesn’t work on every site) or you copy-paste and clean up manually.
If you save recipes from the web multiple times a week, this convenience gap is real.
Ingredient scaling
In Paprika, you tap the serving number, change it from 4 to 8, and every ingredient amount doubles instantly. In Mela, same thing. One tap and the whole recipe scales.
Apple Notes doesn’t have this. There’s no built-in way to adjust servings and have ingredients update automatically.
If you need to double a recipe, you’re doing the math yourself. For bakers and precision cooks who scale recipes regularly, this is one of the clearest wins for dedicated apps.
Cook mode
Dedicated apps have a mode designed for cooking. Large text. Step-by-step navigation. Screen stays on. Some even have hands-free features, Crouton lets you wink to advance to the next step.
Apple Notes has none of this. You can approximate it with Guided Access and collapsible sections (Section 7), but it’s a workaround, not a feature.
Smart grocery lists
Paprika generates a grocery list from your selected recipes, combines duplicate ingredients (if two recipes both need onions, you see “onions” once with the total amount), and sorts by grocery store aisle.
Apple Notes can’t do any of that.
You can dictate items to Siri, and they land in Reminders, but there’s no automatic extraction or deduplication.
9.4 The Hybrid Approach (What Actually Makes Sense)
Here’s what a lot of people end up doing, and honestly, it’s probably the smartest move:
Use Apple Notes for:
- Quick recipe captures on the go (someone texts you a recipe, you hear one on a podcast, you see one on TikTok)
- Personal variations and experiments (“I tried it with coconut milk instead, and it was better”)
- Family recipe digitization (scanning cards, recording verbal recipes)
- Freeform cooking journals and tasting notes
- Collaborative meal planning with family
- Building your cookbook index with note linking
Use a dedicated app for:
- Batch-importing web recipes you find online
- Cooking from structured recipes where you need scaling and cook mode
- Automated grocery list generation for weekly meal planning
You’re not choosing one or the other. You’re using each where it’s strongest.
Apple Notes is the capture tool, the creative space, the family archive. The dedicated app is the execution tool for structured cooking.
9.5 Five-Year Cost Comparison
If cost is a factor (and for most people it is), here’s what each option actually costs over 5 years:
Apple Notes only: $0
Mela (one-time purchase): iPhone app: $5 | Mac app: $10 | Both: $15 Total over 5 years: $15
Paprika (one-time per platform): iPhone: $5 | Mac: $30 | Android: $5 | Windows: $30 Total for Apple ecosystem over 5 years: $35 Total for all platforms: $70
Crouton (subscription): ~$9/year Total over 5 years: ~$45
CookBook (subscription): ~$40/year Total over 5 years: ~$200
Mela is the value pick if you want a dedicated app. One-time purchase, no subscription, runs on iPhone and Mac, and it’s genuinely good.
Paprika is the best if you need a cross-platform (Android/Windows). CookBook is expensive but strong for social media recipe import.
Apple Notes is FREE. That matters.
9.6 So Who Should Use What?
Stick with Apple Notes if:
- You have fewer than 200 recipes
- You cook from feel and guidelines more than exact measurements
- You don’t want to pay for another app
- You’re already deep in the Apple Notes ecosystem
- You need to share and collaborate on recipes with family
- You want to store more than just ingredients and steps (audio, scans, notes, photos, tables)
Get a dedicated recipe app if:
- You have 200+ recipes and growing
- You save web recipes multiple times a week
- You need grocery list automation for weekly shopping
- You want a proper cook mode with hands-free features
- You bake a lot and need precise, instant scaling
- You cook across multiple platforms (Android + Apple)
Use both if:
- You want the flexibility of Apple Notes for capture and creative cooking
- But also want the polish of a dedicated app for structured recipes and grocery lists
- You don’t mind having two systems for different purposes
There’s no wrong answer. There’s only what fits how you actually cook.
10. What Apple Notes Can’t Do (And the Workarounds)
I’ve spent this entire guide showing you what Apple Notes can do for recipes. Now let me be straight about what it can’t.
Every tool has limits. Pretending otherwise would make this guide less useful, not more. So here are the real limitations, stated plainly, with a specific workaround for each one.
10.1 No Native Web Clipper
Apple Notes can’t grab a recipe from a webpage in one clean step. The Share Sheet only saves a link preview. You don’t get the actual recipe content.
Workaround: Copy the recipe page URL, paste it into ChatGPT with the extraction prompt from Section 3.2, and paste the clean output into a new note. It takes about 30 seconds and gives you a properly formatted recipe without the ads and life stories. If you don’t want to use ChatGPT, you can manually select and copy-paste the recipe text from the page, but you’ll need to clean up the formatting yourself.
10.2 No Cook Mode
There’s no button that makes the text bigger, keeps the screen on, and gives you step-by-step navigation with hands-free controls.
Dedicated apps like Crouton and Paprika have this. Apple Notes doesn’t.
Workaround: Use Guided Access to lock the screen to Apple Notes with auto-lock disabled (Section 7.1). Use collapsible sections to show only the instructions while cooking (Section 7.2). Increase text size temporarily in Settings → Display & Brightness → Text Size. It’s three separate steps instead of one button, but once you’ve done it a couple times, it becomes muscle memory.
10.3 No Automatic Ingredient Scaling
You can’t tap a number and have every ingredient adjust. Paprika has a slider. Mela has a tap-to-adjust servings button. Apple Notes has nothing like that built in.
Workaround: There’s no real workaround for this one. If you need to double or halve a recipe, you’re doing the math yourself. For the occasional recipe, that’s fine. But if you scale recipes regularly, this is one area where a dedicated app like Paprika or Mela genuinely does it better.
10.4 No Smart Grocery List
Dedicated apps can extract ingredients from a recipe and generate a grocery list sorted by aisle, with duplicates merged across multiple recipes. Apple Notes can’t do any of that.
Workaround: Two options. First, just dictate to Siri while looking at your recipe: “Hey Siri, add chicken thighs to my grocery list.” Each item lands in the Reminders app’s grocery list, which auto-categorizes by section (produce, dairy, meat, etc.). It’s manual, but it works hands-free.
Second, use the Save Recipe Add Ingredients Shortcut (Section 4.3). When you save a social media recipe, it automatically creates both the Apple Note and a Reminders grocery list from the ingredients. One tap, two outputs.
Neither option is as slick as Paprika’s automatic extraction, but they get your list made.
10.5 No Built-In Templates
Despite years of users asking for it, Apple Notes still doesn’t have a template gallery.
Workaround: Create a template note, then long-press it and tap Duplicate Note every time you want a new recipe (Section 8). Or build a Siri Shortcut that generates a pre-formatted recipe note for you (covered in Section 11). The three ready-to-copy templates in Section 8 give you the starting point. Not ideal, but it works fine once you get in the habit.
10.6 Export Used to Be Painful (But It’s Getting Better)
This used to be one of the biggest frustrations with Apple Notes.
Sharing a recipe note via Messages or Mail strips all formatting — bold, headings, checklists, tables, everything turns into plain text. Bulk exporting from iCloud.com used to create .txt files that lost all structure.
The good news: iOS 26 added Markdown export.
You can now tap Share → Export as Markdown on any note, and it saves a clean .md file with headings, lists, links, and text formatting intact.
That’s a huge improvement for backing up recipes or moving them to another app. On Mac, you can also do this via File → Export as Markdown.
The limitations that remain: Markdown export doesn’t perfectly handle tables, embedded images, or audio recordings. Those elements either get simplified or dropped.
And sending a note directly via Messages or Mail still strips formatting, you need to use the Export as Markdown option specifically.
Workaround for sharing a single recipe with someone: The cleanest option is still to take a screenshot of the note and send the image. The formatting stays intact visually.
For backing up your collection, use the Markdown export to Files, or keep iCloud sync enabled so your notes are always backed up to your Apple account. For sharing with non-Apple users, send a shared note link (they can view it at iCloud.com in a browser, even without an Apple device).
10.7 Apple Ecosystem Only
No Android app. No Windows app. The iCloud.com web version exists, but it’s limited and clunky.
If your household has a mix of Apple and Android devices, shared recipe management in Apple Notes is going to be frustrating.
Workaround: For sharing with non-Apple users, you have a few options. Send recipe notes as plain text via Messages or email. Share a note link that opens in iCloud.com on their browser.
Or if you’re doing serious cross-platform recipe sharing, this might be a reason to use Paprika instead (it runs on iOS, Mac, Android, and Windows).
10.8 Search Is Basic
Apple Notes search can’t do partial word matching (“chick” won’t find “chicken”). No Boolean operators (can’t search “chicken AND curry”). No folder-scoped search (can’t search only inside the Recipes folder). No saved searches.
Workaround: Tags and Smart Folders compensate for most of this. If you’ve tagged your recipes properly (Section 2), you rarely need to rely on search. A Smart Folder for “Quick Weeknight Dinners” is more useful than searching for “quick dinner” anyway.
And for specific recipe names, search still works fine, it just needs the exact word.
10.9 Formatting on iPhone Is Slow
Making text bold on iPhone requires: select the text → tap Aa → tap Bold → dismiss the format menu. That’s 3-4 taps for one formatting action. Applying a heading style, adding a checklist, inserting a table — all multi-tap operations.
Building a nicely formatted recipe note from scratch on iPhone is slow.
Workaround: Use templates (Section 8). The whole point of a template is that the formatting is already done. You duplicate it and fill in the content. No formatting from scratch.
If you’re doing heavy recipe note creation or cleanup, do it on Mac or iPad where keyboard shortcuts make formatting instant (Cmd+B for bold, Cmd+Shift+H for heading, etc.). Save iPhone for quick edits and on-the-go captures.
10.10 The Bottom Line on Limitations
None of these are dealbreakers on their own. Every one has a workaround. But stacked together, they’re the reason dedicated recipe apps exist.
If three or more of these limitations genuinely frustrate you, a $5-$15 app like Mela or Paprika might be worth it for the recipe-specific stuff, while Apple Notes handles everything else.
The honest answer is: Apple Notes is a surprisingly capable recipe tool with real gaps. The workarounds close most of those gaps. But they are workarounds, not solutions. Whether that’s good enough depends on how you cook and what annoys you.
What You’ve Built
Let’s take a step back and look at what you actually have now.
- A recipe folder system with subfolders, an Inbox for quick saves, and Gallery View that makes the whole thing look like a digital cookbook
- A tag taxonomy that lets Smart Folders automatically sort your recipes by meal type, cuisine, effort level, and status
- Three different methods for saving web recipes, plus Shortcuts that pull recipes from TikTok and Instagram in one tap
- A way to scan and preserve family recipe cards so they outlast the paper they were written on
- A cookbook index with note links that lets you jump between recipes like flipping pages
- A kitchen-ready setup with Guided Access, checklists, and Siri commands so you can actually cook from your notes without fighting your phone
- Templates you can copy and reuse
- And an honest understanding of where Apple Notes works great and where a dedicated app might serve you better
All of it free. All of it built into the phone you already own.
I built this system with 25+ recipes over 2 weeks, and the thing that surprised me most wasn’t any single feature. It was how all of it connects.
- Folders hold the recipes
- Tags let them appear in multiple Smart Folders
- The cookbook index links everything together
- Shortcuts automate the saving
And when you’re standing in the kitchen with your hands covered in flour, Guided Access and Siri keep everything running without you touching the screen.
It’s not perfect. I said that throughout this guide, and I meant it.
If you save 10 web recipes a week and need auto-scaling and grocery lists, get Mela or Paprika. But if you want one free app that handles saving, organizing, digitizing, collaborating, and cooking from your recipes, Apple Notes does way more than most people give it credit for.
Start with Section 1:
- Set up the folder
- Save 5 recipes
- Tag them
- Turn on Gallery View
That alone takes 15 minutes and already puts you ahead of the “155 notes with no system” screenshot that inspired this whole guide.
Then build from there.
If you’ve built your own recipe system in Apple Notes, or you’ve found a trick I didn’t cover, I’d genuinely love to hear about it. Drop me a message or find me on Reddit at u/TheiPhoneAppGuy.
More Apple Notes guides on iAppList:
- How I Turn Apple Notes Into a Personal Journal
- How I Use Apple Notes as a Daily Planner on My iPhone
- How I Use Apple Notes to Keep My Health Info Organized
- How I Use Apple Notes to Plan My Vacation
FAQs
Is Apple Notes good enough for storing recipes?
Yes. Apple Notes handles recipe storage well for collections under 200 recipes. You get folders, tags, Smart Folders, Gallery View for visual browsing, document scanning for handwritten recipes, checklists for ingredients, and iCloud sync across all your Apple devices. It lacks one-tap web import, cook mode, and auto-scaling that dedicated recipe apps offer, but free Siri Shortcuts close most of those gaps.
Can I save TikTok and Instagram recipes to Apple Notes?
Yes, using the free Reel to Recipe Siri Shortcut. Share a TikTok, Instagram Reel, YouTube Short, or Facebook Reel to the Shortcut, and it uses Apple Intelligence to parse the caption into a formatted recipe note with ingredients, steps, and a link to the original video. A ChatGPT-powered version exists for older iPhones that don’t support Apple Intelligence.
How do I organize hundreds of recipes in Apple Notes?
Use a combination of folders, tags, and Smart Folders. Create a main Recipes folder with subfolders by meal type (Breakfast, Lunch & Dinner, Desserts, etc.). Add tags like #recipe, #dinner, #italian, #quick, #tested to each note. Then set up Smart Folders that auto-collect recipes matching specific tag combinations, like “Quick Weeknight Dinners” filtering for #recipe + #dinner + #quick.
Can Apple Notes scan handwritten recipe cards?
Yes. Apple Notes has a built-in document scanner (camera icon → Scan Documents) that captures recipe cards with automatic edge detection and perspective correction. Live Text OCR makes the text in scanned images searchable. You can also use Scan Text (camera icon → Scan Text) to extract handwritten or printed text as editable typed content directly into a note.
Does Apple Notes have a recipe template?
No built-in template exists. But you can create your own template note with sections for title, source, servings, prep/cook time, ingredients (as a checklist), numbered instructions, and tags. Then long-press the template note and tap Duplicate Note every time you want to add a new recipe. This works on both iPhone and Mac.
Is Apple Notes better than Paprika or Mela for recipes?
It depends on how you cook. Apple Notes is better for freeform content, real-time collaboration, family recipe digitization, note linking, and it’s completely free. Paprika and Mela are better for one-tap web recipe import, automatic ingredient scaling, cook mode, and smart grocery lists. Many people use both: Apple Notes for capturing and organizing, a dedicated app for structured cooking.