How to Free Up Storage on iPhone Without Deleting Apps
Ever gotten that annoying iPhone Storage Full message right when you’re trying to take a photo, download an app, or update iOS?
Suddenly, your phone just won’t cooperate.
If you’re like most iPhone users, the first instinct is to delete apps to make space.
But what if I told you there’s a better way?
You don’t have to part with your favorite apps just to free up some storage.
Apple has built-in tools and smart tricks that let you clear space without deleting a single app.
In this guide, I’ll walk you through quick and effective ways to reclaim storage on your iPhone.
Whether it’s clearing hidden junk, optimizing your photos, or offloading unused files, these easy-to-follow steps will help you free up space while keeping your apps intact.
Let’s dive in.
Check Your iPhone Storage Usage
Before you start clearing space, it’s important to see what’s actually taking up storage on your iPhone.
Sometimes, the biggest culprit isn’t apps.
It’s photos, messages, cached files, or even system data you didn’t realize was piling up.
i. How to Check Your Storage:
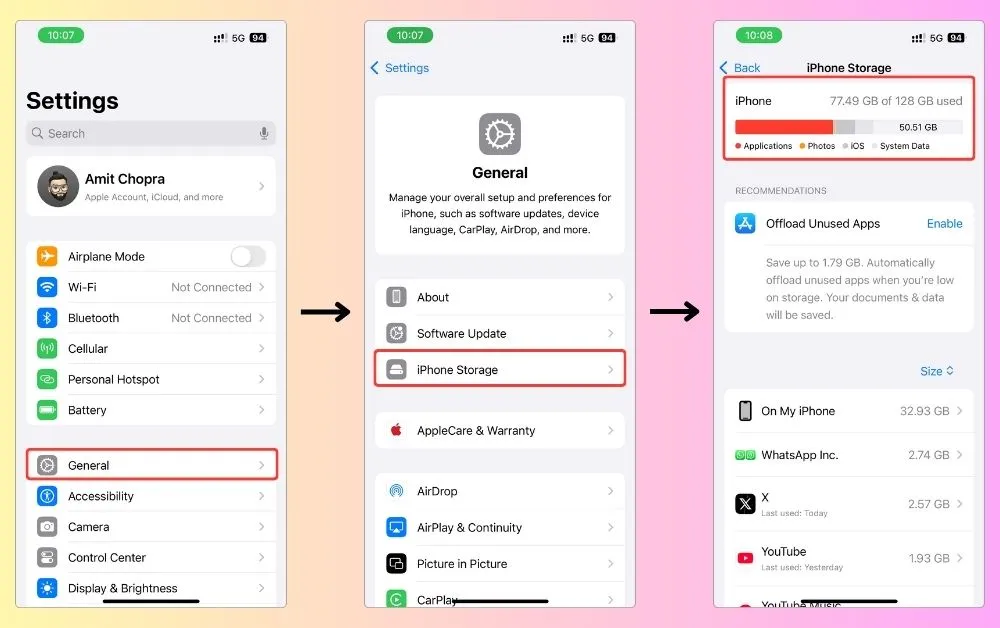
- Open Settings on your iPhone.
- Tap General, then select iPhone Storage.
- Wait a few seconds while your iPhone analyzes storage usage.
- You’ll see a color-coded bar showing how much space is used by apps, photos, messages, system files, and more.
ii. Why This Is Helpful:
- You can identify space hogs (e.g., a single app or video might be taking up gigabytes).
- iOS gives personalized recommendations on what to delete or offload.
- You’ll know exactly where to focus your cleanup efforts instead of randomly deleting things.
Now that you know what’s taking up your storage, let’s move on to the best ways to solve the low-storage problem on your iPhone.
1. Clear Safari Cache & Website Data
If you use Safari to browse the web on your iPhone, it stores a lot of temporary data—like cookies, cached images, and browsing history—to make websites load faster.
Over time, this data can pile up and take up a surprising amount of storage.
Luckily, clearing Safari’s cache is super easy and can instantly free up space without affecting your apps or important data.
1.1 How to Clear Safari Cache on iPhone:
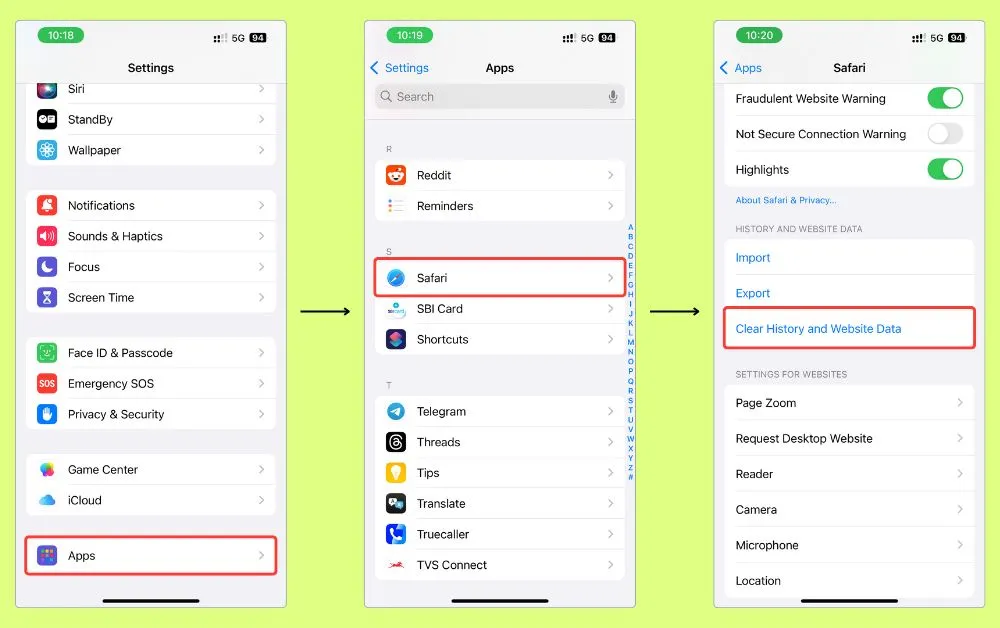
- Open Settings > Apps > Safari.
- Scroll down and tap Clear History and Website Data.
- Confirm by selecting timeframe.
1.2 What Happens When You Do This?
- It frees up storage used by Safari.
- It logs you out of most websites (so make sure you remember your passwords).
- It won’t delete saved bookmarks or reading list items, so no need to worry about losing those.
If you don’t want to clear all your browsing data, you can also delete website-specific data by going to: Settings > Apps > Safari > Advanced > Website Data and removing data from specific sites.
Now that Safari’s junk is cleared, let’s move on to an even more powerful trick: offloading unused apps.
2. Offload Unused Apps (Without Losing Data)
Did you know iOS has a built-in feature that lets you remove apps without deleting your data?
It’s called Offload Unused Apps.
And it’s perfect for freeing up space while keeping your important app files safe.
Here’s how it works: Instead of completely deleting an app, iOS removes the app itself but keeps all its documents and data. So, when you reinstall the app later, it’s like you never deleted it in the first place.
2.1 How to Offload Apps Manually:
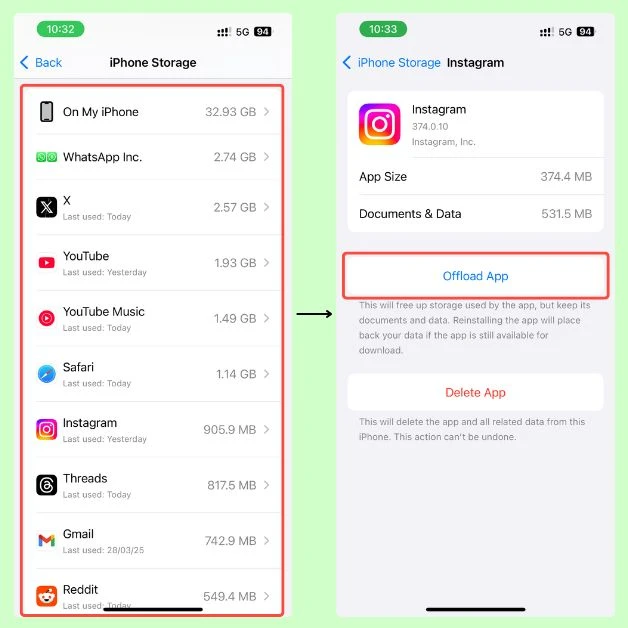
- Open Settings and go to General > iPhone Storage.
- Scroll down to see a list of apps sorted by storage usage.
- Tap on an app you don’t use often.
- Select Offload App, then confirm.
Pro Tip: If you want iOS to handle this automatically, you can enable: Settings > Apps > App Store > Offload Unused Apps (toggle it on).
2.2 What Happens When You Offload an App?
- The app is removed from your iPhone, freeing up space.
- All your app data stays saved on your device.
- If you reinstall the app later, everything is restored exactly as it was.
This trick works great for large apps like games, editing tools, or shopping apps that you don’t use often but don’t want to lose.
3. Delete Large Message Attachments
If you use iMessage frequently, your conversations could be silently eating up gigabytes of storage—especially if they’re packed with photos, videos, GIFs, and voice messages.
The good news?
You don’t have to delete entire conversations; you can just remove the large attachments that are taking up space.
3.1 How to Find & Delete Large Attachments in Messages:
- Open Settings and go to General > iPhone Storage.
- Scroll down and tap Messages.
- Under Recommendations, you’ll see categories like:
- Top Conversations (chats with the most storage usage)
- Photos (all images sent/received via iMessage)
- Videos (high-storage clips from chats)
- GIFs & Stickers
- Tap a category, select unwanted files, and hit Delete.
Bonus Tip: You can also clear old messages automatically by enabling: Settings > Apps > Messages > Keep Messages > Change from ‘Forever’ to ‘1 Year’ or ‘30 Days.’
3.2 Why This Works:
- Frees up tons of space if you send/receive media often.
- Keeps your conversations intact while removing unnecessary files.
- No impact on app performance. Your chats stay, but the clutter goes.
Now that your messages are cleaned up, let’s move on to an even bigger storage saver—managing photos and videos smartly.
4. Manage Photos & Videos Smartly
Photos and videos are some of the biggest storage hogs on any iPhone.
But don’t worry.
You don’t have to delete your favorite memories.
Instead, you can optimize storage, remove duplicates, and clear hidden junk to reclaim space without losing important files.
4.1 Enable iCloud Photo Optimization (Best for Those Using iCloud)
If you have iCloud Photos enabled, your iPhone can store full-resolution images in iCloud while keeping smaller versions on your device.
This saves a ton of local storage while still letting you access all your photos anytime.
How to Enable:
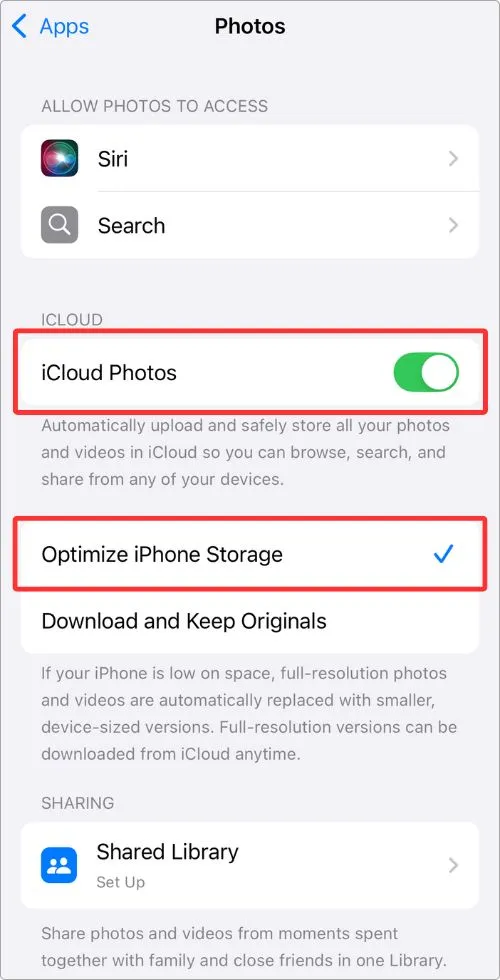
- Open Settings > Apps and go to Photos.
- Toggle on iCloud Photos (if it’s not already on).
- Select Optimize iPhone Storage.
How This Helps:
- Your original, high-quality photos stay in iCloud.
- Your iPhone only keeps lighter, space-saving versions.
- When you open a photo, it downloads the full-quality version if needed.
4.2 Delete Duplicates & Unnecessary Photos
iOS 16+ has a built-in Duplicates album that lets you quickly merge identical photos to save space.
How to Find & Remove Duplicates:
- Open the Photos app.
- Go to Utilities > Duplicates.
- Tap Merge on duplicate sets to keep the best version.
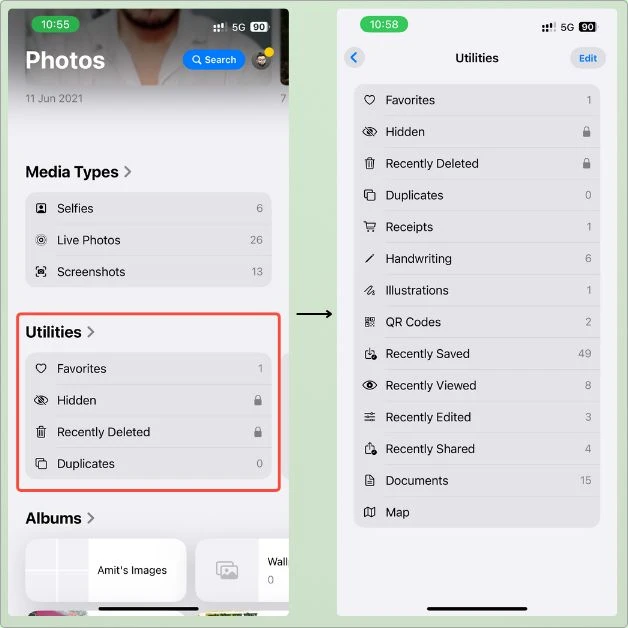
Also, consider deleting:
- Screenshots (found in Media Types > Screenshots).
- Old screen recordings (check Media Types > Screen Recordings).
- Blurry or unwanted photos you no longer need.
4.3 Clear the ‘Recently Deleted’ Folder
Even after deleting photos, they stay in your iPhone for 30 days before being permanently erased.
To free up storage instantly, clear them manually:
How to Empty Recently Deleted Photos:
- Open the Photos app.
- Go to Utilities > Recently Deleted.
- Tap Select > Delete All to free up space.
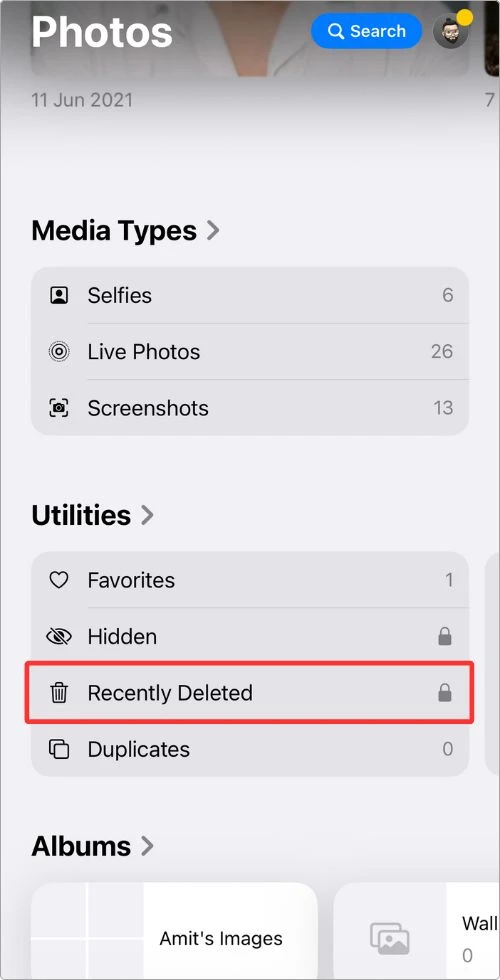
These steps alone can free up gigabytes of storage without removing essential apps or data.
4.4 Turn Off Live Photos (Saves Storage Per Shot)
If you’re looking to prevent future storage issues, tweaking your camera settings can help.
Live Photos capture a few seconds of video before and after each photo, making them much larger than regular pictures.
If you don’t need this feature, disabling it will save space with every new photo you take.
How to Disable Live Photos:
- Open the Camera app.
- Look for the Live Photo icon (three circles in the top-right).
- Tap it to turn it off (it should have a slash through it).
- To make this setting permanent, go to Settings > Camera > Preserve Settings and enable Live Photo (this prevents it from turning back on automatically).
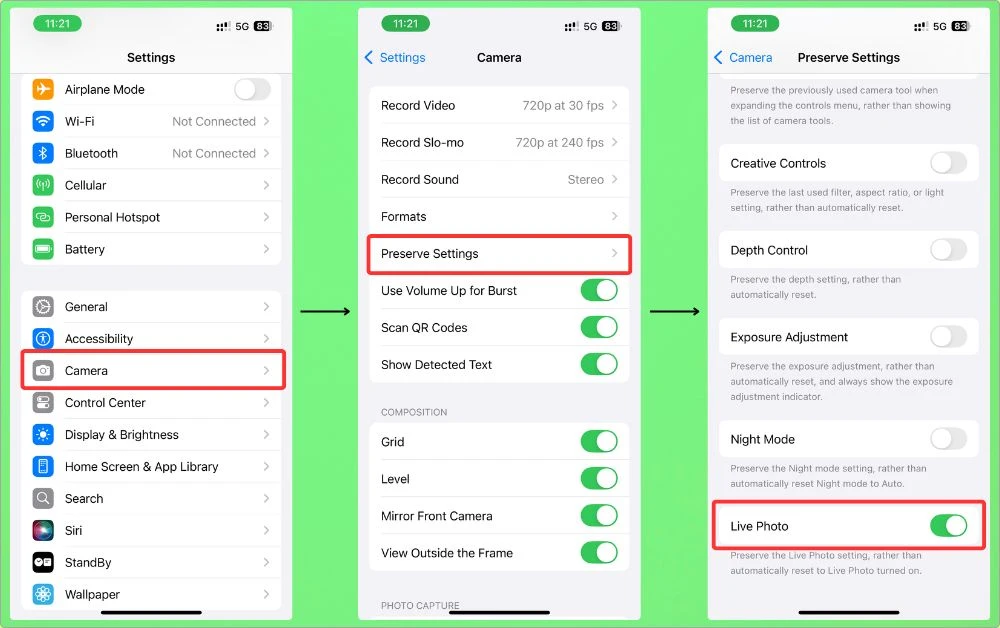
Why This Helps:
- Regular photos are much smaller in size than Live Photos.
- You still get high-quality images without wasting storage.
5. Clear App Caches (For Apps That Allow It)
Some apps store temporary files and cached data to improve performance, but over time, this can clutter your storage.
Apps like Instagram, X, Facebook, TikTok, and Spotify can easily accumulate hundreds of MBs—or even gigabytes—of unnecessary cache.
While iOS doesn’t have a universal “Clear Cache” button, some apps let you manually remove cached files.
5.1 How to Clear Cache in Individual Apps
For apps that allow it, here’s how you can do it:
- Open the app and go to Settings.
- Look for Clear Cache (usually under ‘Storage’ or ‘Data Usage’).
- Tap it to clear it.
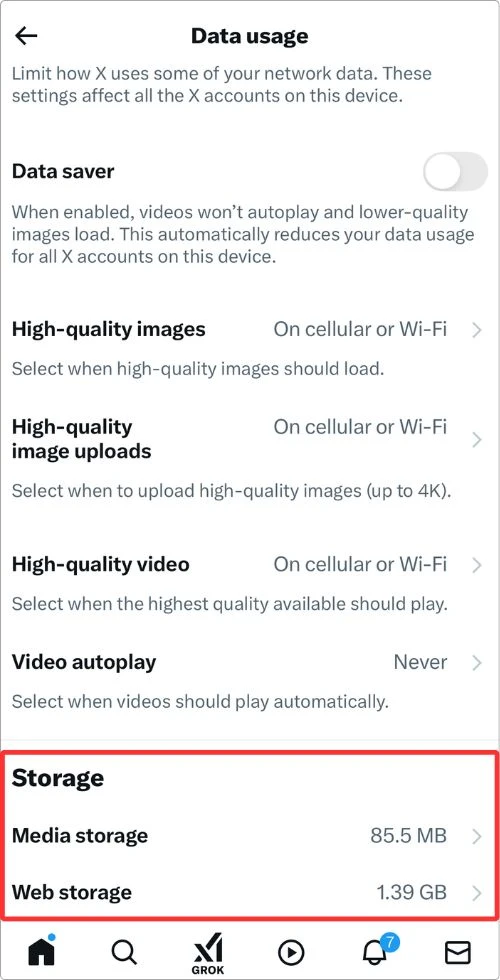
5.2 For Apps That Don’t Have a Clear Cache Option
If an app doesn’t offer a built-in way to clear the cache, the only option is to offload and reinstall it:
- Go to Settings > General > iPhone Storage.
- Find the app, tap it, and select Offload App.
- Reinstall the app from the App Store, and your data will be restored, but the cache will be gone.
Why This Helps:
- Frees up space without losing app data.
- Improves app performance (especially for social media apps).
- Keeps your iPhone running smoothly without unnecessary clutter.
6. Remove Offline Downloads (Netflix, YouTube, Spotify, etc.)
Streaming apps like Netflix, YouTube, Spotify, and Apple Music let you download content for offline use, which is super convenient.
But those files can silently take up gigabytes of space over time.
If you’re not actively watching or listening to downloaded content, clearing it out is a quick way to free up storage.
6.1 How to Remove Offline Content from Popular Apps
Netflix:
- Open the Netflix app.
- Tap Downloads at the bottom.
- Delete movies or episodes you’ve already watched by tapping the trash icon.
YouTube (Premium Users Only):
- Open YouTube and go to the Library tab.
- Tap Downloads.
- Delete videos you no longer need.
Spotify & Apple Music:
- Open Spotify/Apple Music.
- Go to your Library > Downloaded Songs/Albums/Podcasts.
- Tap Remove Download to free up space without losing your playlists.
Pro Tip: Some streaming apps let you see exactly how much storage downloads are using. You can check this in Settings > General > iPhone Storage and tap on an app like Netflix or Spotify to see its total storage usage.
6.2 How This Helps:
- Instantly reclaims GBs of space (especially if you download in HD).
- Doesn’t delete the app, just removes unneeded files.
- You can always re-download content later if needed.
Now that we’ve cleared out old downloads, let’s move on to another hidden space hog.
7. Empty ‘Recently Deleted’ Folders (Files & Notes)
Just like the Photos app, other built-in apps like Files and Notes also have a “Recently Deleted” folder where removed files linger for up to 30 days before being permanently erased.
Until then, they’re still taking up storage on your iPhone.
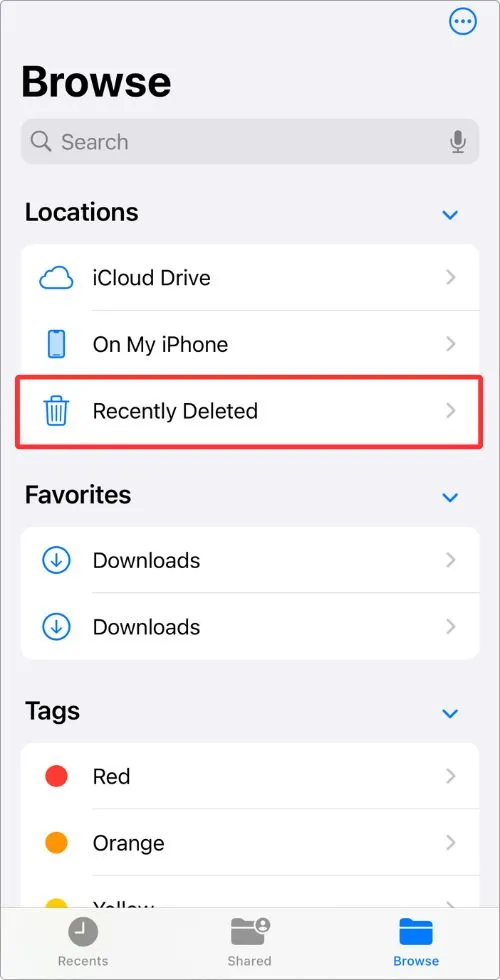
7.1 How to Clear ‘Recently Deleted’ in Files App
- Open the Files app.
- Tap Browse (bottom-right corner).
- Tap Recently Deleted.
- Tap on Three Dots (top-right corner) > Select > Delete All to free up space immediately.
Pro Tip: If you use third-party cloud storage apps like Google Drive, Dropbox, or OneDrive, check their Trash or Bin folders too.
7.2 How to Clear ‘Recently Deleted’ in the Notes App
- Open the Notes app.
- Tap the Folders button (top left).
- Tap on Recently Deleted.
- Tap Edit > Delete All to remove unwanted notes.
Why This Works:
- Frees up hidden storage that most people forget about.
- Prevents unnecessary files from lingering on your iPhone.
- Doesn’t affect important data; you’re just emptying the trash.
8. Delete Old iOS Updates & System Data
Note: This method works only if the update has been downloaded but not yet installed. Once the update is installed, it cannot be deleted.
Your iPhone automatically downloads iOS updates in the background, even if you don’t install them right away.
These files can take up gigabytes of space—especially if you’ve delayed an update.
Luckily, you can delete them manually.
8.1 How to Remove Old iOS Updates:
- Open Settings and go to General > iPhone Storage.
- Scroll down and look for iOS Update.
- If there’s an update file listed (e.g., “iOS 17.4.1”), tap it.
- Tap Delete Update to free up space.
Why This Helps:
- Some update files are 1GB–5GB in size.
- iOS will re-download the update only when you’re ready to install it.
What About System Data: If System Data(formerly ‘Other’ storage) is taking up way too much space, the only way to fully clear it is to restart your iPhone or, in extreme cases, back up and restore your device.
9. Use iCloud or External Storage (For Extra Space)
If you’re still running low on storage, moving your files to the cloud or an external drive is a great long-term solution.
9.1 Store Files in iCloud Drive
Apple gives you 5GB of free iCloud storage, but if you need more, you can upgrade to 50GB, 200GB, or 2TB for a small monthly fee.
How to Move Files to iCloud:
- Open the Files app.
- Move documents, PDFs, and media into iCloud Drive.
- Access them anytime from another Apple device or at iCloud.com.
Bonus: You can also enable iCloud Backup (Settings > Your Name > iCloud > iCloud Backup) to store your device data in the cloud and free up local space.
9.2 Use an External Storage Device
If you don’t want to pay for iCloud, you can also use an external drive with a Lightning or USB-C connector.
Many iPhone-compatible flash drives (like SanDisk iXpand) let you transfer photos, videos, and large files to free up space.
How to Use an External Drive:
- Plug the drive into your iPhone.
- Open the Files app and transfer large files.
- Keep your important data stored externally while freeing up iPhone space.
10. Reduce System Storage (Advanced Trick)
If you’ve ever checked your iPhone Storage and noticed a mysterious System Data category taking up several gigabytes, you’re not alone.
This includes cached files, logs, temporary data, and other system junk that can’t be cleared manually.
But don’t worry.
There are a few tricks to reduce it.
10.1 Restart Your iPhone (Quickest Fix)
Sometimes, simply restarting your iPhone forces iOS to clear some temporary files from the ‘System Data’ storage.
How to Restart:
- Press and hold the Power button + Volume Up/Down until the slide to power off screen appears.
- Swipe to turn off your iPhone.
- Wait a few seconds, then turn it back on.
Why This Helps:
- Clears some temporary system files.
- Frees up space instantly (though results may vary).
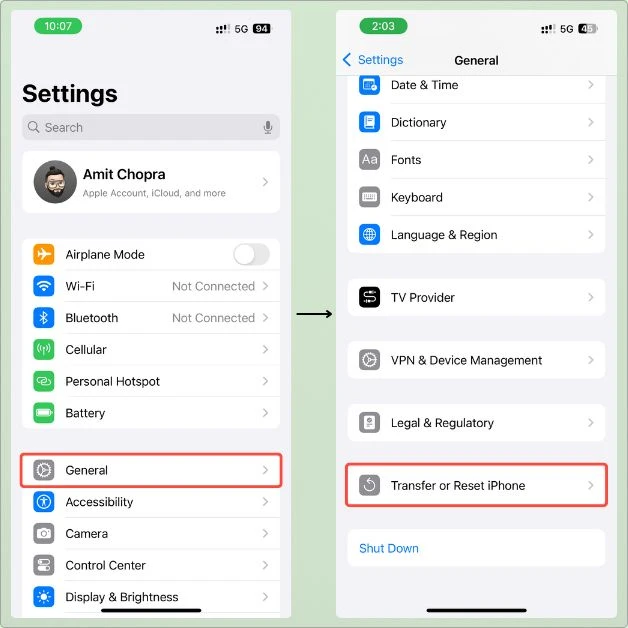
10.2 Reset Network Settings (Clears Hidden Logs & Cache)
- Go to Settings > General > Transfer or Reset iPhone.
- Tap Reset > Reset Network Settings.
- Enter your passcode and confirm.
What Happens?
- Wi-Fi passwords and Bluetooth connections are reset.
- System cache & temporary data are cleared.
- You don’t lose personal files or apps.
10.3 The Ultimate Fix: Backup & Restore
If your ‘System Data’ storage is huge (10GB+), the only surefire way to clear it is by backing up your iPhone and restoring it.
How to Do It:
- Backup your iPhone via iCloud or iTunes.
- Go to Settings > General > Transfer or Reset iPhone > Erase All Content and Settings.
- Set up your iPhone and restore from the backup.
Why This Works:
- Completely removes hidden system junk.
- Resets ‘System Data’ storage back to near zero.
- Speeds up your iPhone if it was lagging.
Note: This is the most advanced method, so use it only if you’re desperate for storage. Otherwise, the previous steps should be enough for most users.
11. Final Tips & Myths About iPhone Storage
Before we wrap up, let’s quickly bust some common myths and go over a few final tips to keep your iPhone storage optimized in the long run.
11.1 Common Myths About iPhone Storage
Myth: Closing apps saves storage and speeds up the phone.
Truth: Closing apps doesn’t free up storage or make your iPhone faster. In fact, it can use more battery because reopening an app from scratch consumes more power than resuming it from memory.
Myth: Deleting an app removes all its data.
Truth: If you just delete an app (instead of offloading it), some residual files may still stay on your iPhone. Check Settings > General > iPhone Storage to ensure it’s fully removed.
Myth: Factory resetting is the only way to free up space.
Truth: While a reset can clear hidden system files, you usually don’t need such extreme measures. Just offload apps, clear caches, and optimize your files. That’s enough for most users.
11.2 Pro Tips to Keep Storage Optimized
- Set Reminders to Check Storage Monthly: Go to Settings > General > iPhone Storage every month to clear unnecessary files before they pile up.
- Enable Auto Offloading for Unused Apps: Turn on Settings > App Store > Offload Unused Apps to have iOS do this automatically.
- Use HEIF & HEVC for Photos & Videos (Saves 50% Space): Enable Settings > Camera > Formats > High Efficiency to use Apple’s advanced compression without losing quality.
- Don’t Store Large Files in Notes or Messages: Instead of keeping photos & videos in Messages or Notes, move them to Photos or iCloud Drive where they’re easier to manage.
My Final Take
By following these simple tricks, you can free up tons of space on your iPhone without deleting your favorite apps.
Here’s a quick recap:
- Offload unused apps (keeps data, removes app).
- Delete large message attachments (photos, videos, GIFs).
- Optimize photos & clear duplicates (iCloud Photos helps).
- Clear app caches (for apps that allow it).
- Remove offline downloads (Netflix, YouTube, Spotify).
- Empty ‘Recently Deleted’ folders (Photos, Files, Notes).
- Reduce System Data storage (restart, reset network settings).
- Disable Live Photos (saves space on new photos).
- Delete old iOS updates (they take up GBs of space).
- Use iCloud or external storage (long-term solution).
Doing these steps regularly will prevent that dreaded Storage Almost Full warning from popping up again.
Also, if you’ve ever paid for an app you no longer need, you might be eligible for a refund.
Learn how to get a refund for an iOS app or subscription in just a few steps.
That’s all from me.
I hope these tips help you free up storage on your iPhone.
If you have any questions or suggestions, feel free to leave a comment below.

