How to Get a Refund for an iOS App or Subscription (Updated 2025)
Have you ever purchased an iPhone app by mistake or forgotten to cancel a subscription before it auto-renewed?
You’re not alone.
Many users face this issue, and while Apple doesn’t guarantee refunds, there’s a proper way to request one.
And many times, they approve it.
The good news?
Apple allows users to request refunds for apps, in-app purchases, and subscriptions, but only under certain conditions.
The process isn’t always obvious, and approvals depend on factors like when you request it and why you need the refund.
In this guide, I’ll walk you through:
- Who is eligible for a refund (and who isn’t)
- Step-by-step instructions to request a refund
- How long refunds take and what to do if denied
By the end of this article, you’ll know exactly how to get your money back if you’re eligible.
Let’s dive in.
Who Can Get a Refund? (Apple’s Eligibility Rules)
Apple doesn’t offer refunds automatically, but in many cases, you can get your money back.
As long as your request meets certain conditions.
Here’s how Apple decides whether to approve or deny a refund request:
1. When Apple Usually Approves Refunds
Apple is more likely to grant a refund if:
- You bought an app by mistake – Maybe you tapped “Buy” instead of “Get.”
- An unauthorized purchase happened – If a child or someone else used your device to make a purchase without permission.
- The app doesn’t work as advertised – If the app crashes frequently, lacks promised features, or is misleading.
- A subscription auto-renewed unexpectedly – If you forgot to cancel before the billing date, you might get a refund (especially if you request it quickly).
- In-app purchases didn’t work – If you bought something inside an app (like extra features or currency) and it wasn’t delivered or functioned incorrectly.
2. When Apple Might Deny Refunds
Apple may reject your request if:
- Too much time has passed – Refunds are usually allowed within 14 days (in some regions, like the EU, this is a legal right).
- You’ve requested too many refunds – Apple may flag repeated refund requests as abuse.
- The app states, “No Refunds” – Some developers enforce a strict no-refund policy.
- You used the app extensively – If you’ve used a subscription or app for a significant time, Apple may decline your request.
Also read: How to install apps not available in your country on iPhone
How to Request a Refund for an iOS App or Subscription
If you meet Apple’s eligibility criteria, you can request a refund using one of the following methods.
The fastest way is through Apple’s Report a Problem website, but you can also do it directly from your iPhone, iPad, or Mac.
Method 1: Request a Refund via iPhone or iPad (Easiest Way)
- Open the Settings app on your iPhone or iPad.
- Tap Your Name (Apple ID Profile) at the top.
- Select Media & Purchases → Tap View Account.
- Scroll down and tap Purchase History.
- Find the app, in-app purchase, or subscription you want a refund for.
- Tap Report a Problem next to the item.
- Choose Request a Refund, select a reason, and submit your request.
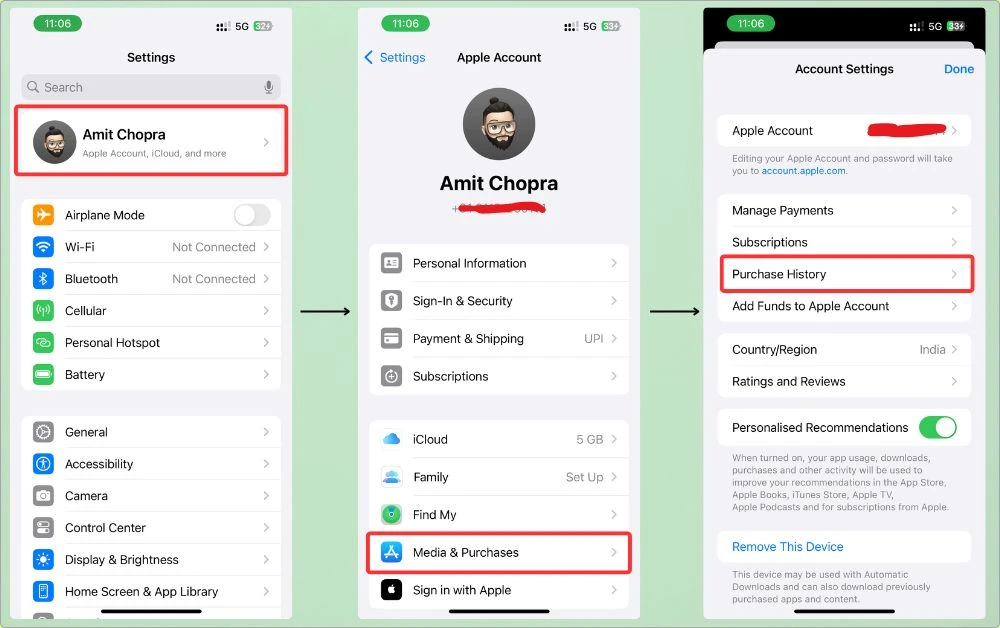
Apple will email you within 48 hours with a decision.
Method 2: Request a Refund via Apple’s Website (Fastest Way)
- Open Apple’s Report a Problem page in a web browser.
- Sign in with your Apple ID.
- Click I’d like to…, then select Request a Refund.
- Choose the app or subscription you want a refund for.
- Select a reason for your request and click Submit.
This method often gets faster responses, sometimes within 24-48 hours.
Method 3: Request a Refund via Mac or PC (iTunes/Music App)
- Open the Music (or iTunes) app on your Mac or PC.
- Click Account in the menu bar → Select View My Account.
- Scroll to Purchase History → Click See All.
- Locate the purchase → Click Report a Problem.
- Follow the prompts to submit your refund request.
What Happens Next?
- If approved: The refund will be processed within 5-30 days, depending on your payment method.
- If denied: You can appeal the decision or try contacting Apple Support (more on this in the next section).
How Long Does It Take to Get a Refund?
Once you submit a refund request, Apple reviews it and sends you an email with their decision.
If approved, the refund processing time depends on your payment method.
Refund Processing Time by Payment Method
| Payment Method | Estimated Refund Time |
| Apple Store Credit | Instant or within 48 hours |
| Credit/Debit Card | 5–30 days (depends on your bank) |
| PayPal | 3–7 business days |
| Mobile Carrier Billing | Up to 60 days (depends on carrier) |
| Other Payment Methods | Varies, usually 3–7 days |
Pro Tip: If your refund is delayed beyond the estimated time, contact Apple Support or check with your bank/payment provider.
What If Apple Denies Your Refund Request? (Plan B)
If Apple denies your refund request, don’t worry—you still have options.
Here’s what you can do next:
1. Try Submitting Another Request (With a Better Reason)
Sometimes, Apple automatically rejects requests if the reason isn’t clear.
Go back to Apple’s Report a Problem page and submit another request with a stronger explanation.
Example: Instead of saying, “I don’t want this app anymore,” say, “The app description promised a feature that is missing.”
2. Contact Apple Support (Best Option if Your Case is Strong)
If your refund request was rejected, but you believe you deserve one, contact Apple Support:
- Visit Apple Support.
- Click Billing & Subscriptions → Request a refund.
- Choose Chat, Phone, or Email support.
- Explain your situation clearly.
Pro Tip: Speaking to a human via chat or phone increases your chances of getting a refund approved.
3. Dispute the Charge With Your Bank (Last Resort)
If Apple refuses to refund an unauthorized or accidental charge, you can dispute the transaction with your bank or credit card provider.
- Call your bank or PayPal and request a chargeback.
- Banks usually side with customers in cases of fraud or accidental purchases.
Warning: Apple may flag your account if you dispute too many charges. Use this as a last resort.
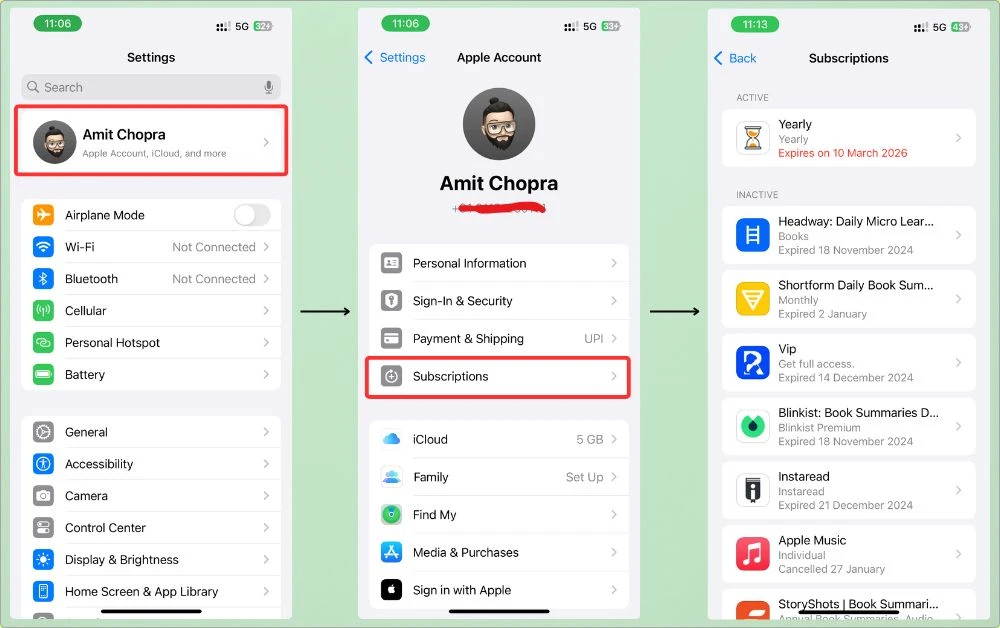
4. Cancel the Subscription to Prevent Future Charges
Even if Apple doesn’t refund your current charge, you can stop future payments:
- Open Settings → Tap Your Name.
- Tap Subscriptions → Select the app.
- Tap Cancel Subscription to stop further charges.
FAQs
1. Can I get a refund for in-app purchases?
Sometimes. Apple allows refunds if the in-app purchase didn’t work, wasn’t delivered, or was purchased by mistake. However, they don’t usually refund consumables (e.g., virtual currency, extra lives in games).
2. What if I bought an app but never opened it?
You have a better chance of getting a refund, especially if you request it within 14 days of purchase.
3. Are subscriptions refundable if they auto-renew?
Yes, but only if you request the refund shortly after the charge. If you wait too long, Apple might deny it.
4. Can I get a refund for a purchase from months ago?
Unlikely. Apple typically doesn’t approve refunds for old purchases unless there’s proof of fraud.
5. What happens if Apple denies my refund request?
You can:
→ Try again with a clearer reason.
→ Contact Apple Support directly.
→ Dispute the charge with your bank (last resort).
6. How do I prevent accidental purchases in the future?
Turn on Ask to Buy (for family accounts) or enable Face ID/Touch ID for purchases to prevent unauthorized charges.
My Final Take
Getting a refund for an iOS app or subscription isn’t always guaranteed.
But if you act quickly and follow the right steps, you have a good chance of success.
Key Takeaways:
- Request your refund as soon as possible—the sooner, the better.
- Use Apple’s official channels (Settings, Report a Problem website, or iTunes).
- Be clear about why you need a refund—Apple is more likely to approve if your reason is valid.
- If denied, don’t give up. Try again, contact Apple Support, or dispute the charge with your bank if necessary.
By knowing how the system works, you can avoid losing money on accidental purchases or unwanted subscriptions.
Plus, if low storage is forcing you to uninstall apps, check out this guide on freeing up iPhone storage without deleting apps.
Stay informed and in control of your app spending.
That’s all for now.
If you have any questions or suggestions, feel free to leave a comment below.


