Apple Notes for Travel Planning: My Full System
Look, I didn’t wanna download another “ultimate travel app” that makes me sign up, sync calendars, and spend an hour setting things up just to book a flight.
So I opened Apple Notes.
And guess what? That was all I needed.
I planned my entire trip — the flights, hotel info, day-wise itinerary, packing list, places to visit, even food spots — right inside the Notes app.
No fancy tools.
Just me, my iPhone, and a plain old note that somehow became the most useful thing I carried during the trip.
Here’s exactly how I did it (and how you can too).
[convertkit form=8161962]
Table of Contents
- Why Apple Notes?
- Step 1: Set Up Your Master Travel Note
- Step 2: Break It Into Sections (This Is Where It Gets Good)
- Step 3: Build Checklists for Packing and To-Dos
- Step 4: Add Bookings, Links, Screenshots, and Maps
- Step 5: Build a Visual Itinerary with Tables (Optional, But Kinda Awesome)
- Step 6: Use Tags and Smart Folders to Stay Organized
- Step 7: Share the Note With a Travel Buddy
- Bonus Tips That Make Apple Notes Even Better for Travel
- My Final Take
- FAQs
Why Apple Notes?
Honestly? I didn’t expect much.
But once I started planning in Apple Notes, it kinda just clicked.
Here’s why I think it works better than most travel apps I’ve tried:
1. It’s Already on Your iPhone
You don’t even need to download anything.
It’s just… there.
Open your phone → open Notes → done.
2. Works Offline
No signal? No Wi-Fi? Chilling in airplane mode?
Doesn’t matter.
The notes’s still there.
No loading. No waiting. It just opens.
3. Everything in One Place
Flights, hotel info, packing list, places to visit — all of it in one note.
You’re not bouncing between five apps. Just scroll and you’ll find what you need.
4. Dead Simple to Use
No learning curve.
Just open it, start typing.
Add a checklist if you want.
Paste a link. That’s it.
5. Syncs Across Devices
Start planning on your Mac.
Add something from your iPad.
Open the note on your iPhone while packing your bag.
It all stays in sync, without you doing anything.
6. And Yeah… It’s Free
No premium features. No ads. No weird subscriptions.
Just you and Apple Notes.
If you’re already using Notes for groceries, journaling, or random thoughts, trust me, it can 100% handle your next vacation too.
Also read: How I Use Apple Notes to Keep My Health Organized
Step 1: Set Up Your Master Travel Note
First things first — you need one place to dump everything.
Flights, hotel info, restaurant ideas, daily plans… it all starts with one note.
So just open the Notes app, tap that new note button, and give it a name you’ll instantly recognize.
Something like:
- Europe Trip 2025
- Family Vacation Gameplan
- Solo Japan Itinerary
- My NYC Escape

Make it sound exciting — that way, you’ll actually want to open it.
If you’re someone who keeps a ton of random notes, you might want to organize this a bit better.
So here’s a quick move:
Create A New Folder Just for Travel Stuff
Go to the Folder’s view → tap the New Folder icon → Name it something like “Travel Plans” or “Trips” → Move your master note in there.
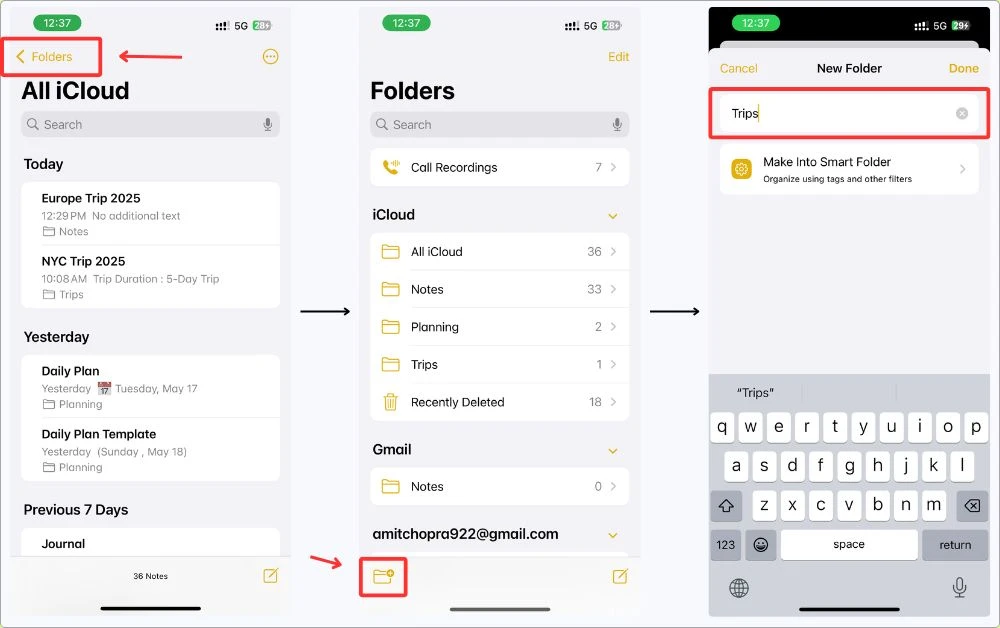
Clean and easy to find later.
You can also pin the note to the top.
Just swipe right on the note from the list view and pin it.

That way, it’s always right there when you open the app.
Once the note’s ready, we start breaking it into sections.
And trust me, that’s where the magic really starts.
Step 2: Break It Into Sections (This Is Where It Gets Good)
Now that your note is ready, it’s time to actually build it.
And this part?
This is what turns your plain note into a full-blown travel planner.
Start by breaking things up into sections using Headings.
It keeps everything organized, and in iOS 18, you can even collapse them to hide or show details — super helpful when your note starts getting long.
Here’s a simple layout you can use (feel free to tweak based on your trip):
Trip Sections to Add:
- Flights
- Accommodation
- Day-by-Day Itinerary
- Places to Visit
- Packing List
- Budget
- To-Dos
- Emergency Info
- Notes & Random Stuff
To add a heading: Just tap the “Aa” button in the toolbar, and select “Heading.” Then type the section name.
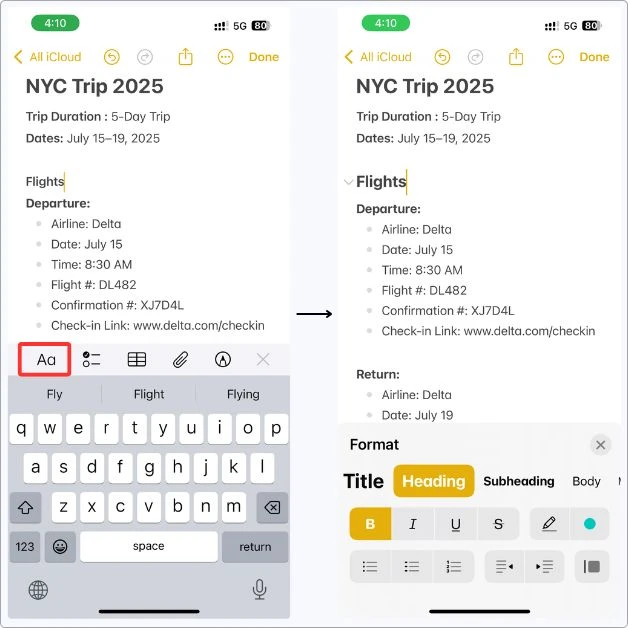
Later, if you want to collapse it, just tap the little arrow next to the heading.
Makes it way easier to scroll and focus only on what you need.
You don’t need to overthink this.
Even just typing the section titles in bold works fine.
The goal here is to keep everything neat so you’re not scrolling through a wall of text the night before your flight.
Step 3: Build Checklists for Packing and To-Dos
This is where Notes really starts pulling its weight.
Because you know what sucks?
Getting to your hotel and realizing you forgot your charger.
Or sunscreen. Or worse — your passport.
So now we’re gonna turn your note into a checklist machine.
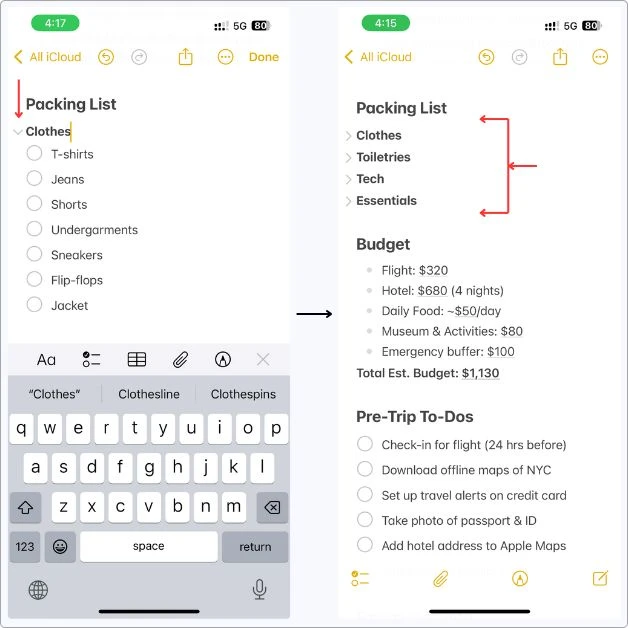
Start with the Packing List
I just made a simple checklist inside the note — grouped it into clothes, toiletries, tech, and all that.
To do it, just tap the little circle-with-a-checkmark icon in the toolbar.
That turns everything into a checklist you can tick off later.
Here’s how mine ended up looking, this was the actual list I used for my NYC trip.
That’s it. Nothing special.
Just stuff I didn’t wanna forget while throwing things into my bag.
Cross things off as you pack.
And the best part?
You can add to this list whenever something pops into your head — even on the go.
Also read: How I Secure Sensitive Information Using iPhone Notes
Add a Pre-Trip To-Do List
This one’s for everything you need to handle before you leave, like:
- Book Airbnb
- Check visa requirements
- Download offline maps
- Set up travel insurance
- Notify the bank about travel
- Make a playlist for the flight
Here’s what mine looked like before that NYC trip — just a quick checklist I made to get stuff sorted the night before flying out:
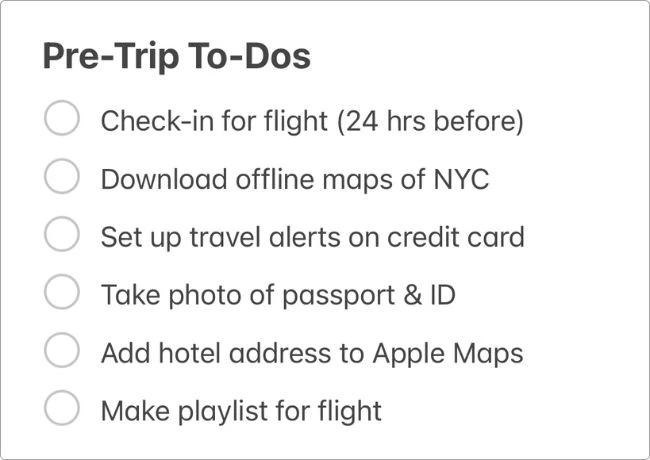
Keep both lists in your note, and you’ve basically eliminated 90% of “crap, I forgot that” moments.
Step 4: Add Bookings, Links, Screenshots, and Maps
You know how trip details usually live in a mess of emails, texts, screenshots, and random apps?
This is where you bring it all together — right inside your note.
Here’s how to do it:
Paste Your Bookings
Whenever I booked something — flight, hotel, whatever — I just copied the important details and dropped them straight into my note.
No need to organize too much.
I had one section for “Flights” and one for “Accommodation,” and I just pasted the stuff in there: date, time, airline, check-in time, booking links… all of it.
That way, if I needed to pull it up at the airport or show something at the hotel, it was right there.
Here’s what that looked like for my NYC trip:
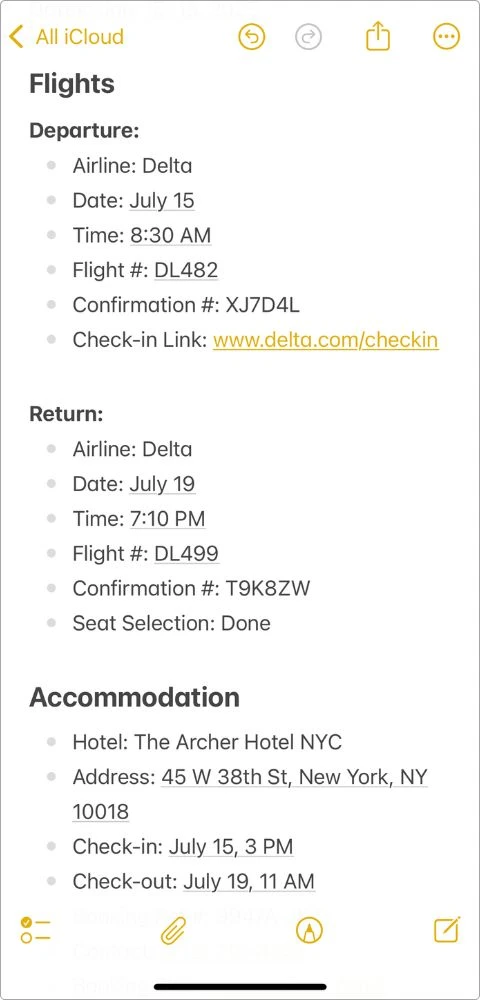
This is honestly one of the best parts about travel planning in Notes.
Everything’s in one scroll, and you can add stuff the second you book it.
Do the same for hotels, activities, or tours.
You can even paste in restaurant reservations or event tickets.
Drop in Screenshots
Got QR codes, boarding passes, or visual info you might need offline?
Take a screenshot and add it right in.
- Tap the Paperclip icon
- Select “Choose Photo or Video”
- Drop in your screenshot
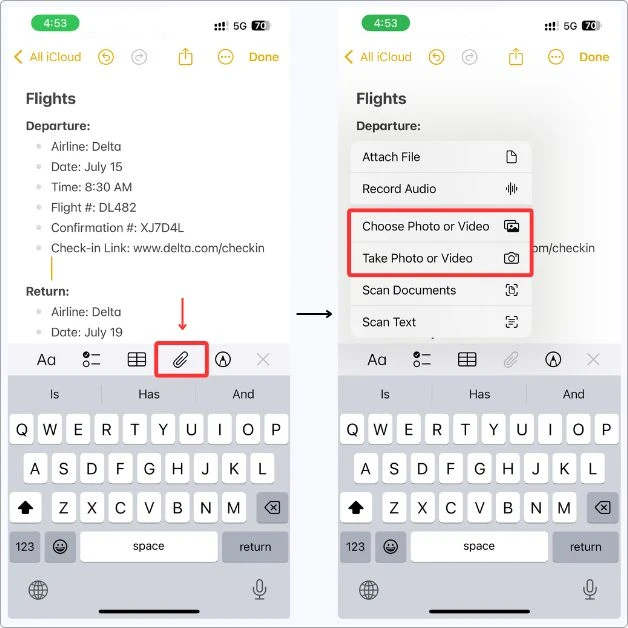
Everything stays local, so even if you lose service, you’re still good.
Save Places You Wanna Visit
When you’re building out your “Places to Visit” section, this is where it gets useful.
Any time you find a spot you wanna check out — a pizza place, a museum, a park — just paste the Apple Maps or Google Maps link right into your note.
Notes will automatically show a little preview of the location, so it stands out while scrolling.
Super helpful when you’re out and about.
You can just tap it and go straight to directions.
No switching apps, no digging through tabs.
Here’s how it looked inside my NYC trip note:
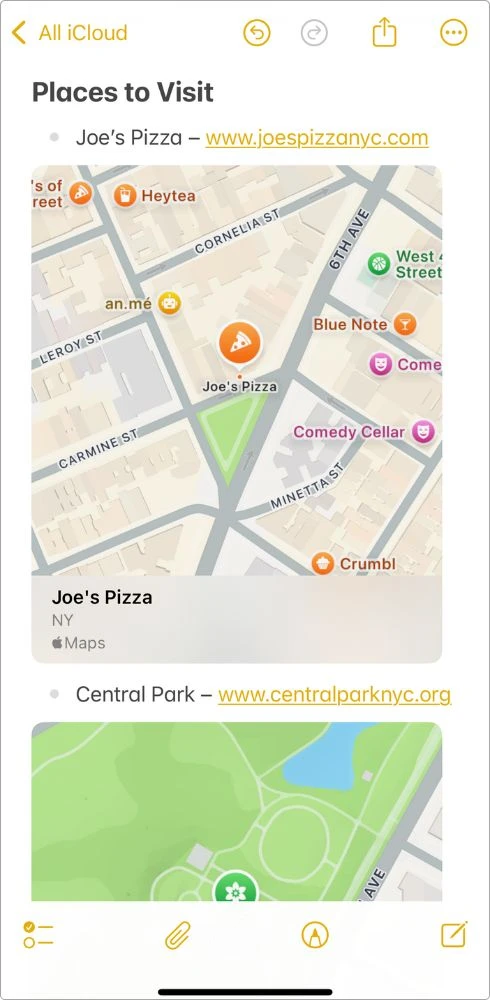
You can do the same thing for restaurant menus, Airbnb locations, or anywhere else you don’t wanna forget.
Just drop them right under your “Places to Visit” heading and you’re set.
Step 5: Build a Visual Itinerary with Tables (Optional, But Kinda Awesome)
So here’s what I did — instead of writing out each day like a big wall of text, I just made a table.
One row per day, with the plan and little notes on the side.
Super clean. Easy to glance at.
And I didn’t have to scroll like crazy every time I needed to check what was next.
To make a table, just tap the little grid-looking icon in the toolbar.
That’s it.
I made three columns: one for the day, one for the plan, and one for quick notes like “book tickets ahead” or “leave early.”
Here’s what mine looked like for my NYC trip:
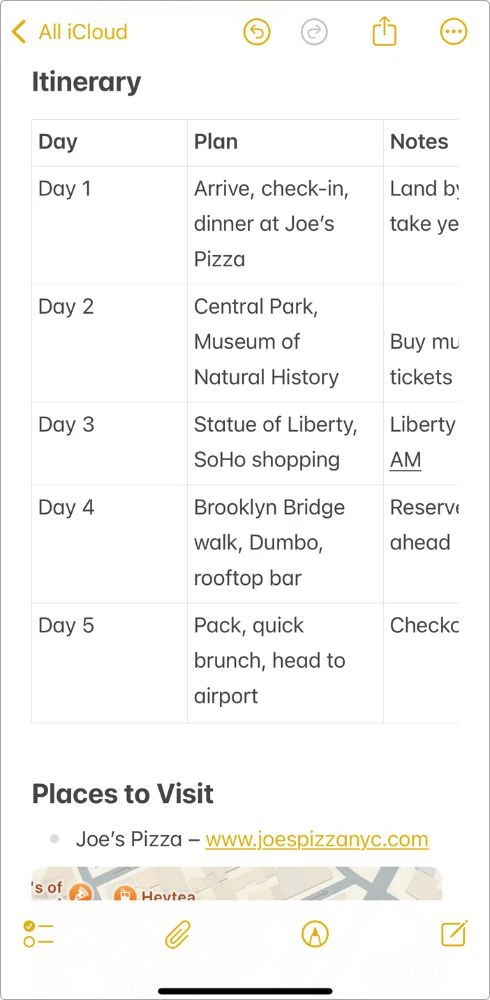
This setup actually helped a ton while I was there.
I’d wake up, open the note, and I knew exactly what I was doing that day.
If plans changed?
I just tapped in and edited it.
Way easier than flipping through apps or trying to remember stuff off the top of my head.
Step 6: Use Tags and Smart Folders to Stay Organized
Alright, so what happens when you’ve got more than one trip?
Or maybe you’re planning something months out and don’t wanna lose it in the pile of grocery lists and random brain dumps.
This is where tags and smart folders save the day.
First: Add Tags to Your Note
Tags in Apple Notes are just simple keywords that start with a (#).
You can type them anywhere in the note — at the top, bottom, or even inside specific sections.

These tags make your notes instantly searchable.
So if you’re planning multiple trips (or want to find all your travel notes fast), this is gold.
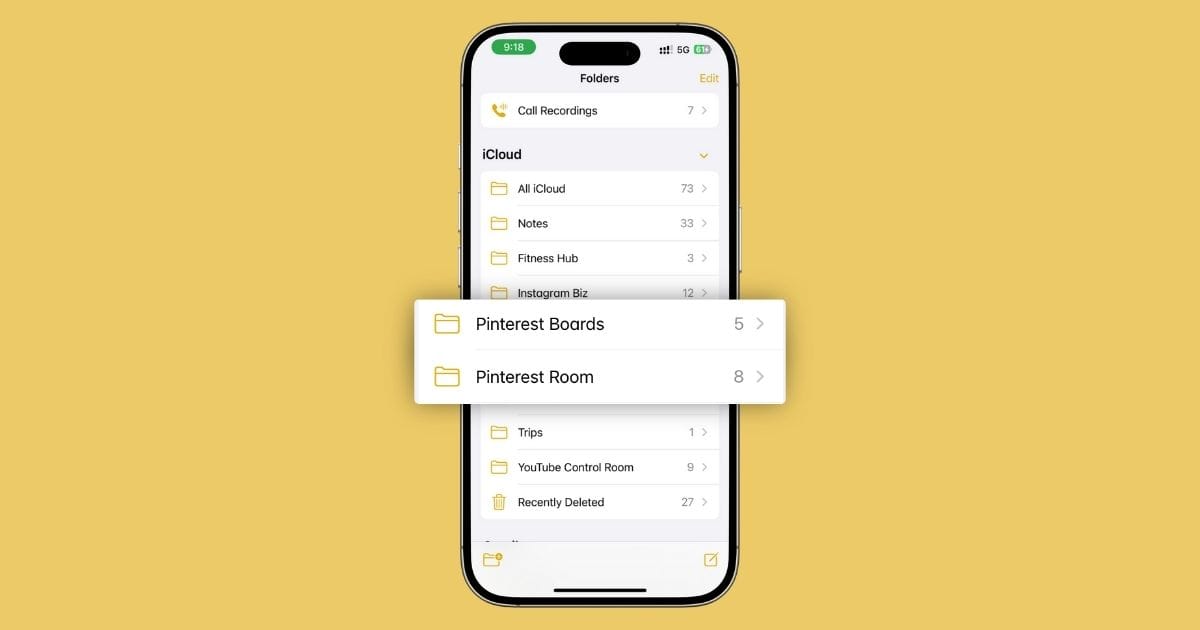
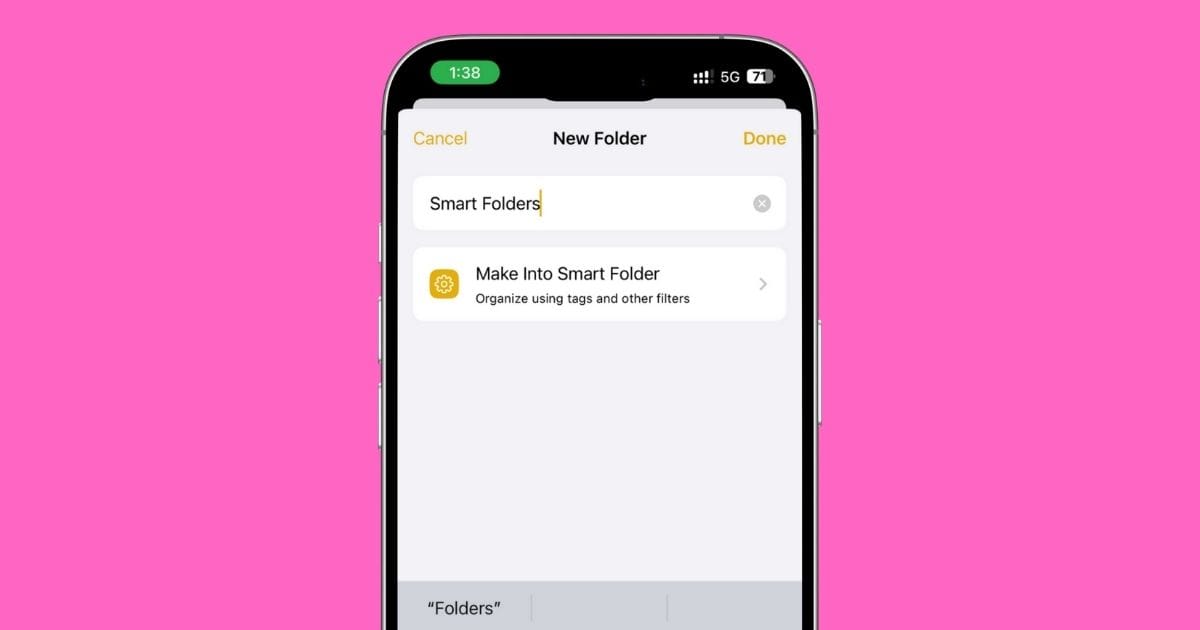
Then: Create a Smart Folder
Now here’s the power move.
- Go to the Notes folder view
- Tap the New Folder icon → Make Into Smart Folder
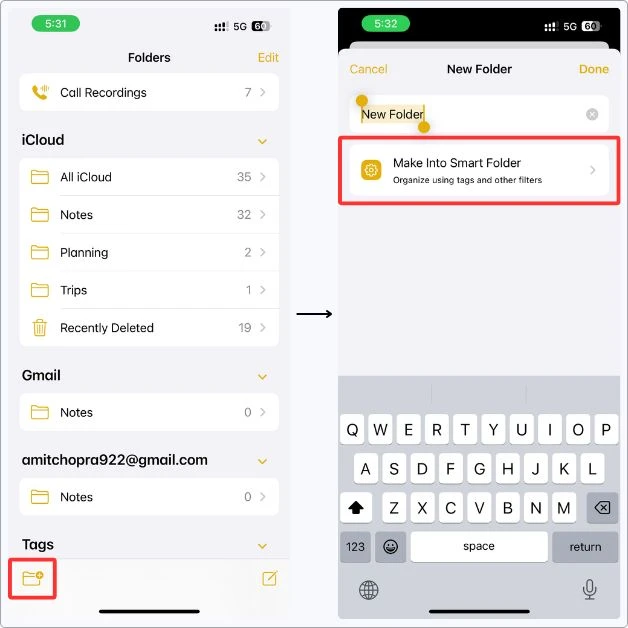
- Select Tags filter → Any Selected Tag (or All Selected Tag) → Choose a tag (like #travel2025)
- Name the folder something like “Travel Plans” or “Trips”
- Done.
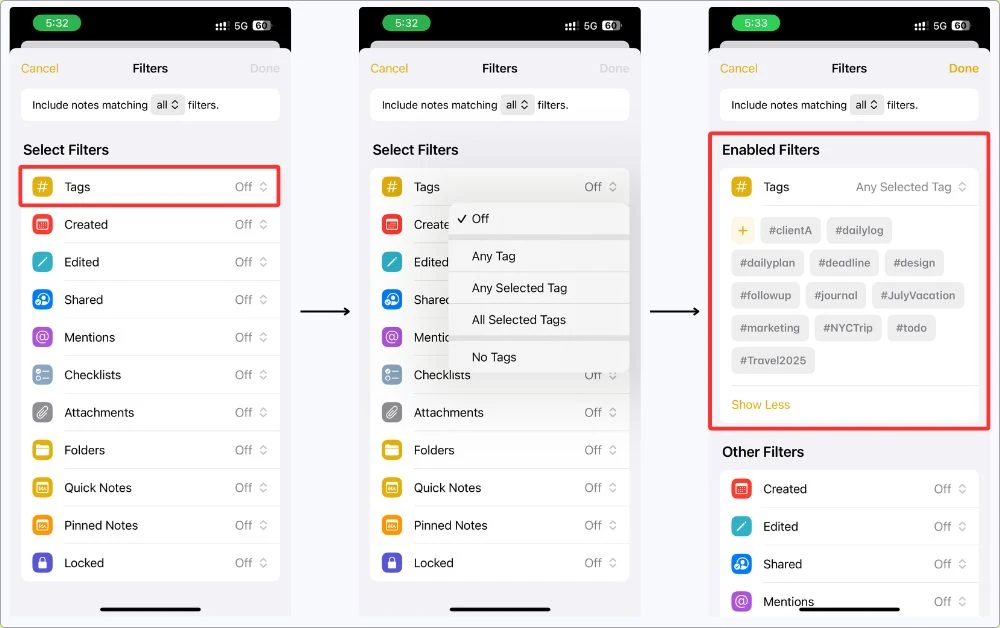
Now, any note with that tag gets pulled into that smart folder automatically.
No need to move anything manually.
Planning your Japan trip next?
Just tag it #japantrip, and it shows up in the same spot.
This is especially helpful if you want to come back months later and pick up right where you left off.
I’ve got a full guide on this if you’re curious — how I use tags, Smart Folders, all of it.
Step 7: Share the Note With a Travel Buddy
If you’re not traveling solo — or even if someone just wants to keep up with the plans — Apple Notes makes it ridiculously easy to share everything.
No need to text hotel addresses or resend booking links one by one.
Just share the note, and everyone sees the same thing.
Here’s how to do it:
- Open your travel note
- Tap the Share icon (top right)
- Choose Collaborate
- Set permissions if you want — you can let them view only, or allow them to make changes
- Pick how you want to send it — iMessage, Mail, or even just a link
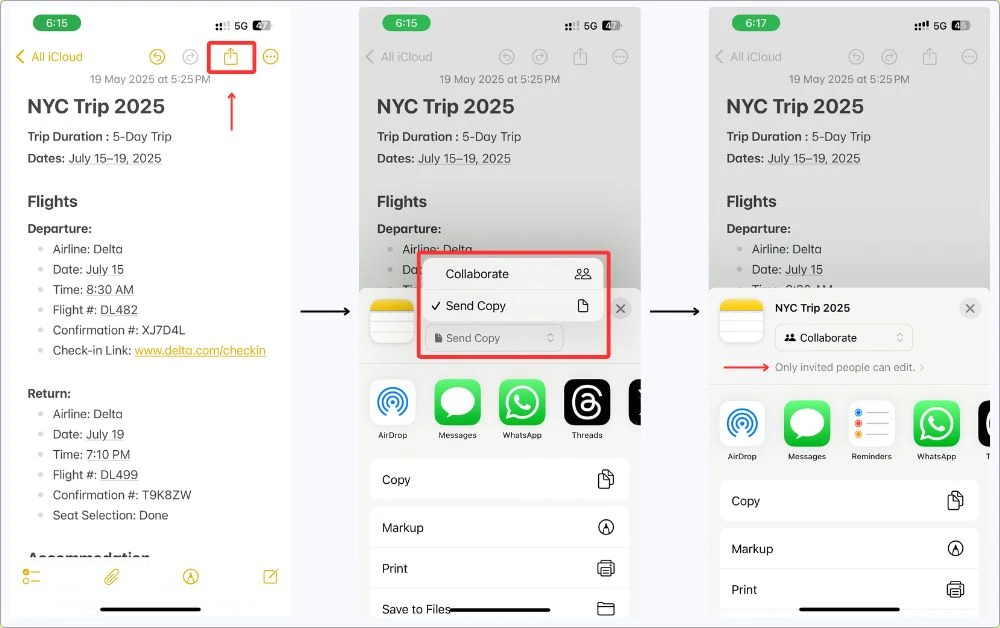
Now both of you can add flight info, places to visit, or even adjust the checklist while packing.
It’s all synced in real time.
This is a lifesaver for:
- Group trips
- Family vacations
- Couples planning together
- Coordinating with someone already at the destination
And yeah, if your travel partner is the “send me the details again?” type, this avoids all that.
Bonus Tips That Make Apple Notes Even Better for Travel
At this point, your Apple Notes is already looking like a pro-level travel planner.
But if you really want to squeeze everything out of Notes, these tips take it next level.
Use Voice Notes (When You’re Too Tired to Type)
Travel days are chaotic.
If your brain’s fried and your thumbs don’t wanna move, just talk instead.
- Tap the Paperclip icon
- Choose Record Audio
- Start speaking — Notes will record your voice
- In iOS 18, it even transcribes as you go
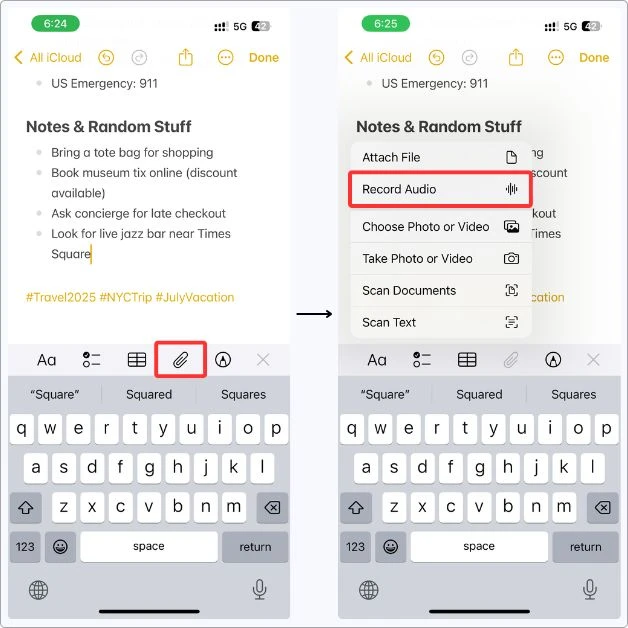
Use it to leave quick reminders, thoughts, or to journal at the end of the day.
Highlight What Matters
You can now highlight text with different colors.
Super handy for marking flight times, addresses, or things you don’t wanna miss.
- Select the text
- Tap the Aa button
- Choose a color
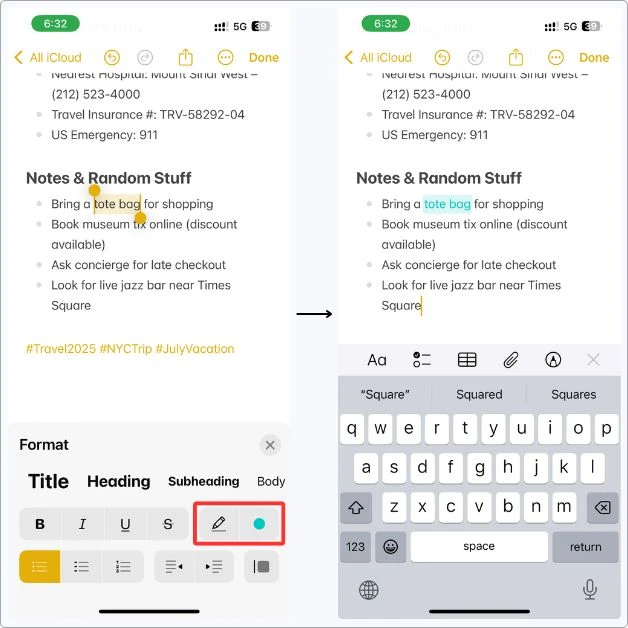
This is low-key one of the cleanest ways to separate important info without bolding everything.
Scan Important Documents
You can scan your passport, visa, insurance docs, and save them in your travel notes.
- Tap the Paperclip icon
- Choose Scan Document
- Snap a pic → Done
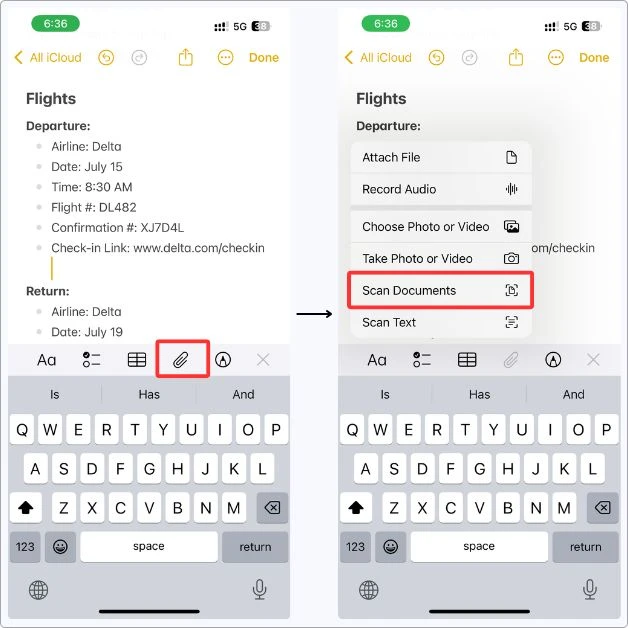
Now, even if you lose your bag, you’ve got a backup.
Pin the Note to the Top
If you’ve got a lot of notes, just swipe right on the one you’re using and tap Pin.
No more scrolling, it’ll stay at the top until you unpin it.
Sketch or Doodle
Tap the pen icon if you ever want to draw something — maybe a quick map, room layout, or to sketch out a shopping list.
Random, but useful.
One Thing I’d Skip Next Time
Don’t overthink it.
I tried going all in with tags, sub-notes, extra folders… it got messy real fast.
One time, I even made a separate note just for restaurants — and then forgot I made it.
Ended up eating at the airport.
Now I just keep everything in one note — flights, plans, places, packing.
One scroll, done.
You don’t need it to look pretty.
You need it to work when you’re half asleep at the airport looking for your Airbnb address.
My Final Take
I didn’t expect Apple Notes to be the MVP of my trip.
But it was.
No fancy app. No sign-ins.
Just a single note that had everything — my flights, my packing list, where I wanted to eat, even random reminders like “buy a travel plug.”
And you know what? It never crashed.
Never slowed down. Never annoyed me with ads or upgrade prompts.
It just worked.
If you’ve been jumping between five different apps trying to plan your trip, maybe give Notes a shot.
Keep it simple. Keep it all in one place.
And if you’ve already tried this before, I’d actually love to hear how you set it up.
Maybe you’ve got a smarter way to organize, or a trick I haven’t thought of yet — let me know.
Because that’s the cool part.
Once you realize how powerful this “boring” little app is, it kinda changes how you use your phone.
And if you like using Apple Notes like this, you might wanna check out how I use it as a daily planner or even as a personal journal.
Both changed how I use my iPhone.
Alright. That’s it from me.
Safe travels — and don’t forget the charger.
FAQs
Can I use Apple Notes for travel planning instead of a travel app?
Yes, 100%. Apple Notes can handle flights, hotels, itineraries, checklists, links, and even scanned documents — all in one place. It won’t replace apps that book stuff for you, but for planning and organizing, it’s more than enough.
What’s the best way to organize a travel note in Apple Notes?
Break your note into sections using headings like Flights, Accommodation, Itinerary, Packing List, and Budget. Use checklists for to-dos and packing, and drop in links, screenshots, or scanned documents wherever needed. If it starts getting long, collapse the sections to keep things tidy.
Can I access my travel notes offline?
Yes. Once you’ve created a note, it stays saved on your device. Even without Wi-Fi or cell service, everything you’ve added — text, checklists, images — will still be there. Perfect for airports, subways, or remote spots.
Can I share my travel plan from Notes with someone else?
Yep. Tap the Share icon in the top corner and choose “Collaborate.” You can invite them via iMessage, Mail, or copy a link. You can even let them edit or view-only. Great for couples, group trips, or just sharing an itinerary with family.
Can I use Apple Notes for multiple trips?
Absolutely. Either create a new note for each trip and organize them in a “Travel” folder, or tag them with something like #travel2025 or #paristrip and set up a smart folder to group everything automatically.
Does Apple Notes work for longer, multi-week trips?
Yes. You can plan a single weekend getaway or a month-long backpacking trip — it’s all about how you structure the note. Using headings, tables, and collapsible sections keeps things manageable, even for big trips.