8 Simple Ways to Browse the Internet Anonymously on iPhone
Alright, let’s be real for a sec.
Most of us just want to use our iPhones in peace, right?
Open Safari, check something quickly, scroll a bit… without feeling like we’re leaving a breadcrumb trail for trackers, ads, or worse.
I’ve been there.
That moment when you search for something totally random, like weird indoor plants that look like animals, and suddenly every app is showing you ads for it.
That’s when I started diving into anonymous browsing.
Not because I had something to hide, but because I wanted some breathing room online.
In this guide, I’m going to show you all the ways I’ve found to browse the internet more privately on an iPhone.
If you’re ready to clean up your digital trail, let’s walk through it together.
This guide is for real people, not techies.
Table of Contents
What Does Anonymous Browsing Really Mean on iPhone?
Okay, before we jump into tools and settings, let’s clear something up.
Anonymous browsing doesn’t mean you’re invisible.
Not even close.
When people hear “anonymous,” they sometimes imagine they can hop online and suddenly become a ghost, untraceable and undetectable.
But on an iPhone, it’s a bit more layered than that.
Here’s what anonymous browsing actually means in real life:
What It Does Help With:
- Hiding your browsing history from others who use your device
- Stopping websites from saving cookies or tracking you across the web
- Masking your IP address (with tools like VPN or iCloud Private Relay)
- Reducing targeted ads and creepy suggestions
- Minimizing data collection from apps and services
What It Doesn’t Do:
- It doesn’t make you completely invisible online
- It won’t protect you from everything (like phishing or malware)
- And no, it won’t fool websites if you log into your personal accounts because once you’re logged in, you’re not anonymous anymore
Anonymous browsing is more about minimizing your digital footprint than erasing it completely.
You’re covering your tracks, not vanishing entirely.
Best Ways to Browse Anonymously on iPhone
Alright, now let’s get into the actual tools and tricks you can use to keep your browsing private.
We’ll start with the basics and build our way up.
1. Use Private Browsing Mode in Safari
This is probably the first thing most people try, and for good reason.
It’s quick, easy, and doesn’t require installing anything.
But let’s be clear about what it can and can’t do.
How to enable it:
Step 1: Open the Safari app
Step 2: Tap the tab switcher icon (two overlapping squares) in the bottom-right
Step 3: Choose Private
Step 4: Tap the ‘+’ to open a new private tab
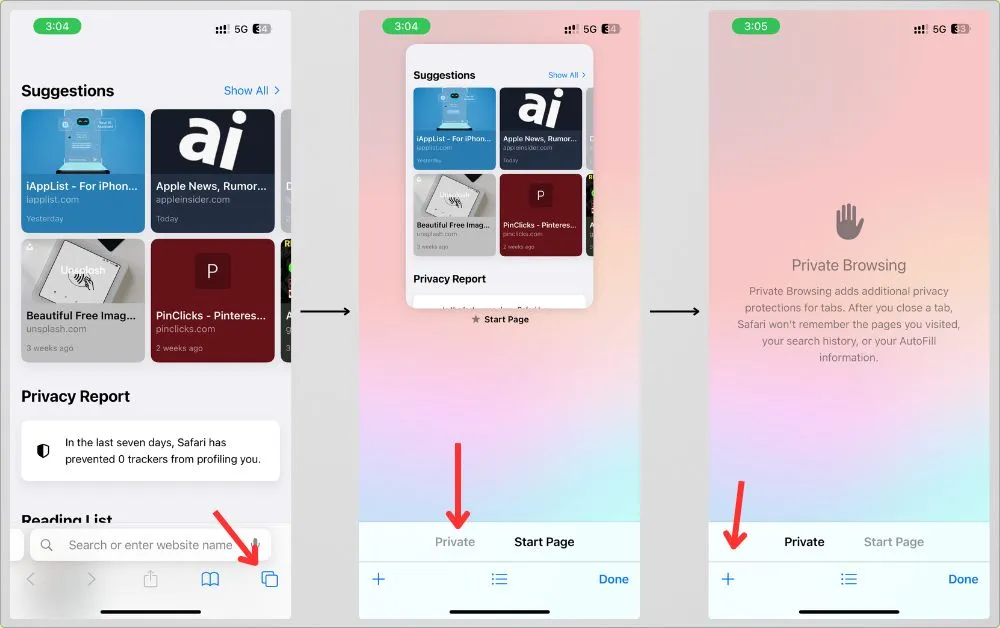
You’ll know you’re in Private Mode when the interface turns dark and Safari says “Private Browsing” at the top.
What It Hides
- Your browsing history (on your device)
- Autofill data (passwords, search history, etc.)
- Cookies (deleted once you close the tab)
- Recently visited pages in the Safari app overview
What It Doesn’t Hide
- Your IP address from websites or network providers
- Your activity from Apple, your employer (if using work Wi-Fi), or your internet provider
- Your identity if you log into a site like Facebook, Gmail, Amazon, etc.
Limitations
- It’s a good local privacy tool (so no one snoops your history on your iPhone), but it’s not true anonymity.
- It won’t stop advertisers or trackers from seeing what you’re up to online.
- Once you log into an account, your anonymity disappears, even in Private Mode.
If you’re just trying to hide your browsing from someone who might pick up your phone, Safari’s Private Mode is great.
But if you’re looking to stay anonymous from your ISP, apps, or advertisers, it’s only the first step.
2. Use a Private Search Engine
Most of us type our deepest, weirdest, most personal thoughts into that search bar without thinking twice.
And if you’re using Google?
Yeah… those searches are logged, profiled, and used to show you ads (or worse, follow you across the web).
That’s where private search engines come in.
They don’t track you, don’t log your searches, and don’t build a profile on you.
How to set one as the default in Safari:
Step 1: Go to Settings → Apps → Safari
Step 2: Tap Search Engine
Step 3: Choose DuckDuckGo (or Brave, if installed)
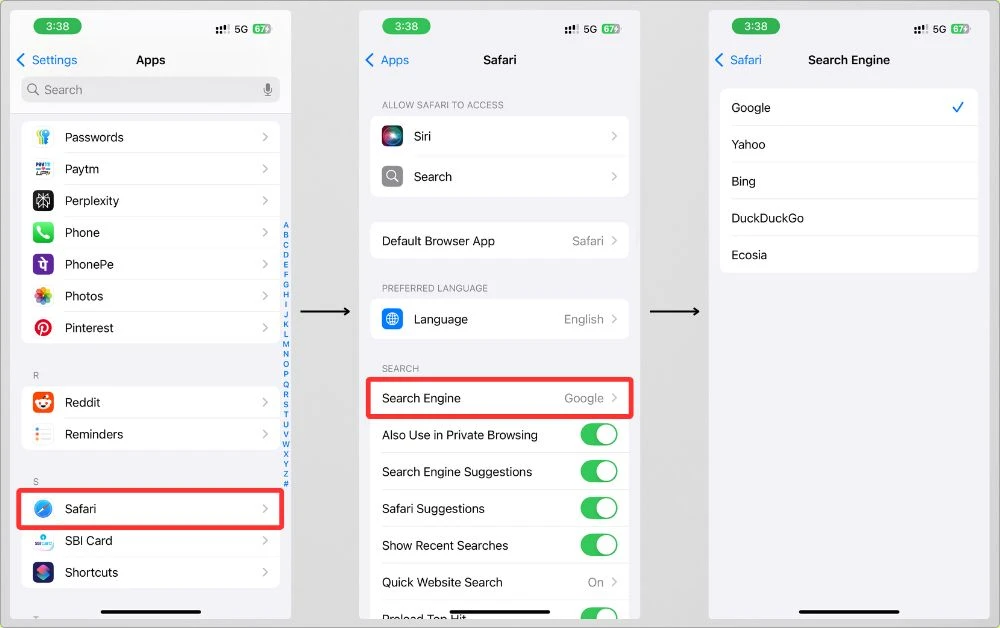
All your Safari searches are now private by default.
What It Hides
- Your search history from being tied to your identity
- Your IP address (some private engines strip or mask it before forwarding queries)
- Personalized tracking based on your clicks and behavior
What It Doesn’t Hide
- Your search traffic from your ISP, unless paired with a VPN or iCloud Private Relay
- Your IP address from the search engine if it doesn’t use anonymizing proxies (DuckDuckGo doesn’t always hide it)
- Click behavior on third-party websites. Trackers can still follow you after you leave the search page
Limitations
- Search results may be less personalized, which is the point, but it might take a little longer to find exactly what you want
- Some private search engines rely on Google/Bing results, so technically, you’re still touching those ecosystems
- Sponsored results still exist, but they’re not based on your profile
Using a private search engine is one of the easiest wins for online privacy.
You can combine it with Safari’s Private Mode or any private browser, and it’s already a huge step up from just “Googling everything.”
Here are a few that actually walk the talk:
- DuckDuckGo – The most popular one, with a clean UI and great iPhone app
- Startpage – Uses Google results but strips out trackers and logs
- Brave Search – A newer player, growing fast, fully independent from Google
3. Enable iCloud Private Relay (for Safari)
Now we’re stepping things up a bit.
If you’re an iCloud+ user, Apple gives you a built-in privacy feature called Private Relay.
And it’s surprisingly good at hiding your IP and activity in Safari.
How to enable it:
Step 1: Open the Settings app
Step 2: Tap your Apple ID at the top
Step 3: Go to iCloud → Private Relay
Step 4: Toggle Private Relay ON
That’s it.
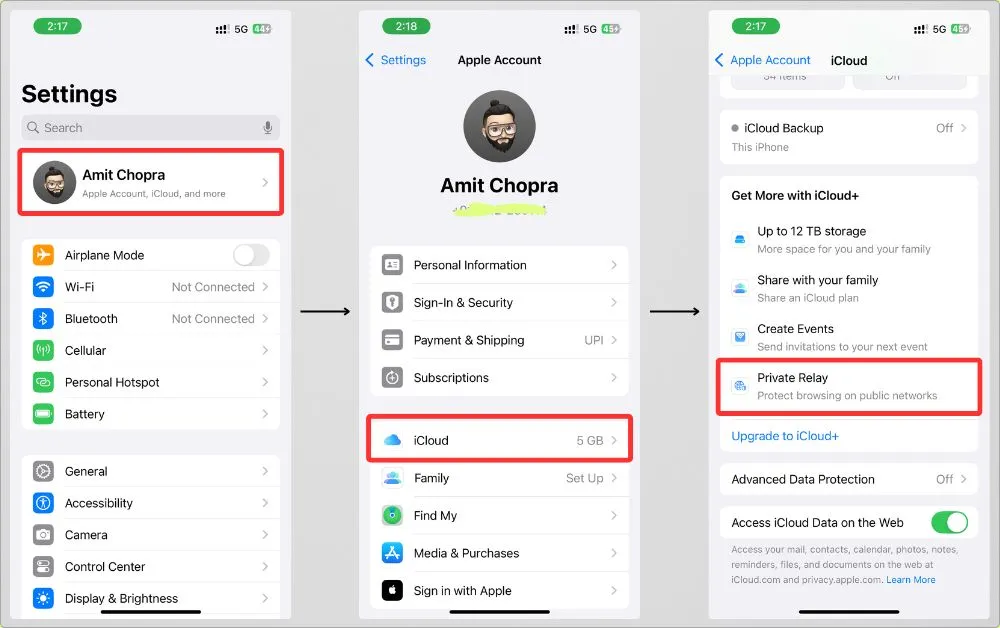
It now works automatically when you browse in Safari.
What It Hides
- Your IP address from websites
- Your exact location (you can choose to share only a general region)
- Your DNS requests (so even your internet provider can’t see what sites you’re visiting)
- Tracking of your Safari activity across sites
What It Doesn’t Hide
- Activity outside Safari (apps, Chrome, other browsers)
- Your identity if you log into websites
- Your traffic from Apple itself (though Apple says it never logs your browsing)
Limitations
- Only works in Safari, not in other browsers or apps
- Requires an iCloud+ subscription (starting at $0.99/month)
- Not available in all countries (Private Relay may be blocked in places like China or the UAE)
- Sometimes causes slower website loading
If you’re already paying for iCloud+, turn this on immediately.
It’s one of the easiest ways to add a meaningful layer of anonymity to your iPhone, especially if you stick to Safari.
4. Use a Private Browser App
Even if you’re using Safari in Private Mode, it still leaks some data.
If you want a browser that fights for your privacy by default, go for a dedicated private browser.
These apps are designed to block ads, strip trackers, and keep zero record of your activity.
To get started:
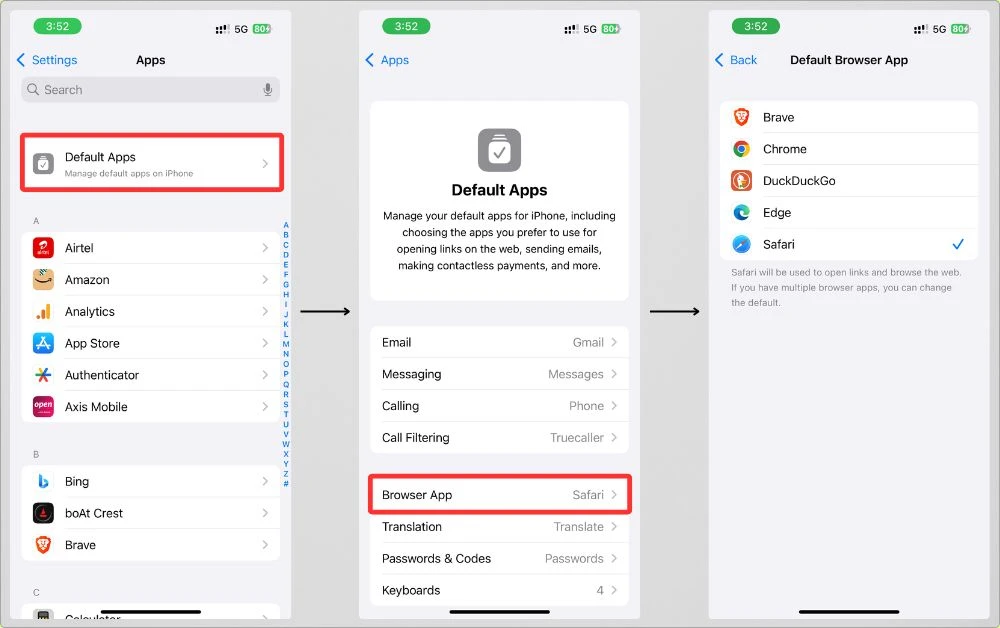
- Install the browser from the App Store
- Open it and set it as your default browser if you want
- (Settings → Apps → Default Apps → Browser App → Choose your private browser)
- Start browsing. Most of these apps block tracking scripts by default
What It Hides
- Trackers and ads that follow you around the web
- Your search history and browsing history (automatically cleared in some apps)
- Fingerprinting scripts (Brave and Firefox Focus are especially good at this)
What It Doesn’t Hide
- Your IP address (unless paired with a VPN)
- Your activity from apps outside the browser
- Your identity if you log in to Google, Facebook, etc.
Limitations
- Some websites might break due to aggressive tracker blocking
- Might feel different from Safari or Chrome if you’re used to those
- Doesn’t encrypt traffic, combine with a VPN or iCloud Private Relay for full protection
If you want a simple switch to upgrade your privacy without messing with advanced tools, private browsers are the sweet spot.
DuckDuckGo and Brave are both great.
I keep both on my iPhone, depending on what I’m doing.
Here are some solid options you can grab from the App Store:
- DuckDuckGo – Clean, simple, fast, with one-tap history wipe
- Brave – Built-in ad and tracker blocker, independent search engine
- Firefox Focus – Super minimal, automatically clears history every time you close
- Onion Browser – Tor-powered, for deeper anonymity
5. Use a VPN (Virtual Private Network)
If you’re serious about browsing anonymously on your iPhone, a VPN is a must-have.
It’s one of the most powerful tools for masking your identity online.
In plain terms: A VPN creates a secure tunnel between your iPhone and the internet, so nobody (not your ISP, not your school or work Wi-Fi, not even the websites you visit) can easily see what you’re doing.
How to set up:
Step 1: Download a VPN app of your choice
Step 2: Sign up and follow the in-app setup
Step 3: Allow VPN configuration when prompted
Step 4: Connect to a server (ideally, choose one near your location for better speed)
Once connected, all your traffic (including from apps) is encrypted, and your IP is masked.
What It Hides
- Your real IP address
- Your location
- Your activity from your ISP, network admin, or even Apple
- App and browser data traffic
- Tracking by many ad networks (though not all)
What It Doesn’t Hide
- Who you are if you log into personal accounts
- Tracking from cookies or browser fingerprinting (unless used with private browsers)
Limitations
- Good VPNs cost money (free ones are usually sketchy or limited)
- Can slow down your internet depending on the server
- You’re trusting the VPN provider with your traffic, so choose wisely
- Some apps/websites may block VPN traffic or ask for CAPTCHAs
If I had to recommend one tool to upgrade your online anonymity, it’s a VPN.
Pair it with Private Browsing or Safari + iCloud Private Relay, and you’re covered from multiple angles.
Here are some privacy-respecting options to check out:
- Proton VPN – Free tier available, strong privacy policies
- Mullvad VPN – No email or account required
- IVPN – Transparent and independent
- NordVPN / Surfshark – More mainstream, with extra features
6. Use Tor Browser
If you’ve ever heard of the “dark web” or deep privacy tools, chances are you’ve come across Tor.
It stands for The Onion Router, and it’s kind of like a VPN on steroids.
Instead of just masking your IP like a VPN, Tor bounces your traffic through multiple encrypted layers (or “nodes”) all around the world.
Each hop hides more information, making it incredibly hard for anyone, your ISP, Apple, or even governments, to trace your activity back to you.
How Tor Works
Imagine whispering a secret, but instead of one person hearing it, it goes through 3 randomly chosen people, each only knowing part of the message.
That’s Tor.
Your traffic:
- Gets encrypted 3 times
- Is sent through 3 random servers (called nodes)
- Each node only decrypts one layer
- The final one delivers your request anonymously to the website
The catch? All this extra bouncing slows things down, but the privacy trade-off is huge.
While there’s no official Tor Browser app from The Tor Project for iOS, the next best option is Onion Browser, a privacy-focused browser that connects you to the Tor network.
How to use it:
Step 1: Download Onion Browser from the App Store
Step 2: Open the app and choose your connection level (Standard, Safer, or Safest)
Step 3: Wait for it to connect to the Tor network
Step 4: Start browsing. Your IP is now masked, and your traffic is encrypted multiple times
Pro tip: Stick to simple websites. Avoid logging into personal accounts or downloading files through Tor.
What It Hides
- Your IP address
- Your location
- Your browsing history
- Your identity from most websites and ISPs
Even the destination website can’t see who you are. Only the final relay, which doesn’t know your origin.
What It Doesn’t Hide
- If you log into an account (e.g., Gmail, Facebook), your anonymity is broken
- Any data you voluntarily share on websites
- Apps or services outside of the browser (Tor doesn’t protect other apps)
Limitations
- Slower browsing because your traffic hops through multiple relays, and pages take longer to load
- Some websites might block Tor connections altogether
- It can break login-based services, streaming, or anything needing precise location
- Doesn’t block JavaScript trackers or cookies unless you tweak settings manually
- Not ideal for everyday use (but perfect for research, reading, and private browsing sessions)
If you’re dealing with sensitive browsing or just want to go full incognito, Tor (via Onion Browser) is as private as it gets on iPhone.
Just be patient.
It’s not built for speed, it’s built for serious privacy.
7. Disable App & Website Tracking
Even if you’re careful with browsers, a lot of tracking actually happens inside apps, especially social media, shopping, and even news apps.
These apps quietly collect data like your location, usage habits, and even cross-app activity, then use it to serve hyper-targeted ads or sell it to third parties.
But the good news is that Apple has built-in settings to shut most of this down.
How to Disable App Tracking on iPhone
Apple introduced App Tracking Transparency (ATT) in iOS 14.5+, and it’s one of the best privacy upgrades in years.
To turn it on:
- Open Settings
- Tap Privacy & Security → Tracking
- Turn off “Allow Apps to Request to Track”
- You can also manually deny tracking for specific apps here
That’s it.
Apps can no longer follow you across other apps and websites.
What It Hides
- Cross-app activity (what you do in other apps)
- User and device-level identifiers shared with advertisers
- Personalized ad tracking and data brokers
What It Doesn’t Hide
- In-app behavior (what you do inside the app itself)
- Some fingerprinting or tracking done without explicit tracking requests
- Anything you manually give (like location, camera, or microphone access)
Limitations
- Some apps may still try to fingerprint you using sneaky tactics
- Won’t stop website tracking unless you’re also using Private Relay, VPN, or a private browser
- Not all countries enforce ATT equally; some regions may have weaker rules
This is one of the first things I recommend everyone do when setting up a new iPhone.
It’s easy, effective, and takes 10 seconds.
If you want to dive deeper into this setting (plus hidden tracking tricks apps still use), check out my full guide on how to stop iPhone apps from tracking you.
8. Limit Digital Fingerprints When Browsing & Sharing
Even if you’re using a VPN, private mode, or Tor, websites and apps can still piece together who you are based on the little clues you leave behind.
This is known as fingerprinting.
And it can include everything from your device type to the link you just shared.
Let’s patch those leaks.
How to Reduce Fingerprinting and Hidden Traces
1. Strip Metadata from Photos Before Sharing
Photos taken on iPhone include hidden data like:
- GPS coordinates
- Device model
- Date and time
If you ever share an image on a forum, through a browser, or even via a web-based upload tool, that metadata can be exposed.
How to clean it:
- Go to Photos
- Tap Share on any photo
- Tap Options at the top
- Toggle off Location and All Photos Data
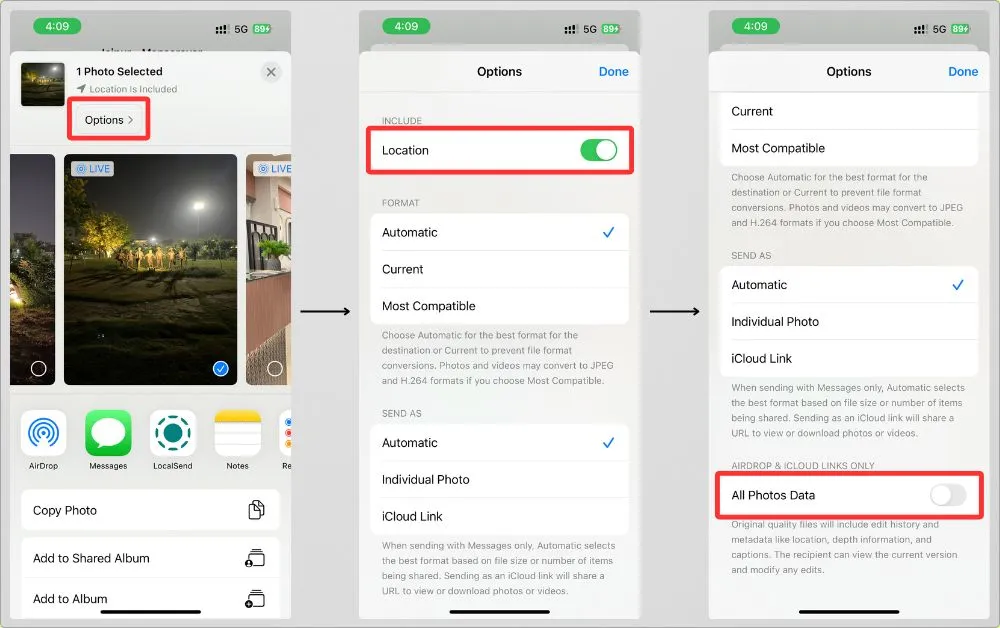
Now, you’re sharing just the pixels, nothing else.
2. Clean Up Tracking from Shared Links
When you copy a URL from Safari or Chrome, it often contains tracking tags (like utm_source, fbclid, etc.).
These are used by companies to trace where you came from, even if you’re using private mode.
Privacy pro tip:
- Before pasting a link, check and delete extra junk after a ? or &
- Use a tool like LinkCleaner to clean links
3. Tweak Safari to Reduce Fingerprinting
Websites can collect fingerprint-style data while you browse:
- Your device model
- Installed fonts
- Battery level
- Screen resolution
To limit this:
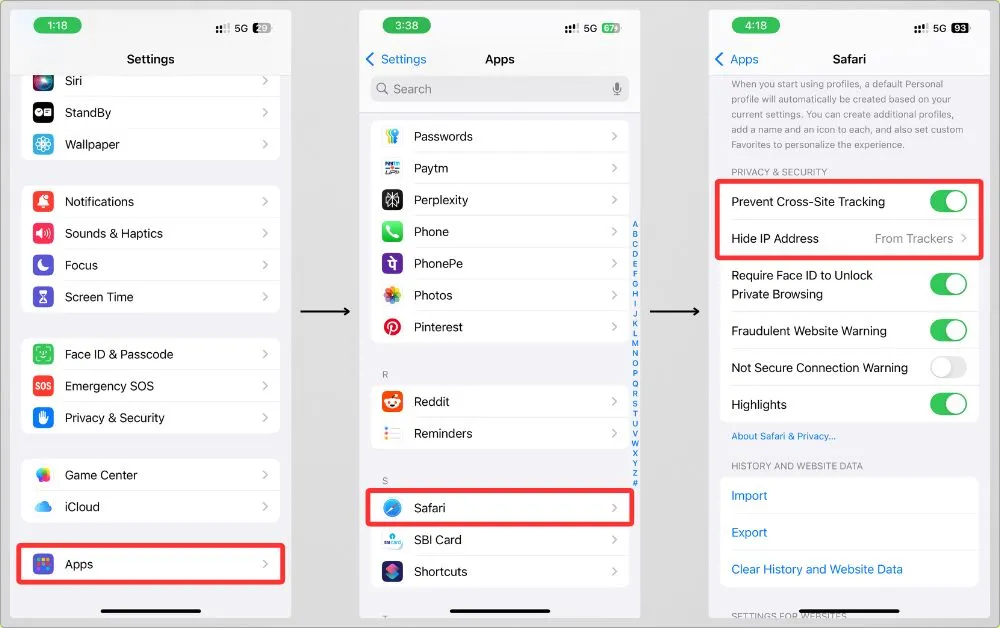
- Go to Settings → Apps → Safari
- Turn on Prevent Cross-Site Tracking
- Enable Hide IP Address → From Trackers
- Optional: Use Reader Mode where possible (it simplifies page elements)
What It Hides
- Metadata in shared photos or uploads
- Tracking tags in links you copy/paste
- Partial device info collected through fingerprinting scripts
What It Doesn’t Hide
- Your full identity if you’re logged into Google, Facebook, etc.
- IP address unless you’re using a VPN or Private Relay
- Browser behavior outside of Safari if not similarly configured
Limitations
- You’ll need to do some of this manually
- Some social apps auto-strip metadata (but not all do)
- These tactics don’t stop data collection inside apps themselves
If you’re serious about anonymous browsing, it’s not just about how you browse, but also what you share while doing it.
Small leaks, like GPS tags or URL trackers, can still build a profile of you.
Tighten these up, and you’re way harder to follow.
Advanced Tips for Power Users
If you’ve already nailed private browsing, VPNs, and anti-tracking tools, here’s how to take your iPhone anonymity game to the next level.
These tips go beyond basic privacy settings.
Some of them are deep cuts that most people don’t even consider.
1. Use a Fake Apple ID for Anonymous Downloads
Want to install apps without linking them to your real identity, email, or payment info?
You can create a separate Apple ID using:
- A private email (like Apple’s Hide My Email or ProtonMail)
- No payment method
- A name and birthdate that aren’t tied to your real info
This way, even if Apple’s systems are tracking downloads and app behavior, it’s not tied to you.
Heads up: You’ll need to sign in/out manually or use a secondary device for this to be practical.
2. Block Background App Activity
Apps love to do sneaky stuff in the background, like ping servers, fetch ad data, or track your location.
Shut it down:
- Go to Settings → General → Background App Refresh
- Set it to Off globally, or Wi-Fi only for less data leakage
- Bonus: Go to Settings → Privacy & Security → Location Services and turn off Precise Location for most apps
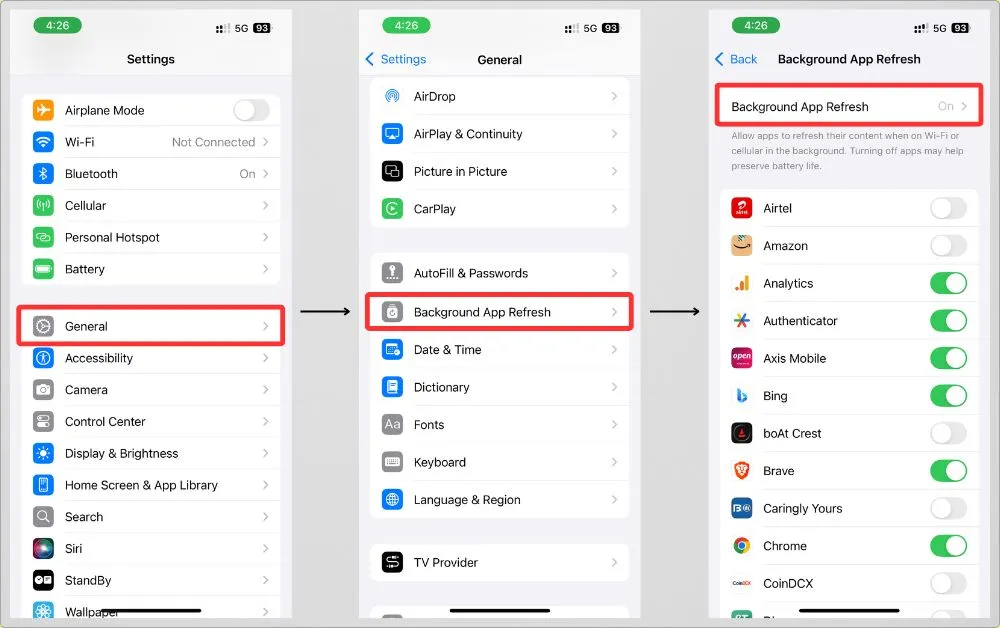
This reduces app-level tracking and background analytics.
3. Combine Focus Modes + Private Email (Hide My Email)
Focus Modes aren’t just for productivity.
They’re a stealth tool for controlling notifications, background activity, and app access.
Here’s a power combo:
- Create a “Privacy” Focus Mode that limits which apps can run
- Set it to automatically disable things like social media, mail, and Maps
- Use Apple’s Hide My Email (via iCloud+) when signing up for apps or sites while browsing
- It gives you a random, anonymous email alias that forwards to your real inbox but hides your identity from trackers or marketers.
4. Jailbroken Device? Proceed with Caution
If your iPhone is jailbroken, you have even deeper control, but also greater risk.
You can install tools that:
- Block tracking domains at the network level
- Fake location, IP, and even app permissions
- Monitor app traffic in real time (via tools like Filza or Flex)
But…
- You lose system-level protections
- Many privacy-focused apps (like banking, 2FA, or password managers) won’t work
- And it may void your Apple warranty
I only recommend this for advanced users who know exactly what they’re doing, and even then, tread carefully.
Most people stop at Private Browsing and VPNs.
But if you’re someone who really values anonymity, these steps can close the last few leaks.
Anonymous Browsing Methods Compared (At a Glance)
| Method | Hides IP | Blocks Trackers | Hides Activity | Speed Impact | Free? |
| Safari Private Mode | No | No | Locally only | No | Yes |
| iCloud Private Relay | Yes | No | Yes (Safari only) | Minimal | No (iCloud+) |
| VPN | Yes | Yes | Yes | Yes | Depends |
| Tor Browser | Yes | Yes | Yes | Yes | Yes |
Quick Definitions:
- Hides IP: Prevents websites from seeing your real IP address.
- Blocks Trackers: Stops third-party cookies and ads from tracking you across sites.
- Hides Activity: Prevents your browsing history from being logged.
- Speed Impact: Whether it slows down your connection or not.
- Free?: Whether it’s 100% free to use without limits.
Pro tip: Stack some of these methods for layered privacy. For example, using Safari Private Mode + iCloud Private Relay + Link Cleaner gives you great protection with minimal effort.
Common Myths About Anonymous Browsing
Think you’re totally off the grid just because you opened Private Mode?
Not so fast.
These are the most common myths people believe when trying to browse anonymously on an iPhone.
Let’s clear them up.
1. Private Mode Means I’m Invisible Online
Private Browsing Mode in Safari (or Chrome) only hides your history locally.
That means:
- It won’t save cookies
- It won’t remember what you searched or visited
- It clears data after you close the tab
But here’s the catch: Your IP address, device info, and browsing behavior can still be seen by:
- Websites you visit
- Your internet provider
- Any trackers embedded in the page
TL;DR: It’s private from someone using your iPhone, not from the internet.
2. VPNs Are Always Safe
VPNs can hide your IP and encrypt your connection.
But they also route all your traffic through their own servers.
So if you’re using a shady or free VPN…
- They might be logging your data
- They might sell it to advertisers or worse
- They could even inject ads or malware into pages
Only trust well-reviewed, zero-log VPNs like Mullvad, Proton VPN, or IVPN.
Rule of thumb: If a VPN is free and unlimited, you might be the product.
3. Apple Doesn’t Track Me Because It Cares About Privacy
Apple talks a big privacy game, and yes, they do a lot of things right:
- App Tracking Transparency
- On-device processing
- Hide My Email
But… Apple still collects device analytics, Siri interactions, App Store behavior, and more, especially if you’ve never opted out.
Check this:
- Go to Settings → Privacy & Security → Analytics & Improvements
- Turn off everything you’re not comfortable sharing
Transparency ≠ zero tracking. It just means you can (sometimes) opt out.
The worst privacy move?
Thinking you’re 100% anonymous when you’re not.
Real privacy is about layering your defenses and understanding what each tool actually protects you from.
Don’t fall for the “one-click and done” myth.
Best Practices for Staying Anonymous
You don’t need to go full hacker mode to stay private.
Just make these habits part of your iPhone routine, and you’ll dodge most forms of tracking with ease.
1. Clear Cookies and Cache Regularly
Even in Private Mode, websites can drop cookies during your session.
If you’re not browsing privately, those cookies stick around and quietly track you.
Here’s how to clean house:
- Safari: Go to Settings → Apps → Safari → Clear History and Website Data
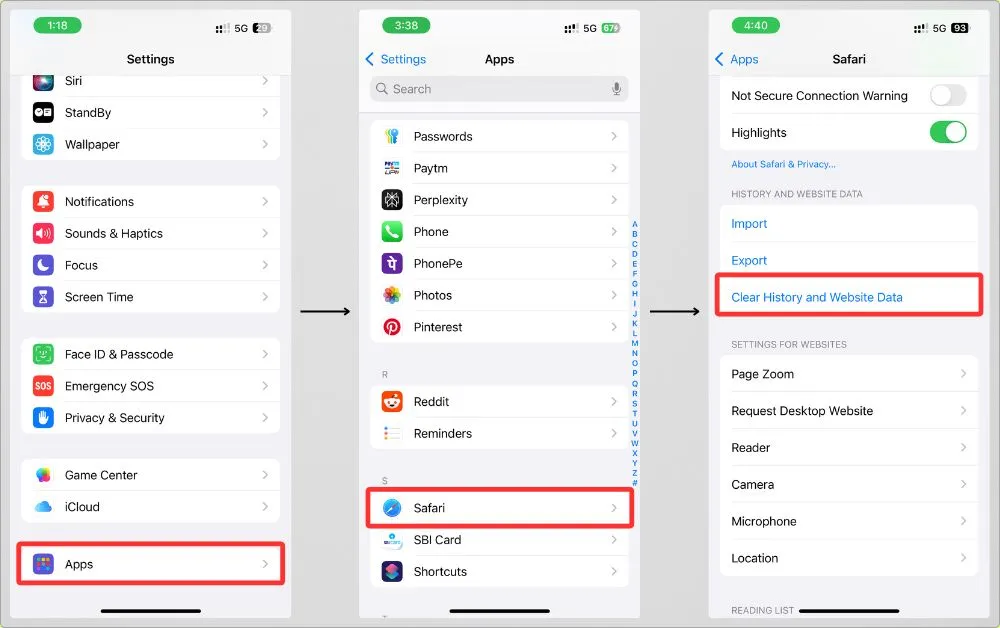
- Third-party browsers: Check the in-app settings for clearing cache/cookies (do it weekly if possible)
2. Don’t Log Into Accounts While Browsing Anonymously
If you log into Google, Facebook, or Amazon, you’re not anonymous anymore.
Your real identity is now tied to your session, regardless of whether you’re in Private Mode or using a VPN.
Even Tor becomes pointless the moment you log into a personal account.
Stick to anonymous sessions for:
- Searching
- Reading news
- Viewing content
And save logins for normal browsing unless absolutely necessary.
3. Watch Out for App-Level Permissions
Apps often have more access than they need.
And they can silently track or fingerprint you.
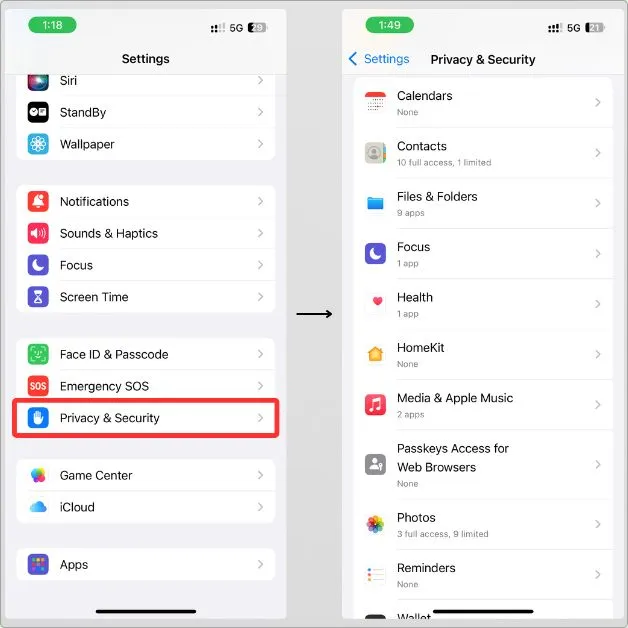
Privacy audit checklist:
- Go to Settings → Privacy & Security
- Review each section (Location, Microphone, Camera, etc.)
- Remove access from any app that doesn’t need it
Also:
- Disable Bluetooth and Nearby Devices when not in use
- Limit apps from accessing Photos to “Selected Photos” only
4. Use Aliases & Private Email Addresses
When signing up for new services or newsletters:
- Don’t use your main email
- Use Hide My Email (if you have iCloud+)
- Or try aliases with services like SimpleLogin or Addy .io (formerly AnonAddy)
This keeps your real inbox safe from spam, leaks, and tracking pixels.
Smart move: Combine this with a secondary Apple ID and VPN for near-total stealth.
Staying anonymous isn’t just about using fancy tools.
It’s about building smarter habits.
If you stack even a few of these best practices, you’ll already be ahead of 90% of internet users when it comes to privacy on an iPhone.
My Final Take
To be honest, true anonymity on an iPhone is tough.
Apple gives us some great tools like Private Relay and Hide My Email.
But if you really want to stay off the grid, you’ll need to go beyond default settings.
For me, the sweet spot is practical privacy.
That’s why I personally use a mix of:
- Private browsing in Safari
- A reliable VPN
- DuckDuckGo as my default search engine
- And yes, I’ve even started sharing links with stripped metadata (small win, big peace of mind)
If you’re someone who values control over your data, this guide isn’t about fear.
It’s about taking your digital privacy into your own hands, one small setting at a time.
Try a few of these out.
See what fits your lifestyle.
You don’t have to go full-on cyber-spy mode… but it feels good knowing you’re not being watched every click of the way.
If this guide helped you, awesome.
If you’ve got questions, suggestions, or even your own privacy tricks, I’d genuinely love to hear them.
Drop a comment, send me a message, or check out more of my iPhone guides; there’s always more to explore.
FAQs
Can private browsing mode on iPhone hide my IP address?
Nope. It only hides your history locally on your device. Your IP address is still visible to websites, your ISP, and network admins.
What’s the best free way to browse anonymously on iPhone?
The Tor-based Onion Browser is your best bet for free. It hides your IP, blocks trackers, and routes your data through multiple encrypted layers. Downside? It’s slower and not compatible with every site.
Is using a VPN enough to stay anonymous?
It depends on the VPN. A good one (like Proton VPN or Mullvad) can hide your IP and encrypt your traffic, but if you log into Google or Facebook, your identity can still be tracked. Also, avoid free VPNs unless you 100% trust the provider.
Do I need to combine multiple tools for better privacy?
Absolutely. A great setup might look like:
→ Safari in Private Mode
→ → iCloud Private Relay or VPN
→ → Fake/alias Apple ID
→ → Link cleaner or metadata remover
Layering = power.
Do photos and links I share leak private data?
Sometimes. Photos can contain location metadata, and Safari previews can include tracking info. You can strip location data by default in Settings → Photos → Sharing Options. Use tools like Metapho to clean files before sharing.
Can I be 100% anonymous on iPhone?
Real talk? Not really. iPhones are locked into Apple’s ecosystem, which offers some strong privacy features but not total anonymity. Apple still collects diagnostics and usage patterns unless you manually opt out. You can get close to anonymous, but not 100%.
What’s safer, VPN or Tor?
It depends on your goals:
→ VPN: Faster, better for everyday use, but you must trust the provider.
→ Tor: Slower, but routes your traffic anonymously through multiple relays, better for high-stakes privacy.
For most users, a VPN is practical. For maximum anonymity, Tor wins.
Does Apple track me even in private mode?
Yes. Private Mode only hides your activity from others using your device. Apple can still collect:
→ Device analytics
→ App usage patterns
→ Siri interactions
→ → Unless you opt out in Settings → Privacy & Security → Analytics & Improvements
Is using public Wi-Fi safe if I use a VPN?
Much safer but still not bulletproof. A good VPN encrypts your data so hackers can’t snoop on public Wi-Fi. But:
→ Don’t log into sensitive accounts
→ Avoid downloading sketchy files
→ Still be mindful of phishing links